Introduction
Stocky SaaS — Multi-Tenant Inventory Management System with POS, Online Store & Complete SaaS Platform.
Stocky SaaS is a powerful, multi-tenant Software-as-a-Service platform built on top of the Stocky inventory management system. It allows you to run your own SaaS business where multiple tenants (businesses) can sign up, choose a subscription plan, and get their own isolated workspace — each with a full-featured inventory system, POS, online store, and more.
The platform is divided into two main panels:
- Super Admin Panel — The central control hub for platform owners. Manage tenants, subscription plans, payments, landing page CMS, knowledge base, email templates, payment gateways, and all platform-wide settings.
- Tenant Panel — The workspace for each tenant (business). A complete inventory management system with POS, online store, sales, purchases, customers, suppliers, reports, and much more.
SaaS Platform Features
- Multi-Tenant Architecture — Each tenant gets an isolated database and workspace
- Subscription Plans — Create flexible plans with usage limits and feature toggles
- Multiple Payment Gateways — Stripe, PayPal, Paystack, Flutterwave
- Landing Page CMS — Fully customizable public landing page with hero, features, pricing, testimonials, FAQ sections
- SEO Management — Configure meta tags and keywords for your landing page
- Knowledge Base — Self-service help center for tenants
- Email Templates — Customizable notification emails with multi-language support
- Tenant Lifecycle Management — Create, approve, suspend, cancel, and reprovision tenants
- Revenue Dashboard — Track payments, invoices, and monthly revenue trends
- Role-Based Admin Access — Super admin and admin roles with granular permissions
- VPS & Shared Hosting Support — Automatic or manual tenant provisioning
Tenant Features
- Easy POS and Dynamic Dashboard
- Online Store Integration
- Products, Adjustments, Transfers
- Quotations, Sales, Purchases
- Sale Returns & Purchase Returns
- Customers, Suppliers, Users Management
- Accounts, Expenses, Deposits, Transfer Money
- Projects & Tasks Management
- Comprehensive Reports (Sales, Purchases, Inventory, Payments, and more)
- Multilingual — 24+ languages with RTL support
- Dark Mode Included
- Barcode/Label Printing & POS Receipt Printing
- Mail & SMS Notification System
- Role-Based Permissions (110+ permissions)
Tech Stack
- Backend — Laravel 12, PHP 8.2+
- Frontend — Vue.js, Vuex, Vue Router, Bootstrap Vue
- Database — MySQL 5.7+
- Multi-Tenancy — Separate databases per tenant
Installation
Follow this guide to install Stocky SaaS on your local machine or production server.
Server Requirements
Please ensure your server meets the following requirements before proceeding:
- PHP >= 8.2.0
- MySQL 5.7 or higher
- BCMath PHP Extension
- Ctype PHP Extension
- cURL PHP Extension
- Fileinfo PHP Extension
- GD2 PHP Extension
- JSON PHP Extension
- Mbstring PHP Extension
- OpenSSL PHP Extension
- PDO PHP Extension
- Tokenizer PHP Extension
- XML PHP Extension
- ZIP PHP Extension
Installation in Localhost
1) Installation With XAMPP
- Install XAMPP from apachefriends.org
- Step 1: Extract the
stocky_saas.ziptoC:/xampp/htdocs/ - Step 2: Go to
C:\Windows\system32\drivers\etc\and open the hosts file in Administrator mode. Add:127.0.0.1 stocky.local - Step 3: Go to
C:\xampp\apache\conf\extraand open httpd-vhosts.conf. Add the VirtualHost configuration below. - Step 4: Restart your XAMPP
- Setup: Access the URL
http://stocky.local/setup
2) Installation With Laragon
- Download Laragon from laragon.org and install it
- Step 1: Extract the
stocky_saas.ziptoC:/laragon/www/stocky - Step 2: Start your Laragon
- Setup: Access the pretty URL
http://stocky.test
Nginx Configuration
If deploying to a server running Nginx, use the following configuration as a starting point.
Ensure all requests are directed to public/index.php.
Installation on Server (cPanel)
yourdomain.com).
Installing in a subdomain or subfolder is not supported and will cause issues with multi-tenancy.
- Step 1: Login to cPanel and navigate to File Manager
- Step 2: Upload the files to your root domain's public directory (e.g.,
public_html) - Step 3: Upload your
stocky_saas.zipfile and wait for the upload to complete - Step 4: Unzip the uploaded file
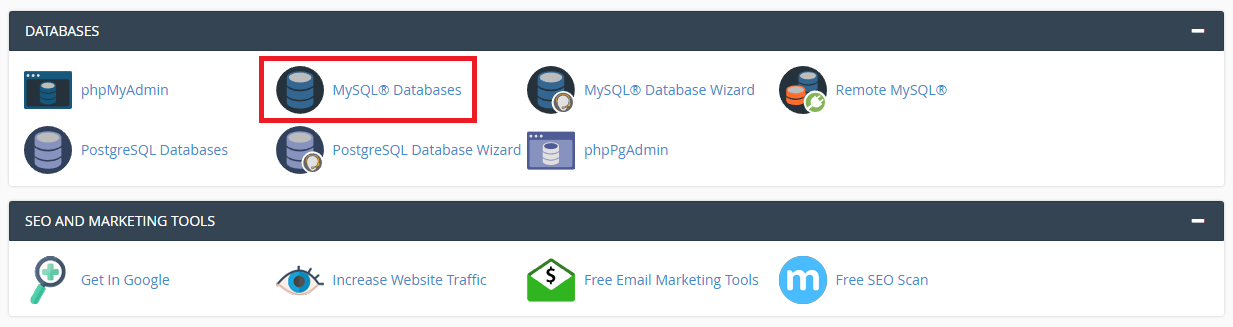
- Step 5: Go back to cPanel and navigate to Databases to create a new database
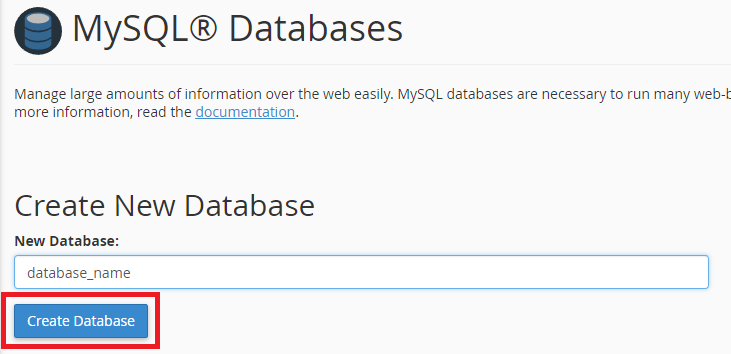
Creating a New Database
Before installing, create a new empty database from your cPanel. You will need the database name, username, and password for the setup wizard.
Create Database
Database Name
Create Database User

Add User to Database
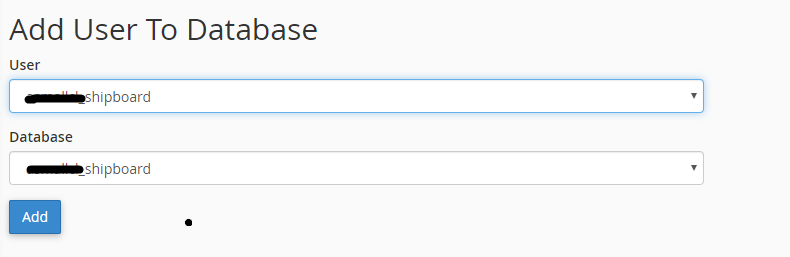
Set Full Permissions
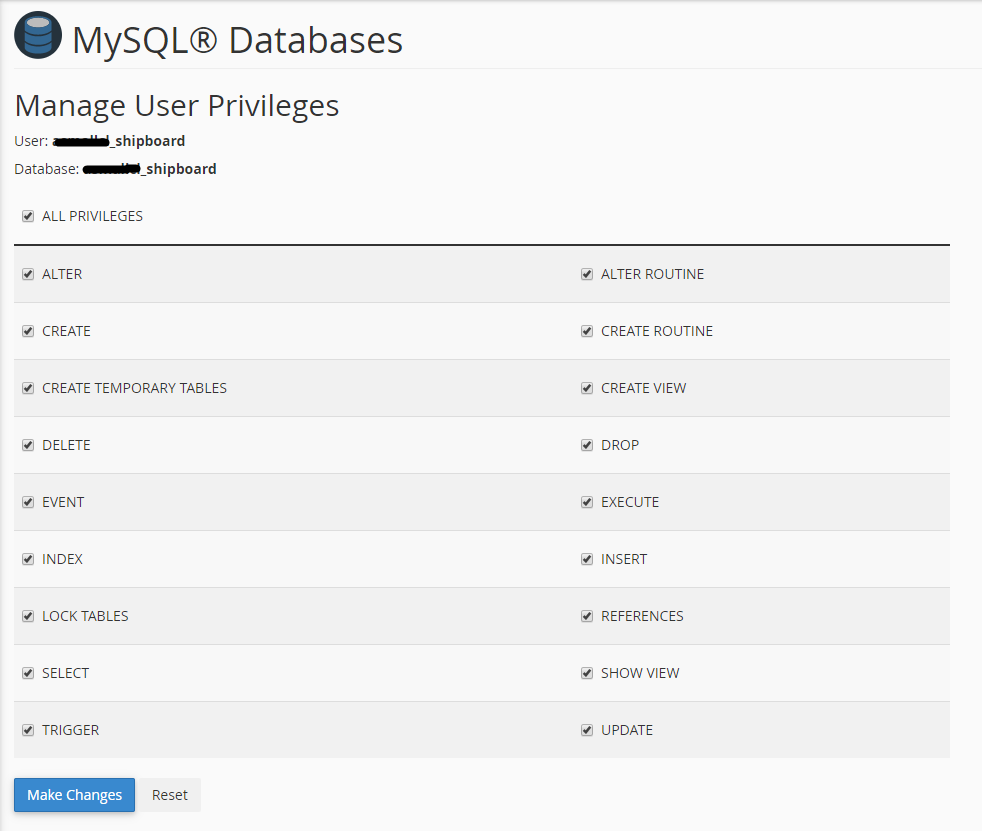
Once the database is ready, access the URL yourdomain.com/setup to start the setup wizard.
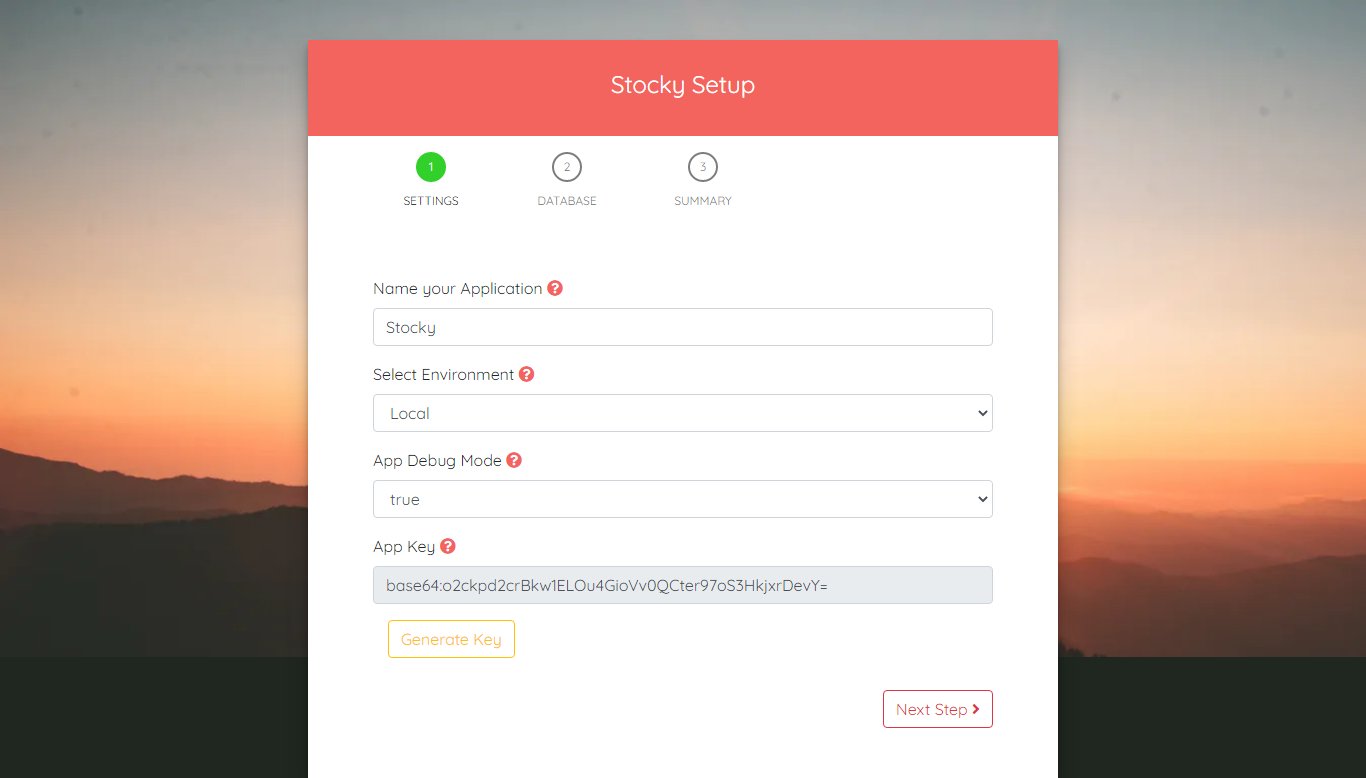
Setup Wizard
The setup wizard guides you through three simple steps to configure your application.
Step 1 — Application Settings
- Name your application
- Select Environment: Local (localhost) or Production (server)
- App Debug: set to false on production servers
Step 1 - Application Settings
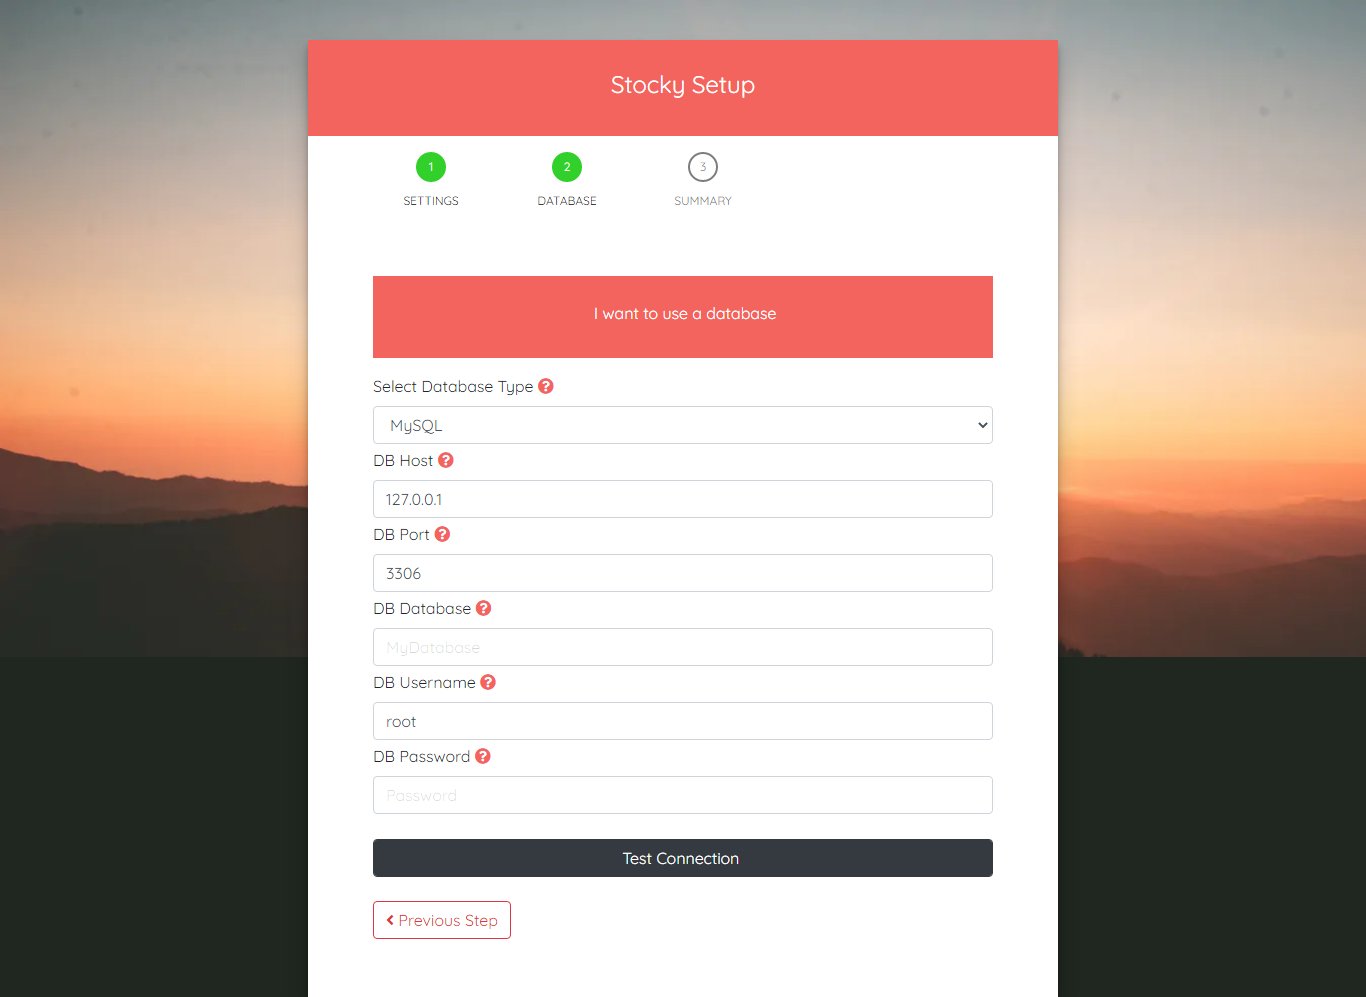
Step 2 — Database Configuration
- DB Host — Database server address (usually
localhostor127.0.0.1) - DB Port — Database port (default
3306) - DB Database — The name of the database you created
- DB Username — The database user
- DB Password — The database user's password
- Use the Test Connection button to verify your database credentials
Step 2 - Database Configuration
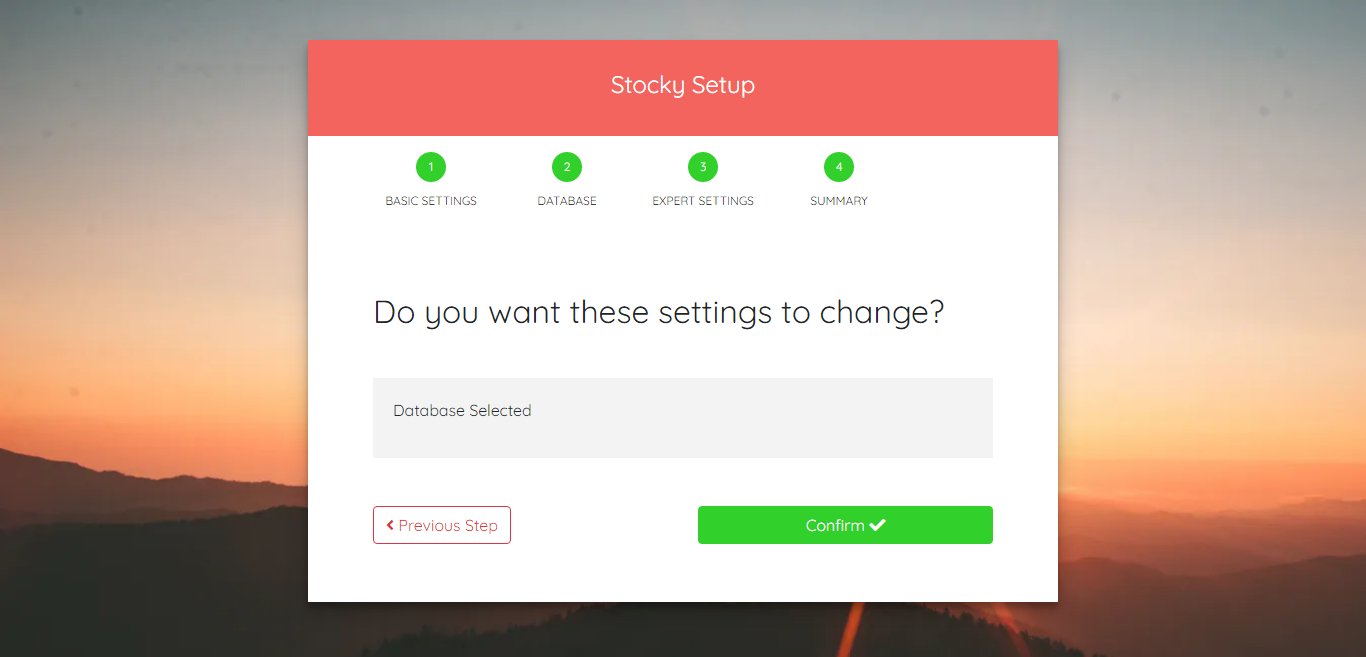
Step 3 — Finalize Installation
- Click Confirm and wait for the database to be generated
- Do not close the browser or stop the process during installation
Step 3 - Finalize Installation
installed file is placed in the /storage directory.
If this file is present, the /setup route will return a 404 page to prevent re-installation.
SaaS Super Admin - Overview
The Super Admin panel is the central control hub for managing your entire Stocky SaaS platform. From here you can manage tenants, subscription plans, payments, landing page content, and all platform-wide settings.
Access the Super Admin panel by navigating to /super/login on your central domain.
Only users with super_admin or admin roles can access this panel.
Super Admin Features
- Dashboard — Real-time analytics on tenants, subscriptions, and revenue
- Tenant Management — Create, suspend, approve, and manage all tenant workspaces
- Plans — Configure subscription plans with feature limits and pricing
- Subscriptions — Monitor and manage all tenant subscriptions
- Payments & Billing — Track revenue, transactions, invoices, and refunds
- Admin Users — Manage super admin accounts with role-based permissions
- CMS – Landing Page — Customize your public landing page (hero, features, pricing, testimonials, FAQ)
- SEO Settings — Configure meta tags, keywords, and SEO for your landing page
- Knowledge Base — Create help articles and categories for your tenants
- Email Templates — Customize notification emails (subscription expired, payment success, etc.)
- Payment Gateways — Configure Stripe, PayPal, Paystack, and Flutterwave
- Mail Settings — Set up SMTP, Mailgun, Amazon SES, or Sendmail
- General Settings — Configure branding, currency, logo, and company info
Permission Matrix
Super Admin accounts support two roles:
- super_admin — Full unrestricted access to all features
- admin — Restricted access based on assigned permissions (Dashboard, Tenants, Plans, Subscriptions, Admins, Payments, Knowledge Base, CMS, Email Templates, Settings)
Super Admin — How It Works
This section explains how tenant provisioning works depending on your hosting mode. Stocky SaaS supports two hosting modes: VPS/Dedicated Server (fully automatic) and Shared Hosting (manual approval). You can change your hosting mode from General Settings.
Hosting Modes
VPS / Dedicated Server
Fully automatic provisioning. When a new tenant signs up, the system automatically creates the database, runs migrations, seeds data, and activates the workspace — no admin intervention required.
Shared Hosting
Manual approval with database configuration. When a new tenant signs up, the admin must manually create the subdomain, configure the database, and approve the tenant before their workspace is activated.
VPS Mode — Automatic Provisioning
Free & Trial Plan Signup
- Step 1 — User Registers: The user fills in company name, subdomain, email, and password on the signup page.
- Step 2 — Tenant Created: A new tenant record is created with
provisioningstatus. - Step 3 — Auto Database Setup: The system automatically creates a MySQL database (
tenant_{uuid}), runs all migrations, seeds default data, creates the admin user, and installs Passport keys. - Step 4 — Workspace Activated: The tenant status changes to
activeand the user can log in immediately.
Paid Plan Signup
- Step 1 — User Registers & Pays: The user selects a paid plan, fills in their details, and completes payment via the configured payment gateway.
- Step 2 — Payment Verified: The payment gateway sends a webhook to confirm the payment was successful.
- Step 3 — Auto Provisioning: The system automatically provisions the workspace (same as free/trial: creates database, runs migrations, seeds data, creates admin).
- Step 4 — Workspace Activated: The tenant is activated and the user can access their workspace.
Shared Hosting — Manual Approval
Free & Trial Plan Signup
- Step 1 — User Registers: The user fills in company name, subdomain, email, and password.
- Step 2 — Tenant Created as Pending: A new tenant record is created with
pendingstatus. No database is created yet. - Step 3 — Emails Sent: The admin receives a notification email, and the user receives an "Under Review" email.
- Step 4 — User Sees Under Review Page: The user is shown a page indicating their application is being reviewed.
- Step 5 — Admin Creates Subdomain: The admin manually creates a subdomain in the hosting panel (cPanel/Plesk) for the tenant.
- Step 6 — Admin Creates Database & Configures Credentials: The admin creates a new database in the hosting panel and enters the credentials in the tenant management page.
- Step 7 — Connection Tested & Provisioned: The admin tests the database connection and triggers provisioning (migrations, seeding, admin creation).
- Step 8 — Tenant Activated & Email Sent: The tenant status changes to
activeand the user receives an approval email.
Paid Plan Signup
- Step 1 — User Registers & Pays: The user selects a paid plan and completes payment.
- Step 2 — Payment Verified: The payment gateway confirms the payment, but no provisioning happens yet.
- Step 3 — Tenant Created as Pending: The tenant is saved with
pendingstatus. - Step 4 — User Redirected to Under Review Page: The user sees a page indicating their workspace is being set up.
- Step 5 — Admin Creates Subdomain & Database: The admin manually creates the subdomain and database in the hosting panel.
- Step 6 — Admin Configures & Approves: The admin enters database credentials, tests the connection, and triggers provisioning.
- Step 7 — Tenant Activated: The workspace is provisioned and the user receives a confirmation email.
Database Security
- AES-256 Encrypted Passwords — All tenant database passwords are encrypted using Laravel's APP_KEY with AES-256 encryption
- Isolated Tenant Databases — Each tenant gets their own separate database, ensuring complete data isolation
- Test Connection — Use the "Test Connection" button in the tenant management page to verify database credentials before provisioning
- Re-run Migrations — If needed, use the "Re-run Migrations" button to update a tenant's database schema
Tenant Status Lifecycle
Every tenant goes through a lifecycle of statuses:
Pending → Provisioning → Active
- Pending — Awaiting admin approval (shared hosting only)
- Provisioning — Database is being set up and migrations are running
- Active — Fully provisioned and accessible by the tenant
- Suspended — Temporarily disabled by the admin
- Cancelled — Subscription has been cancelled
- Failed — Provisioning failed (check logs and retry)
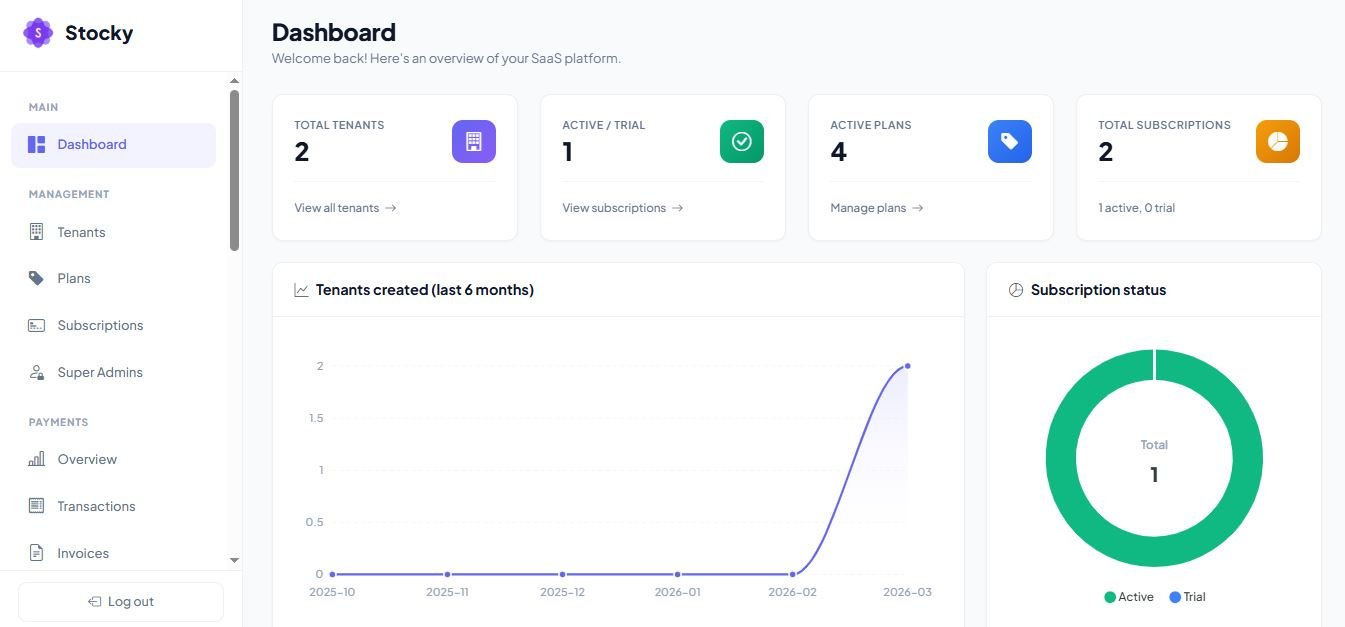
Super Admin — Dashboard
The Super Admin Dashboard gives you a bird's-eye view of your entire SaaS platform. It displays key metrics and charts to help you monitor the health and growth of your business at a glance.
Key Metrics
- Total Tenants — The total number of registered tenant workspaces
- Active Subscriptions — The number of currently active subscriptions
- Active Plans — The number of subscription plans currently available
Charts & Analytics
- Subscription Status Breakdown — Donut chart showing active, trial, cancelled, and suspended subscriptions
- Tenants Created Per Month — 6-month area chart tracking new tenant registrations
- Top 5 Subscriptions by Plan — Bar chart showing the most popular plans
If you are using shared hosting mode, the dashboard will also display a list of pending tenants that require manual approval.
Super Admin Dashboard
Super Admin — Tenants Management
The Tenants section allows you to manage all tenant workspaces on your platform. Each tenant represents a separate business/organization with its own database, users, and data.
Tenant List
The tenant list displays all registered tenants with their current status. You can search and filter tenants by status.
Tenants List
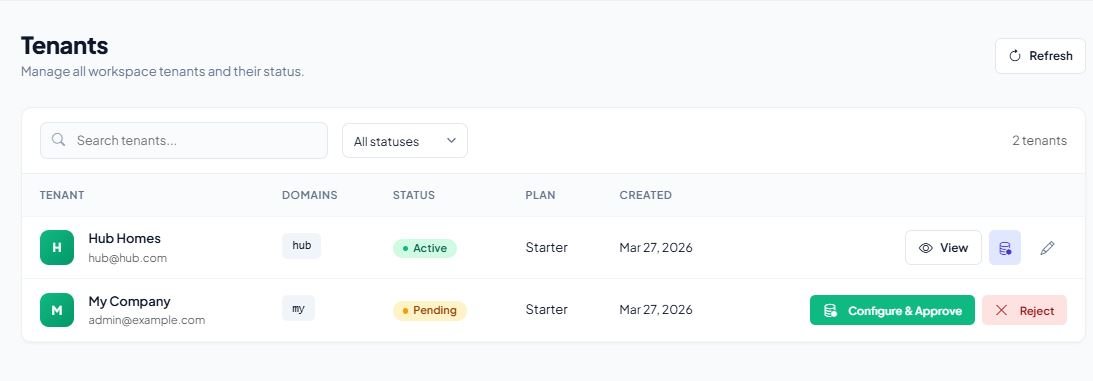
Tenant Statuses
- Pending — Awaiting approval (shared hosting mode)
- Provisioning — Database and workspace are being set up
- Active — Fully operational tenant
- Suspended — Temporarily disabled by admin
- Cancelled — Tenant has been cancelled
- Failed — Provisioning failed (requires troubleshooting)
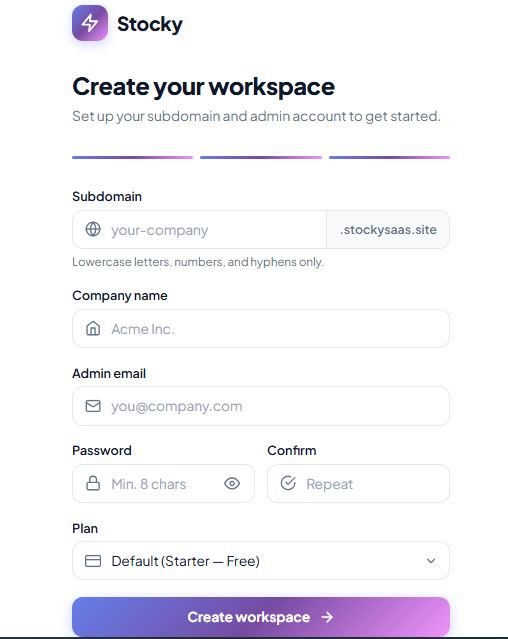
Create a New Tenant
To create a new tenant manually, click the "Create Tenant" button and fill in the following details:
- Subdomain — The unique subdomain for the tenant (e.g.,
company.yourdomain.com) - Company Name — The name of the tenant's business
- Admin Email — Email address for the tenant's admin account
- Admin Password — Password for the tenant's admin account
- Plan — Select the subscription plan to assign
Create Tenant
Tenant Actions
For each tenant, the following actions are available:
- Edit — Update tenant information
- Suspend / Reactivate — Temporarily disable or re-enable a tenant
- Cancel — Permanently cancel a tenant
- Approve / Reject — Approve or reject pending tenants (shared hosting)
- Manage Domains — Add or remove custom subdomains for a tenant
- Manage Users — View, block, or unblock individual users within a tenant
- Database Tools — Test connection, rerun migrations, reseed data, or reset database
- Reprovision — Re-create the tenant workspace if provisioning failed
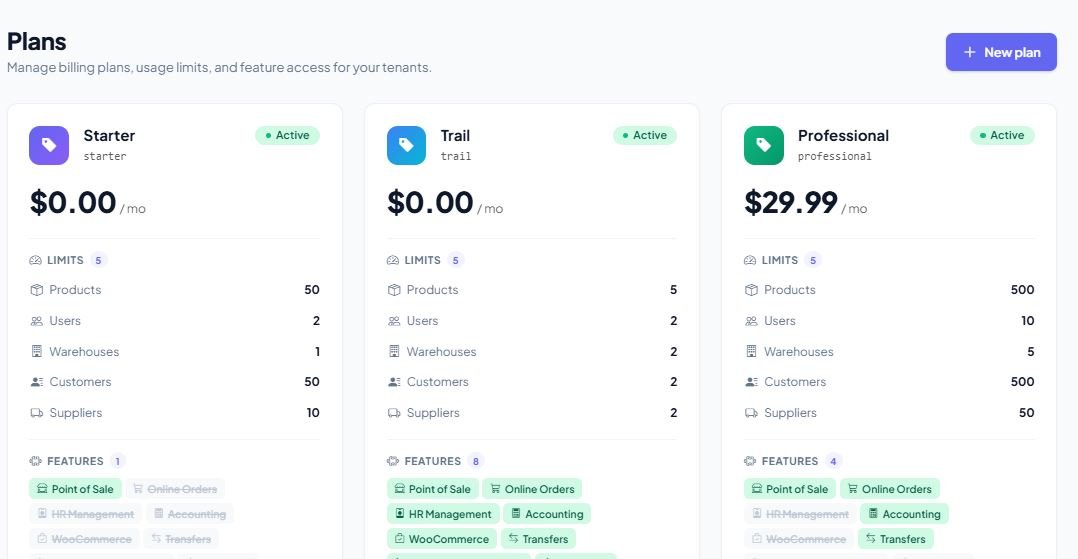
Super Admin — Plans Management
Subscription plans define what features and usage limits each tenant gets. You can create multiple plans with different pricing tiers to suit various business sizes.
Plan List
View all available plans with their pricing, status, and active subscriber count.
Plans List
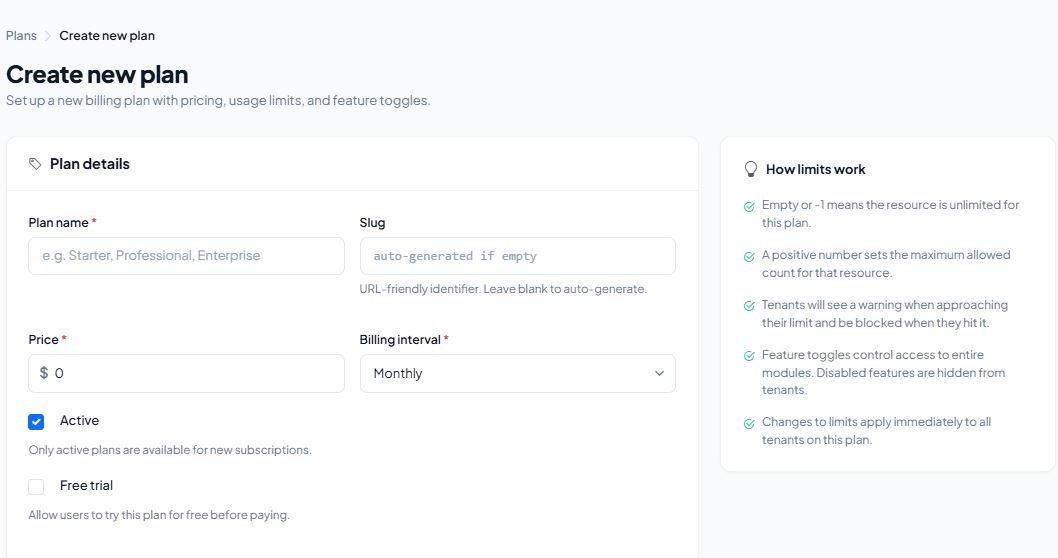
Create a Plan
When creating a new plan, you can configure the following:
- Name & Slug — Display name and URL-friendly identifier
- Monthly Price — The monthly subscription cost
- Yearly Price — The annual subscription cost (discounted)
- Usage Limits — Set limits for: Products, Users, Warehouses, Customers, Suppliers
- Features — Toggle available features:
- POS (Point of Sale)
- Online Orders
- HRM (Human Resource Management)
- Accounting
- WooCommerce Integration
- Transfers
- Service & Maintenance
- AI Reports
- Trial Period — Enable/disable trial and set the number of trial days
- Active / Private — Active plans are available for signup; private plans are hidden from the public pricing page
Create Plan
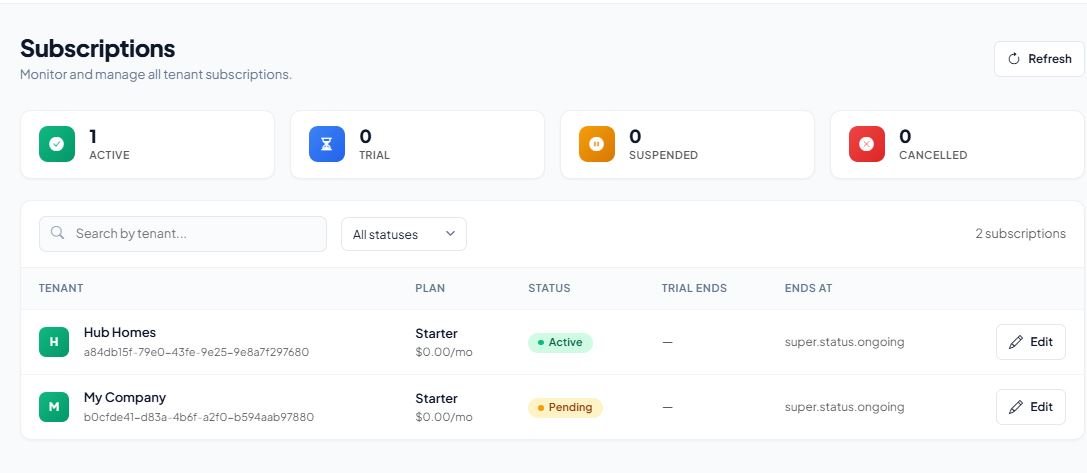
Super Admin — Subscriptions
The Subscriptions section lets you view and manage all tenant subscriptions across the platform. You can see which plan each tenant is on, their subscription status, and make changes as needed.
Subscription List
The list displays all subscriptions with the following information:
- Tenant name and ID
- Assigned plan
- Subscription status (Active, Trial, Suspended, Cancelled)
- Trial end date (if applicable)
- Subscription end date
You can search subscriptions by tenant ID or company name and filter by status.
Subscriptions List
Edit a Subscription
For each subscription, you can:
- Change Plan — Upgrade or downgrade the tenant to a different plan
- Change Status — Switch between active, suspended, cancelled, or trial
- Update Trial End Date — Extend or shorten the trial period
- Update Subscription End Date — Modify when the subscription expires
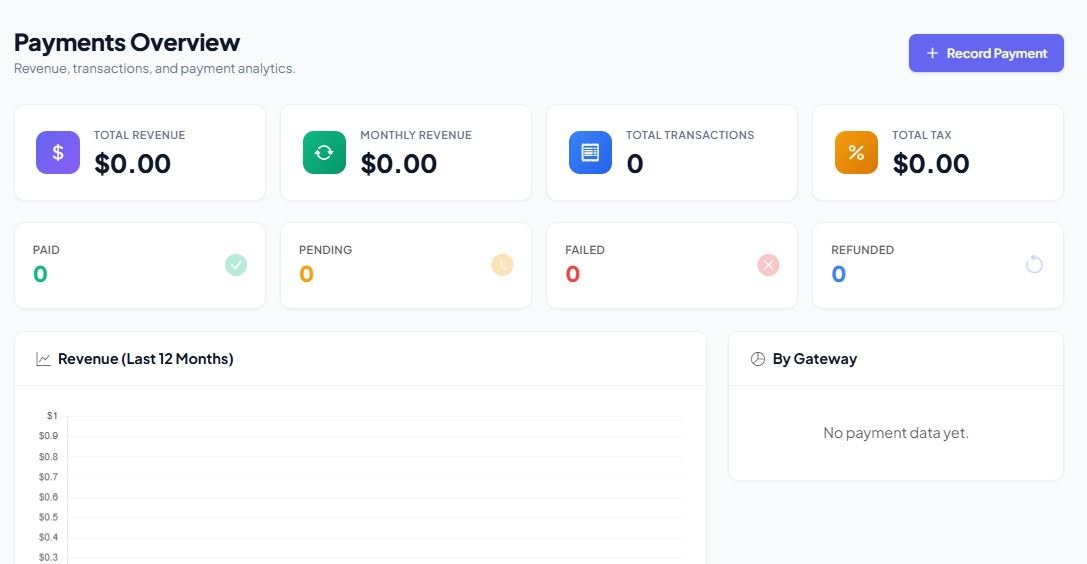
Super Admin — Payments & Billing
The Payments section provides a comprehensive view of all financial transactions on your platform, including revenue tracking, payment management, and invoice generation.
Payment Dashboard
- Total Revenue — Sum of all successful payments
- Total Tax — Total tax collected
- Total Transactions — Number of payment transactions
- Status Breakdown — Paid, failed, refunded, and pending payment counts
- Monthly Revenue Chart — 12-month revenue trend with transaction count per month
- Payment Gateway Breakdown — Revenue distribution across gateways
- Recent Transactions — Quick view of the last 10 transactions
Payments Dashboard
Transaction Management
For each payment transaction, you can:
- View Details — See full payment information (tenant, amount, gateway, date)
- Create Manual Payment — Record an offline or manual payment
- Mark as Paid / Failed / Refunded — Update payment status
- Download Invoice — Generate and download an invoice PDF
Super Admin — Admin Users
Manage all Super Admin accounts that have access to the central admin panel. You can create multiple admin accounts with different permission levels.
Creating an Admin
When creating a new admin account, configure the following:
- Name, Email & Password — Basic account credentials
- Role:
- super_admin — Full unrestricted access to everything
- admin — Access restricted to selected permissions only
- Permissions (for admin role) — Select which sections the admin can access:
- Dashboard
- Tenants
- Plans
- Subscriptions
- Admins
- Payments
- Knowledge Base
- CMS
- Email Templates
- Settings
Managing Admins
The admin list displays all accounts with their role and status. You can edit an admin's details and permissions, or delete an admin account.
Super Admin — CMS – Landing Page
The CMS module allows you to fully customize the public landing page of your SaaS platform without touching any code. Manage all sections from the admin panel with multi-language support.
Landing Page Overview
CMS - Landing Page Builder

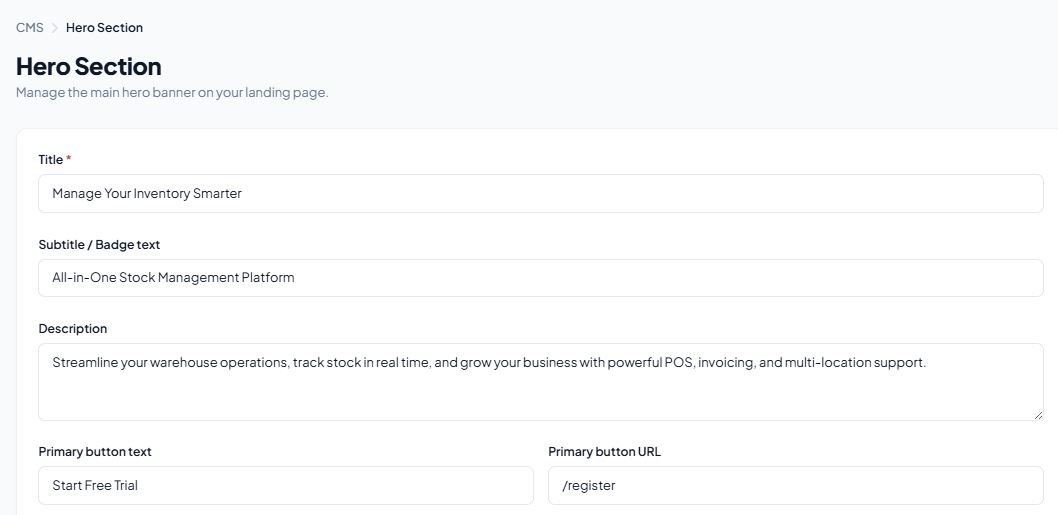
Hero Section
The hero section is the first thing visitors see. You can customize:
- Title and subtitle text
- Description paragraph
- Primary and secondary call-to-action buttons with custom URLs
- Hero image upload
Hero Section
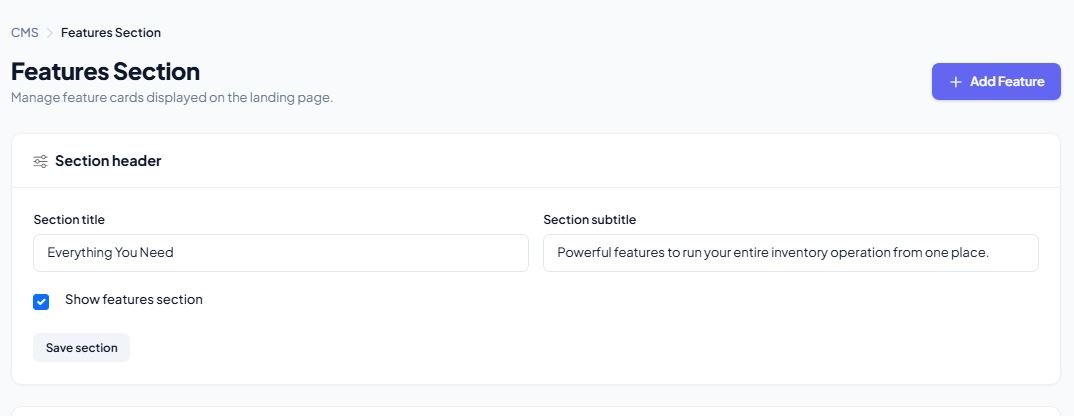
Features Section
Showcase the key features of your platform. For each feature you can set:
- Feature title and description
- Icon selection
- Feature image upload
- Drag-and-drop reordering
Features Section
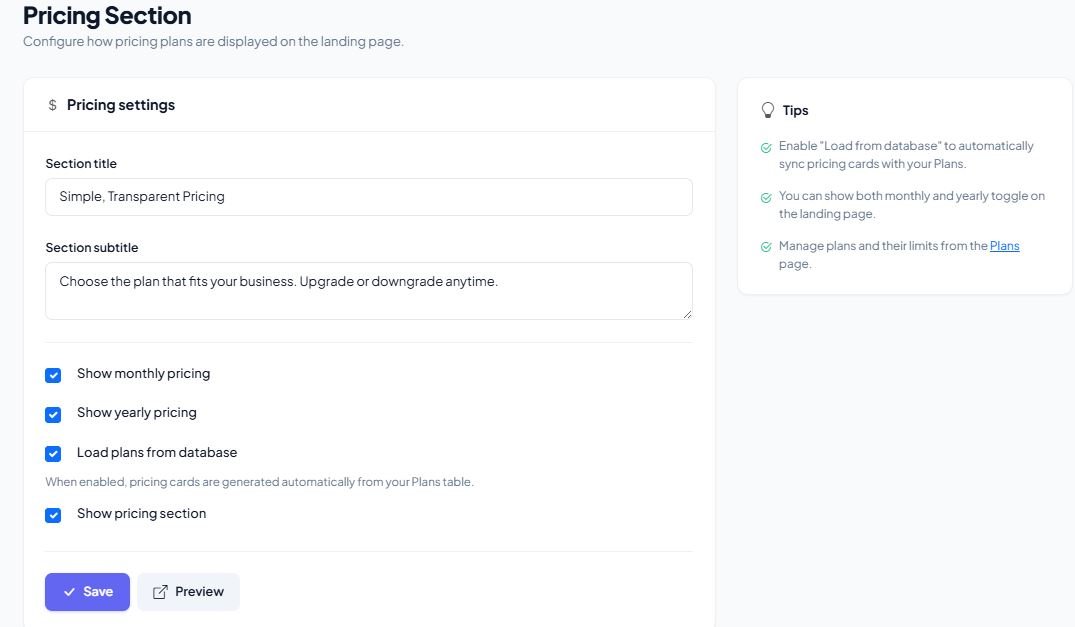
Pricing Section
Configure the headline and description for the pricing section. The pricing cards are automatically generated from your active subscription plans.
Pricing Section
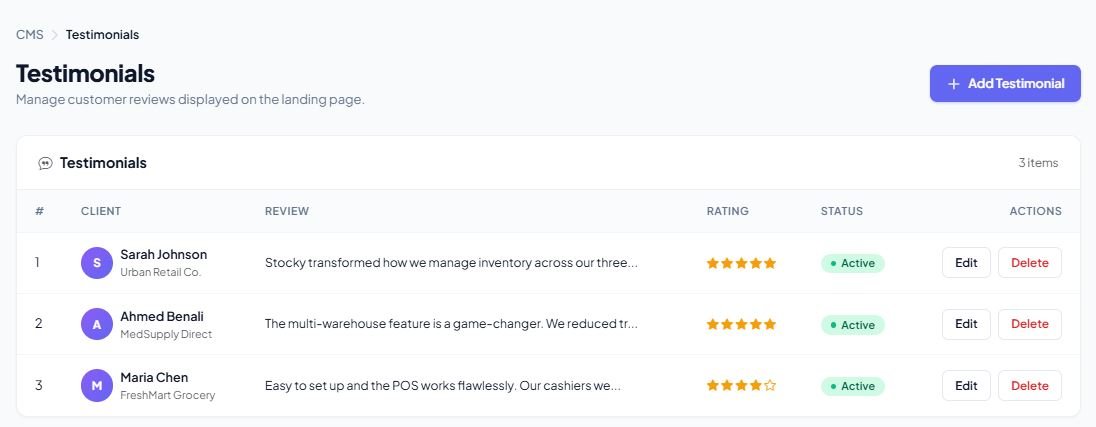
Testimonials
Add customer testimonials to build trust. Each testimonial includes:
- Author name and image
- Testimonial content
- Star rating
Testimonials
Additional CMS Sections
- FAQ Section — Create and manage frequently asked questions with expandable answers
- CTA (Call to Action) — Configure headline, description, and button with custom URL
- Footer — Set footer text, links, and copyright information
- Multi-language Support — All CMS content can be translated into multiple languages (English, French, Hindi, Bengali, and more)
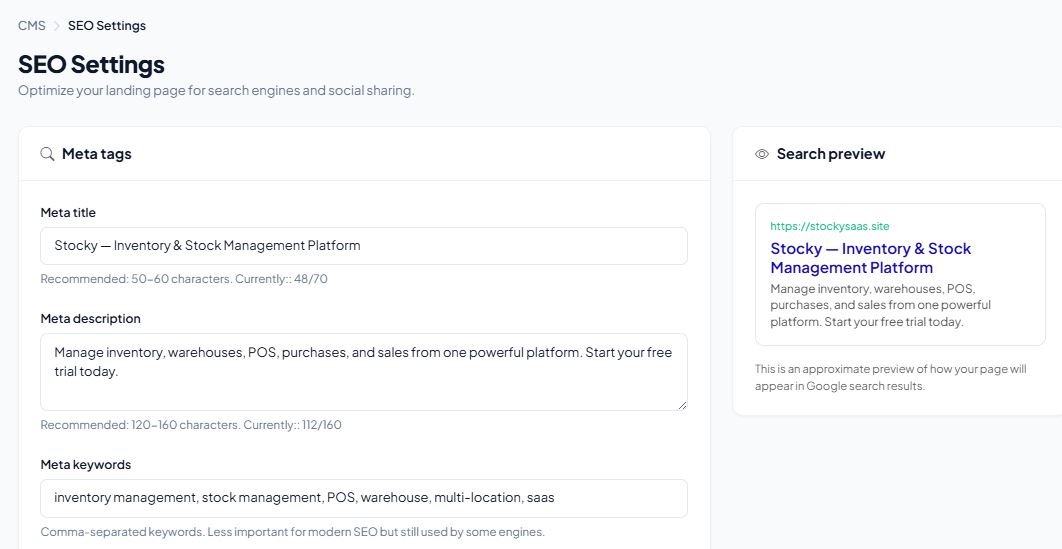
Super Admin — SEO Settings
Configure the search engine optimization settings for your landing page to improve visibility in search results.
Available Settings
- Meta Title — The page title that appears in search engine results and browser tabs
- Meta Description — A brief summary of your page for search engine results
- Meta Keywords — Keywords associated with your platform for search indexing
SEO Settings
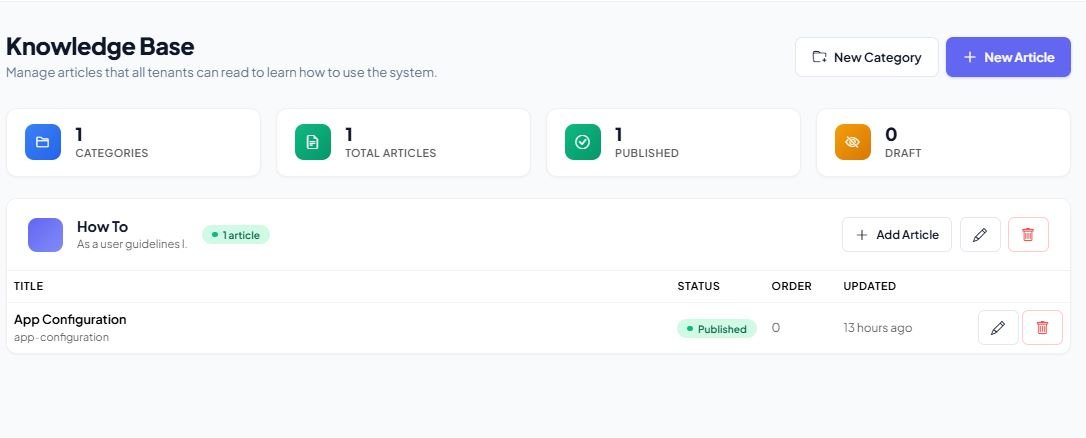
Super Admin — Knowledge Base
The Knowledge Base allows you to create a self-service help center for your tenants. Organize articles into categories so users can quickly find answers to common questions.
Categories
Create and manage knowledge base categories with:
- Category name and slug
- Description
- Icon selection
- Sort order (drag to reorder)
Articles
Create help articles within categories:
- Article title and slug
- Rich text content editor
- Publish / Unpublish toggle
- Sort order within category
Knowledge Base
Super Admin — Email Templates
Customize the automated email notifications sent to tenants throughout their lifecycle. All templates support multi-language translations.
Available Templates
- Subscription Expired — Sent when a tenant's subscription has ended
- Expiring Soon — Renewal reminder sent before expiration
- Payment Success — Confirmation after a successful payment
- Payment Failed — Notification when a payment attempt fails
- Plan Ended — Sent when the plan period is fully over
- Tenant Pending — Notification that the tenant is awaiting approval
- Tenant Under Review — Sent while the tenant application is being reviewed
- Tenant Approved — Confirmation that the tenant has been approved
- Tenant Rejected — Notification that the tenant application was rejected
Template Editing
For each template, you can:
- Edit the email subject line
- Customize the HTML email body with a rich editor
- Add translations for multiple languages
- Preview the email before saving
- Send a test email to verify the template
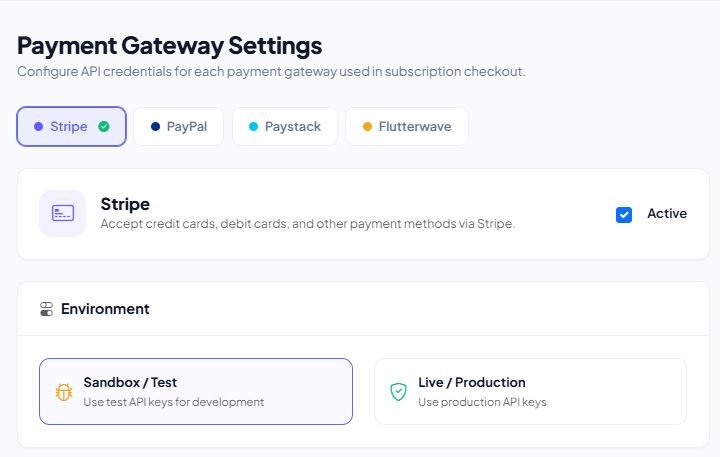
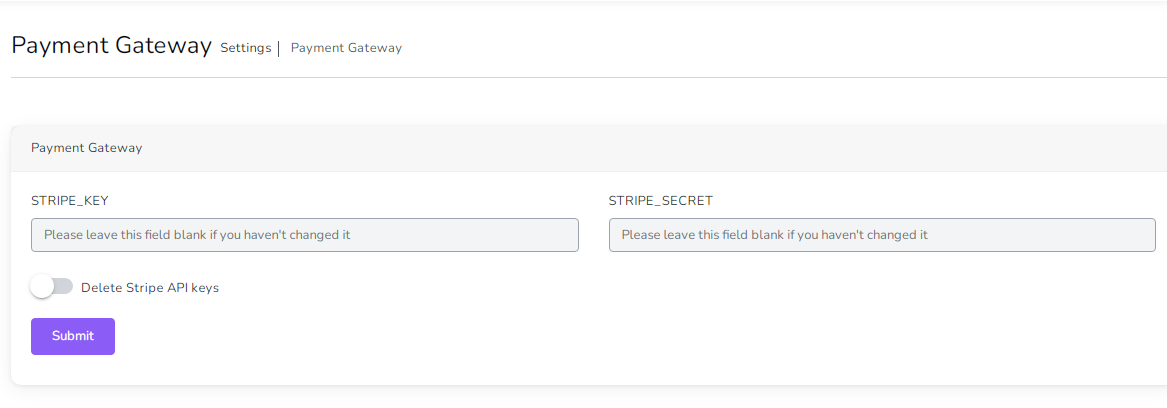
Super Admin — Payment Gateway Settings
Configure the payment gateways your platform accepts for subscription payments. Multiple gateways can be enabled simultaneously, giving tenants flexibility in how they pay.
Supported Gateways
- Stripe — Credit/debit card payments worldwide
- PayPal — PayPal account and card payments
- Paystack — Popular payment gateway for Africa
- Flutterwave — Payment gateway for African businesses
Gateway Configuration
For each gateway, you can configure:
- Enable / Disable — Toggle the gateway on or off
- Test / Live Mode — Switch between sandbox (testing) and production mode
- API Credentials — Enter your API keys and secret keys (stored encrypted)
- Supported Currencies — Set which currencies the gateway accepts
- Default Currency — Set the default currency for the gateway
Payment Gateway Settings
Super Admin — Mail Settings
Configure how your platform sends emails to tenants. This is required for email notifications, password resets, and subscription-related communications.
Supported Mailers
- SMTP — Standard mail protocol (Gmail, Outlook, custom SMTP servers)
- Mailgun — Mailgun transactional email service
- Amazon SES — Amazon Simple Email Service
- Sendmail — Local server sendmail
SMTP Configuration
If using SMTP, configure the following:
- SMTP Host — Mail server address (e.g.,
smtp.gmail.com) - SMTP Port — Port number (typically
587for TLS or465for SSL) - SMTP Username — Your email account username
- SMTP Password — Your email account password
- Encryption — TLS or SSL
- From Address — The sender email address
- From Name — The sender display name
After configuring, use the "Send Test Email" button to verify your settings are working correctly.
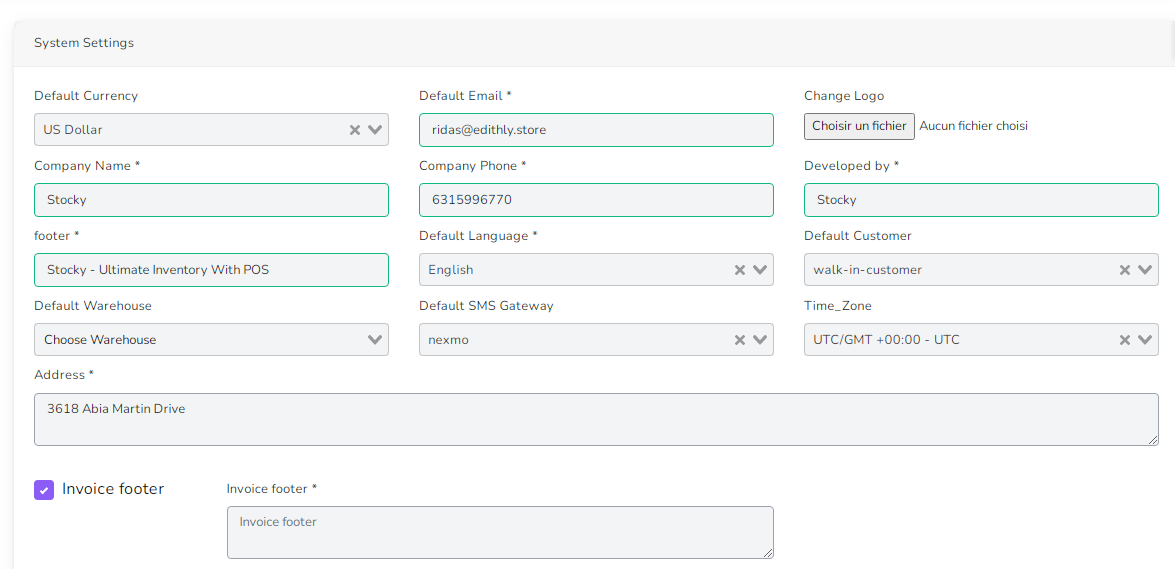
Super Admin — General Settings
Configure the core platform settings that affect the entire SaaS application.
Available Settings
- App Name — The name of your SaaS platform
- Currency Code & Symbol — Default currency for the platform (e.g., USD, $)
- Company Name — Your company's legal name
- Phone — Company contact phone number
- Email — Company contact email
- Address — Company physical address
- Website — Company website URL
- Logo — Upload your platform logo (PNG, JPG, JPEG, SVG, WebP)
- Favicon — Upload your browser tab icon (PNG, ICO, JPG, JPEG, SVG)
- Hosting Mode — Select VPS (automatic provisioning) or Shared Hosting (manual approval required)
Cache Management
Use the "Clear Cache" button to clear the application cache. This is useful after making configuration changes or when troubleshooting issues.
POS Printer Settings
Guide to Setting Up Receipt Printer to work with POS Small Receipts
To set up receipt printer do the following:
- 1) If printer is not already installed, follow manufacturer instructions to set up the printer and install the software.
- 2) Go to settings for your printer in your operating system.
Note: The next instructions are for Windows 10 printer settings.
- Go to your Start Menu and click the Settings icon.
- Go to Devices, then Printers and Scanners. This is your printer settings.
- Once in your printer settings, find the receipt printer. Click the printer icon.
- Next click Manage, then click Printer Properties.
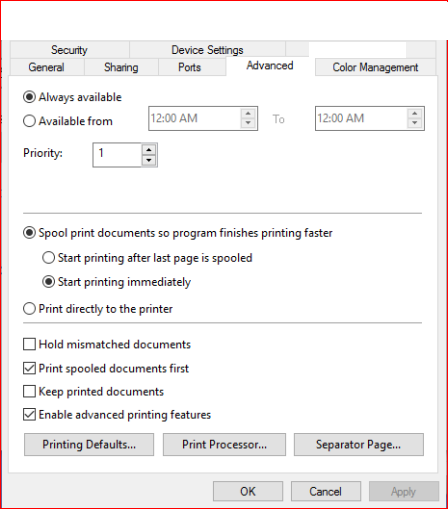
- Click the Advanced Tab.
- Click Printing Defaults.
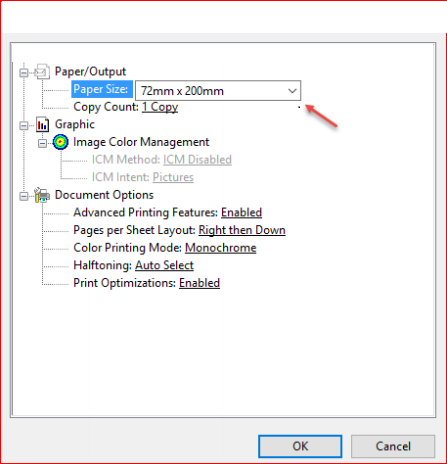
- In the lower right corner of the Printing Defaults screen, click Advanced
- In Advanced Options > Advanced Document Settings, under Paper/Output the Paper Size needs to be 72mm X 200mm. If this is different change it and click OK.
- The setup of the receipt printer is complete. It should properly print small receipts.

Note: These instructions are for Windows 10. If you are using an earlier version of Windows the
                  settings should be similar. If you are using another operating system, find your printer size, find where
                  to set the paper size and set it to 72mm x 200mm.
code>
How to use Cash drawer
- Install and run QZ Tray on each POS machine: https://qz.io/download/
- Connect the cash drawer to the receipt printer’s RJ11/RJ12 port.
- In the app: Settings → POS Receipt → enable “Open cash drawer on cash payment” and, if needed, set the Receipt printer name (as in QZ Tray / Windows).
- Complete a sale with Cash as (at least) one payment method → the drawer should open automatically after payment success.
Note: QZ Tray 2.x can require signed messages. If you see security/signing errors, you’ll need to configure certificate/signing (see QZ signing). The integration is written so that if QZ is not available or signing fails, the POS still completes the sale and only the drawer open is skipped.
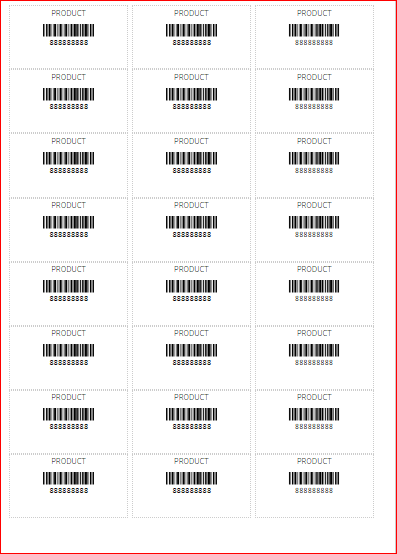
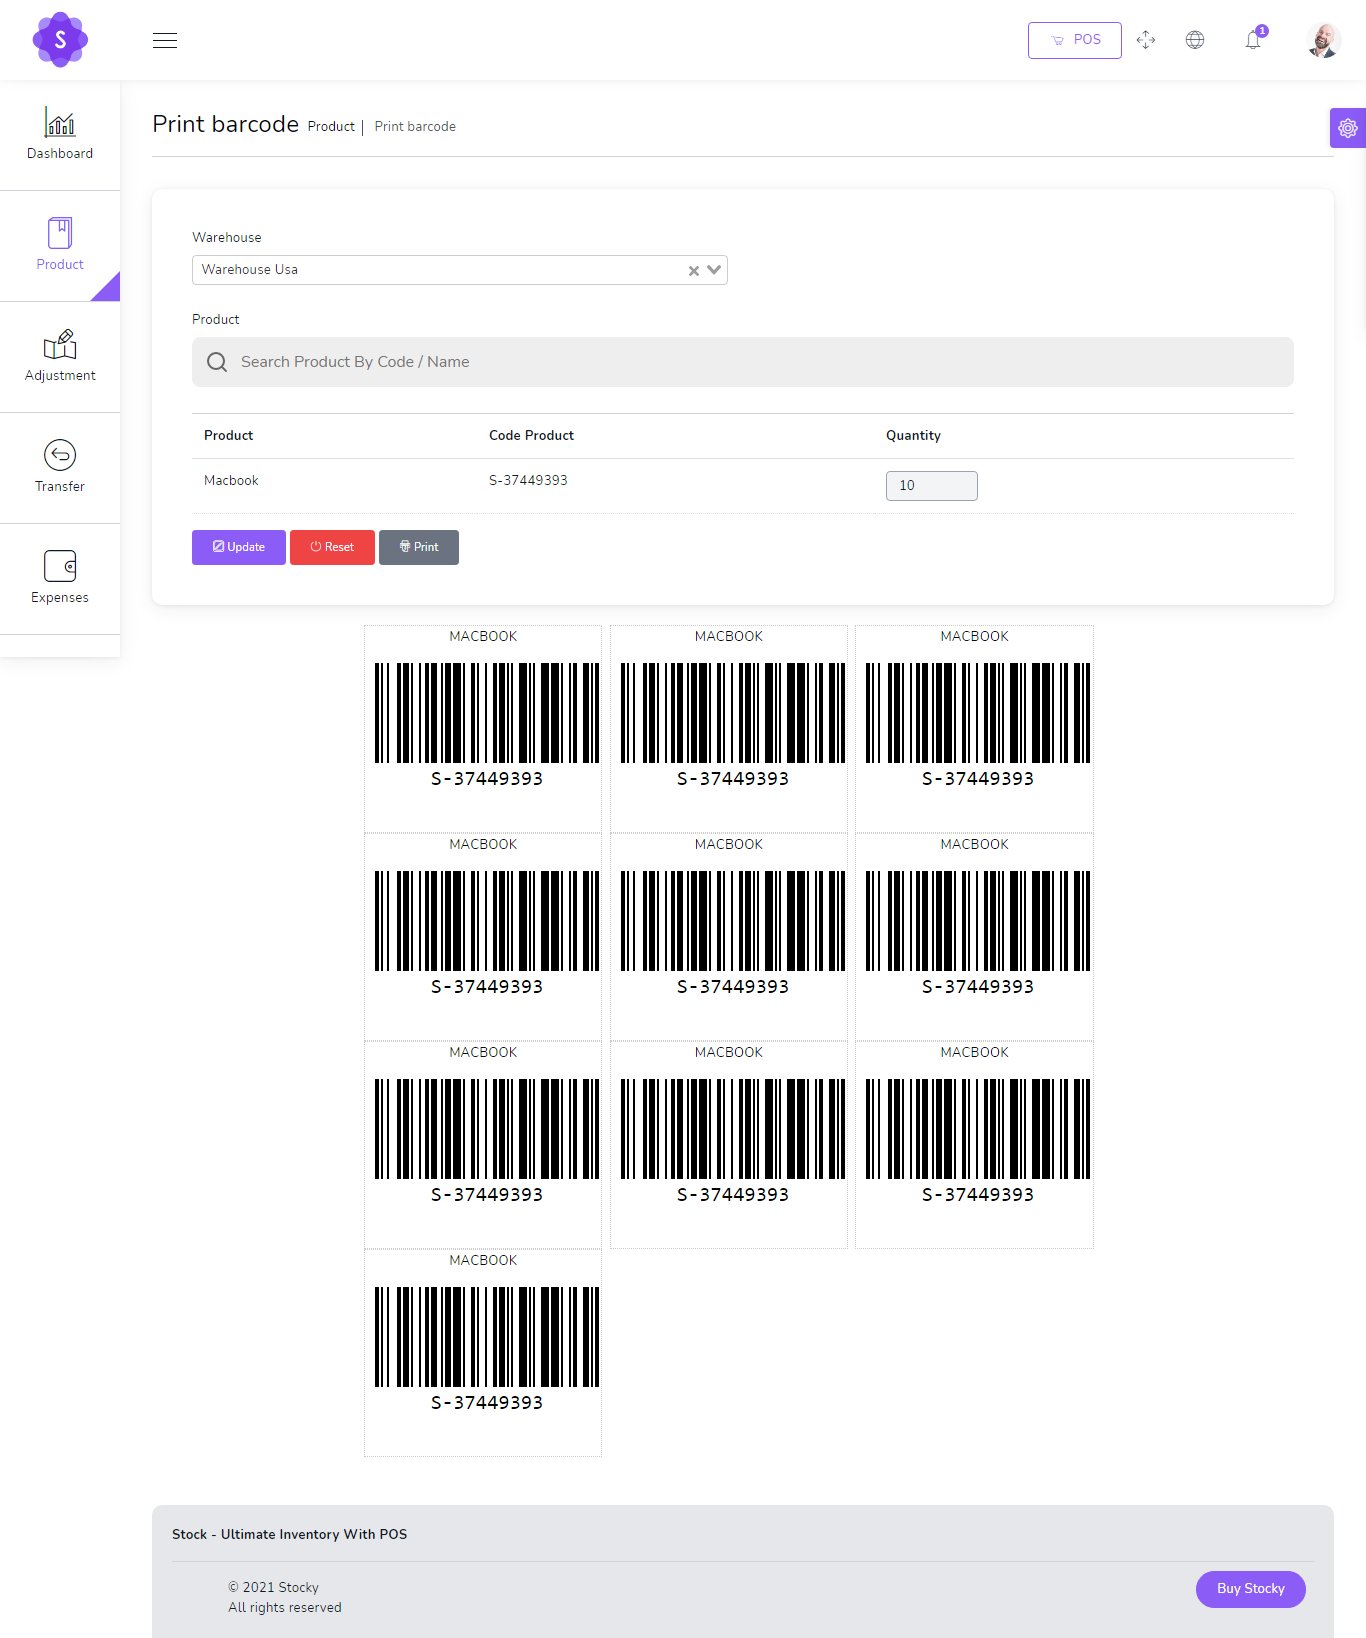
📦 Print Barcode / Labels
Navigate to /app/products/barcode to start printing your barcodes and labels.
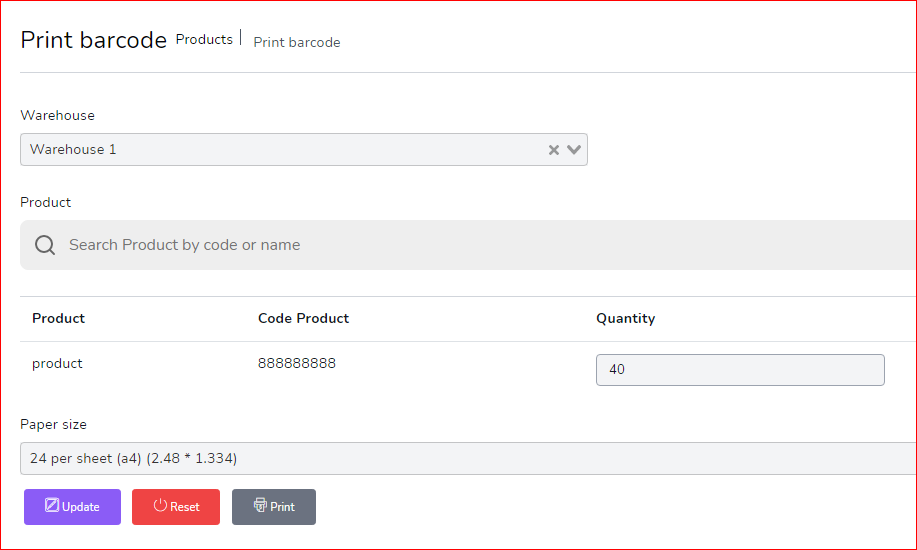
🔧 Steps to Print:
- Select Warehouse
- Select Product
- Set Quantity
- Choose Paper Size
- Click on Update
- Click on Print
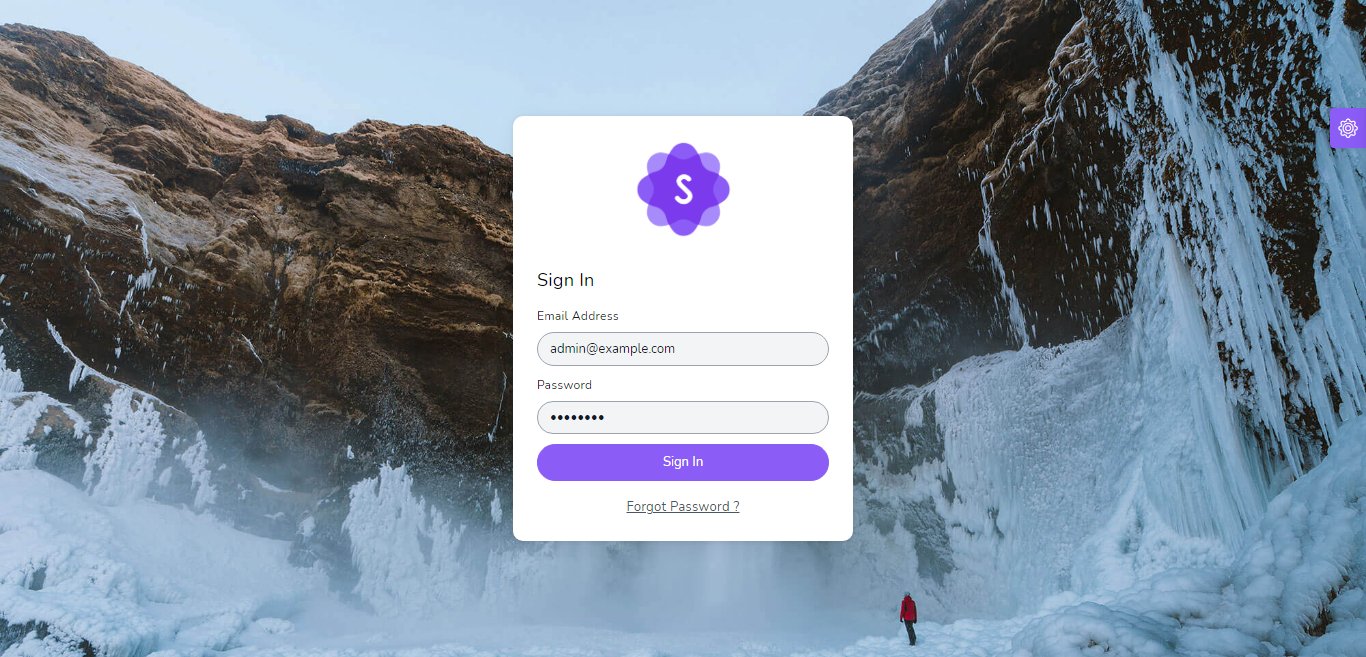
🔐 Login
Login by default
- Email:
admin@example.com - Password:
123456
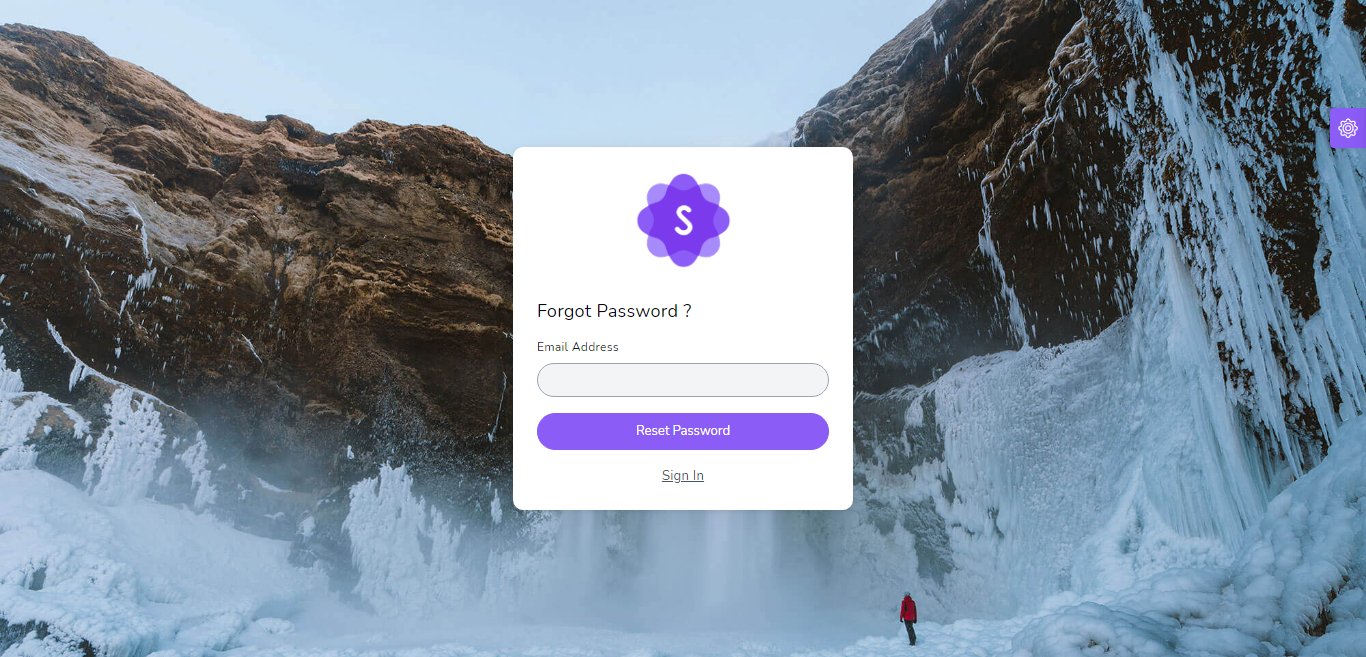
⚠️ You can change the password for security purposes.
If you forgot your password, enter your email and click the reset button. Then check your email for the reset link.
🛍️ Online Store
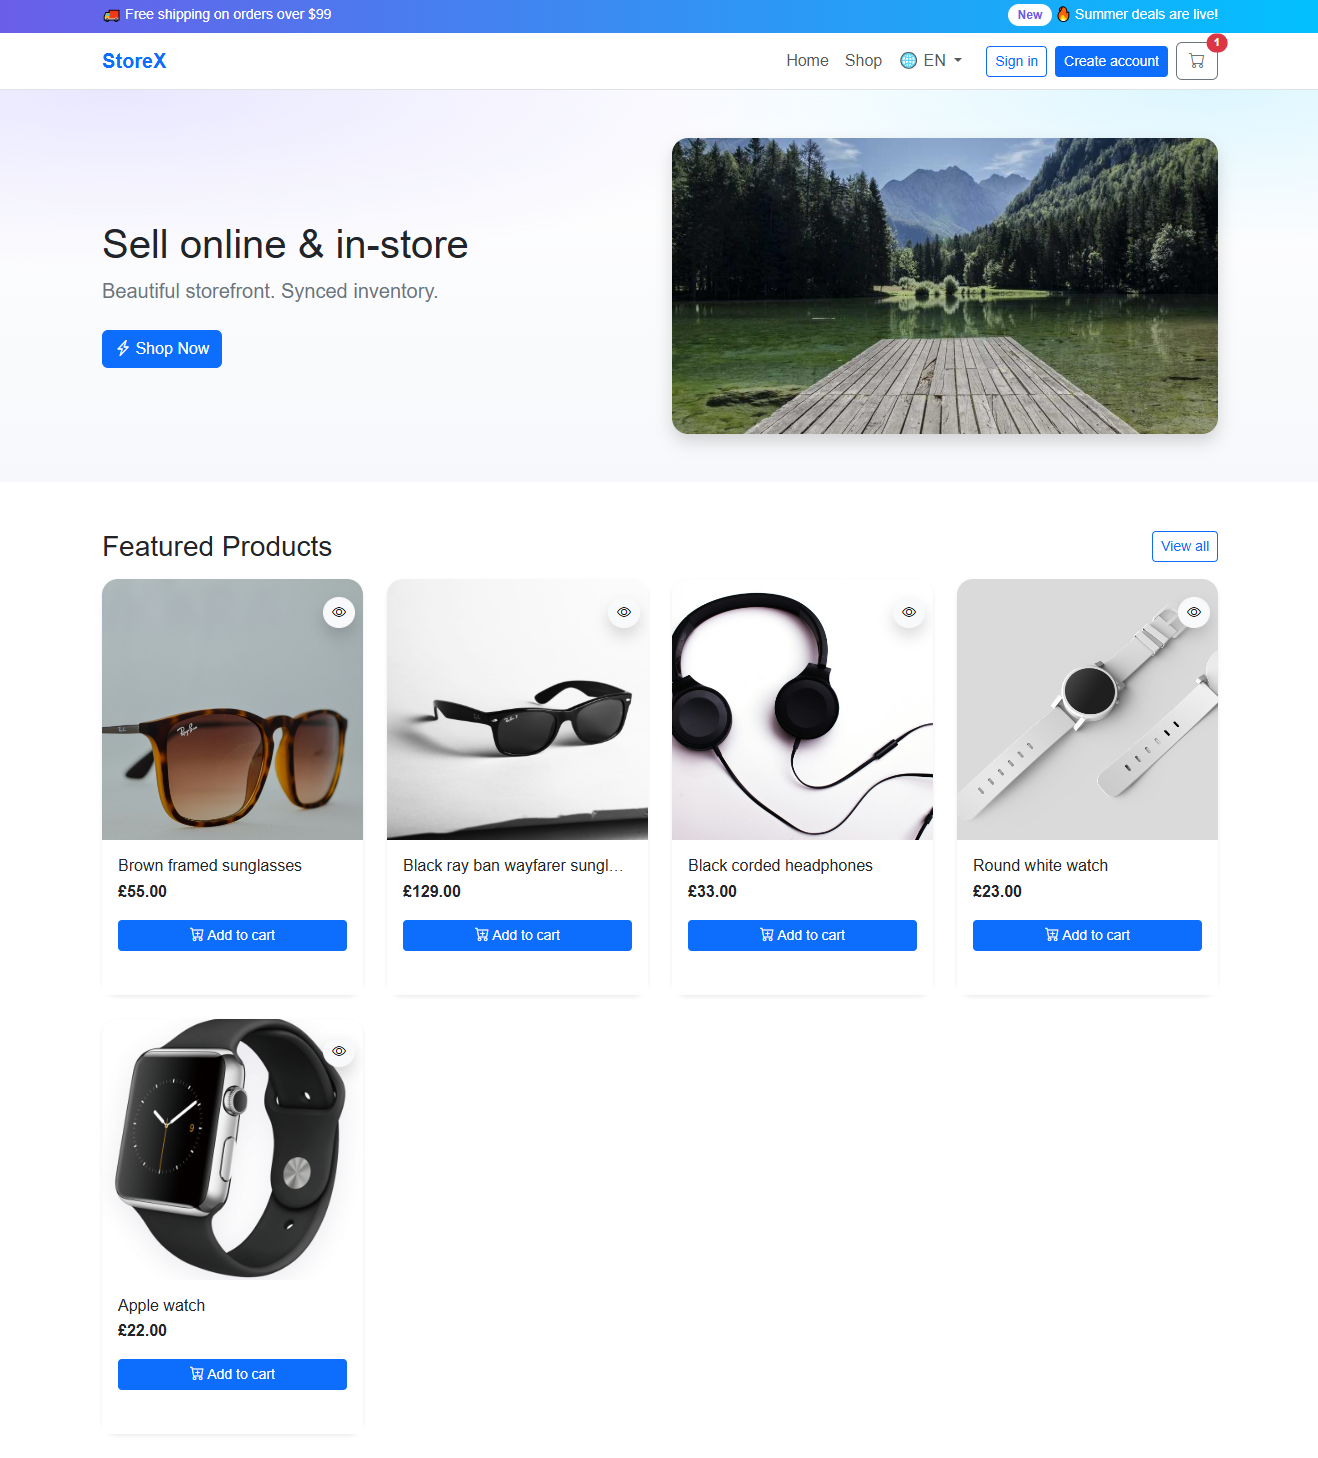
Overview
Sell online and in-store with a synced inventory. Customers can register, login, browse products, add items to the cart, and place orders. From the admin panel you can accept or cancel orders—if accepted, the order is automatically converted to a Sale (invoice) with stock updates.
Storefront
📊 Dashboard
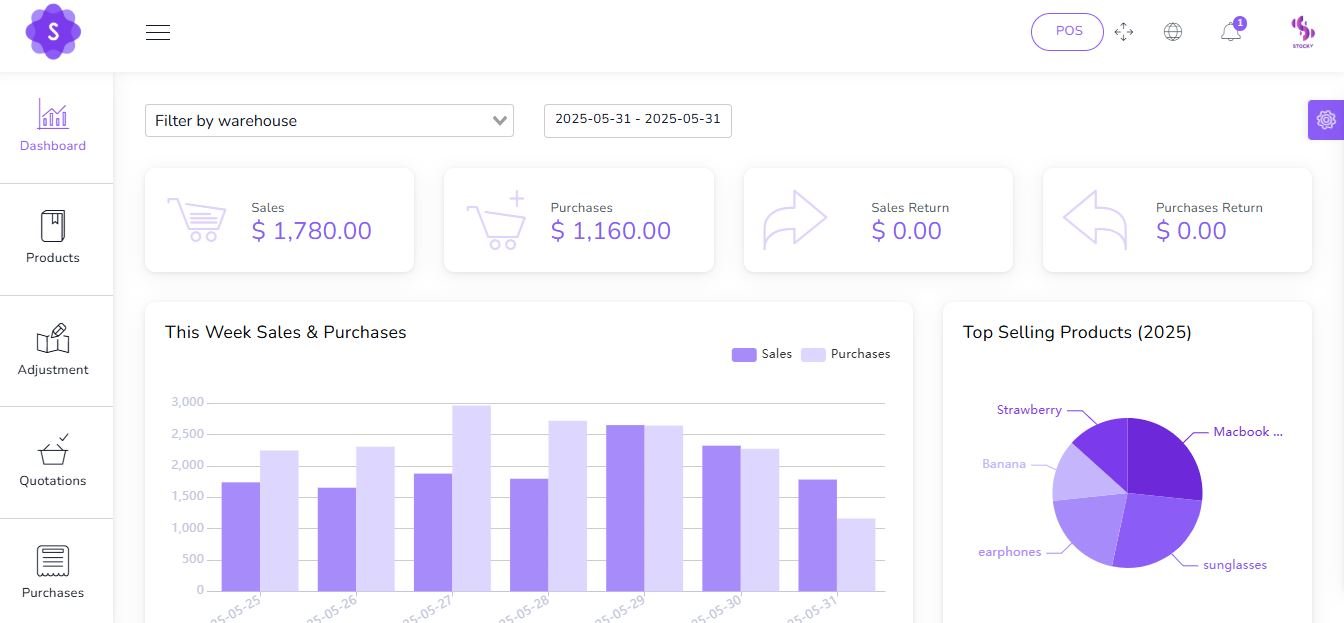
Dynamic dashboard
📌 Key Metrics & Insights:
- Today Sales
- Today Purchases
- Today Sales Return
- Today Purchases Return
- This Week Sales & Purchases
- Top Selling Products This Month
- Payment Sent & Received This Week
- Top 5 Customers This Month
- Recent Sales
🌐 Languages Management
This section allows you to manage all languages, define default ones, and control their status.

Form Fields to Add Language:
- Name: Name of the language (e.g., English, Français, العربية).
- Locale: Locale code (e.g.,
en,fr,ar). - Flag: Upload the flag icon for visual identification.
Language Table Columns:
- Flag: Display the uploaded country flag.
- Name: Language name.
- Locale: Language locale key.
- Is Active: Indicates if this language is currently available in the system.
- Is Default: Marks the language as the system's default fallback.
- Actions: Edit, Delete, or Open Translations.
🈺 Translations Manager
Translate UI texts into any active language. Each key represents a word or phrase used in the system.

Translation Management Features:
- 🔍 Search Bar: Filter translation keys by value or key name.
- ➕ Add New: Insert a new translation key/value manually.
- 💾 Save: Save changes for each translation key independently.
- 📥 Save All Changes: Bulk save after editing multiple fields.
- 🔄 Reload Reminder: Prompts user to reload the page after saving to apply changes immediately.
✅ Use this interface to manage your Translations
🛒 Products
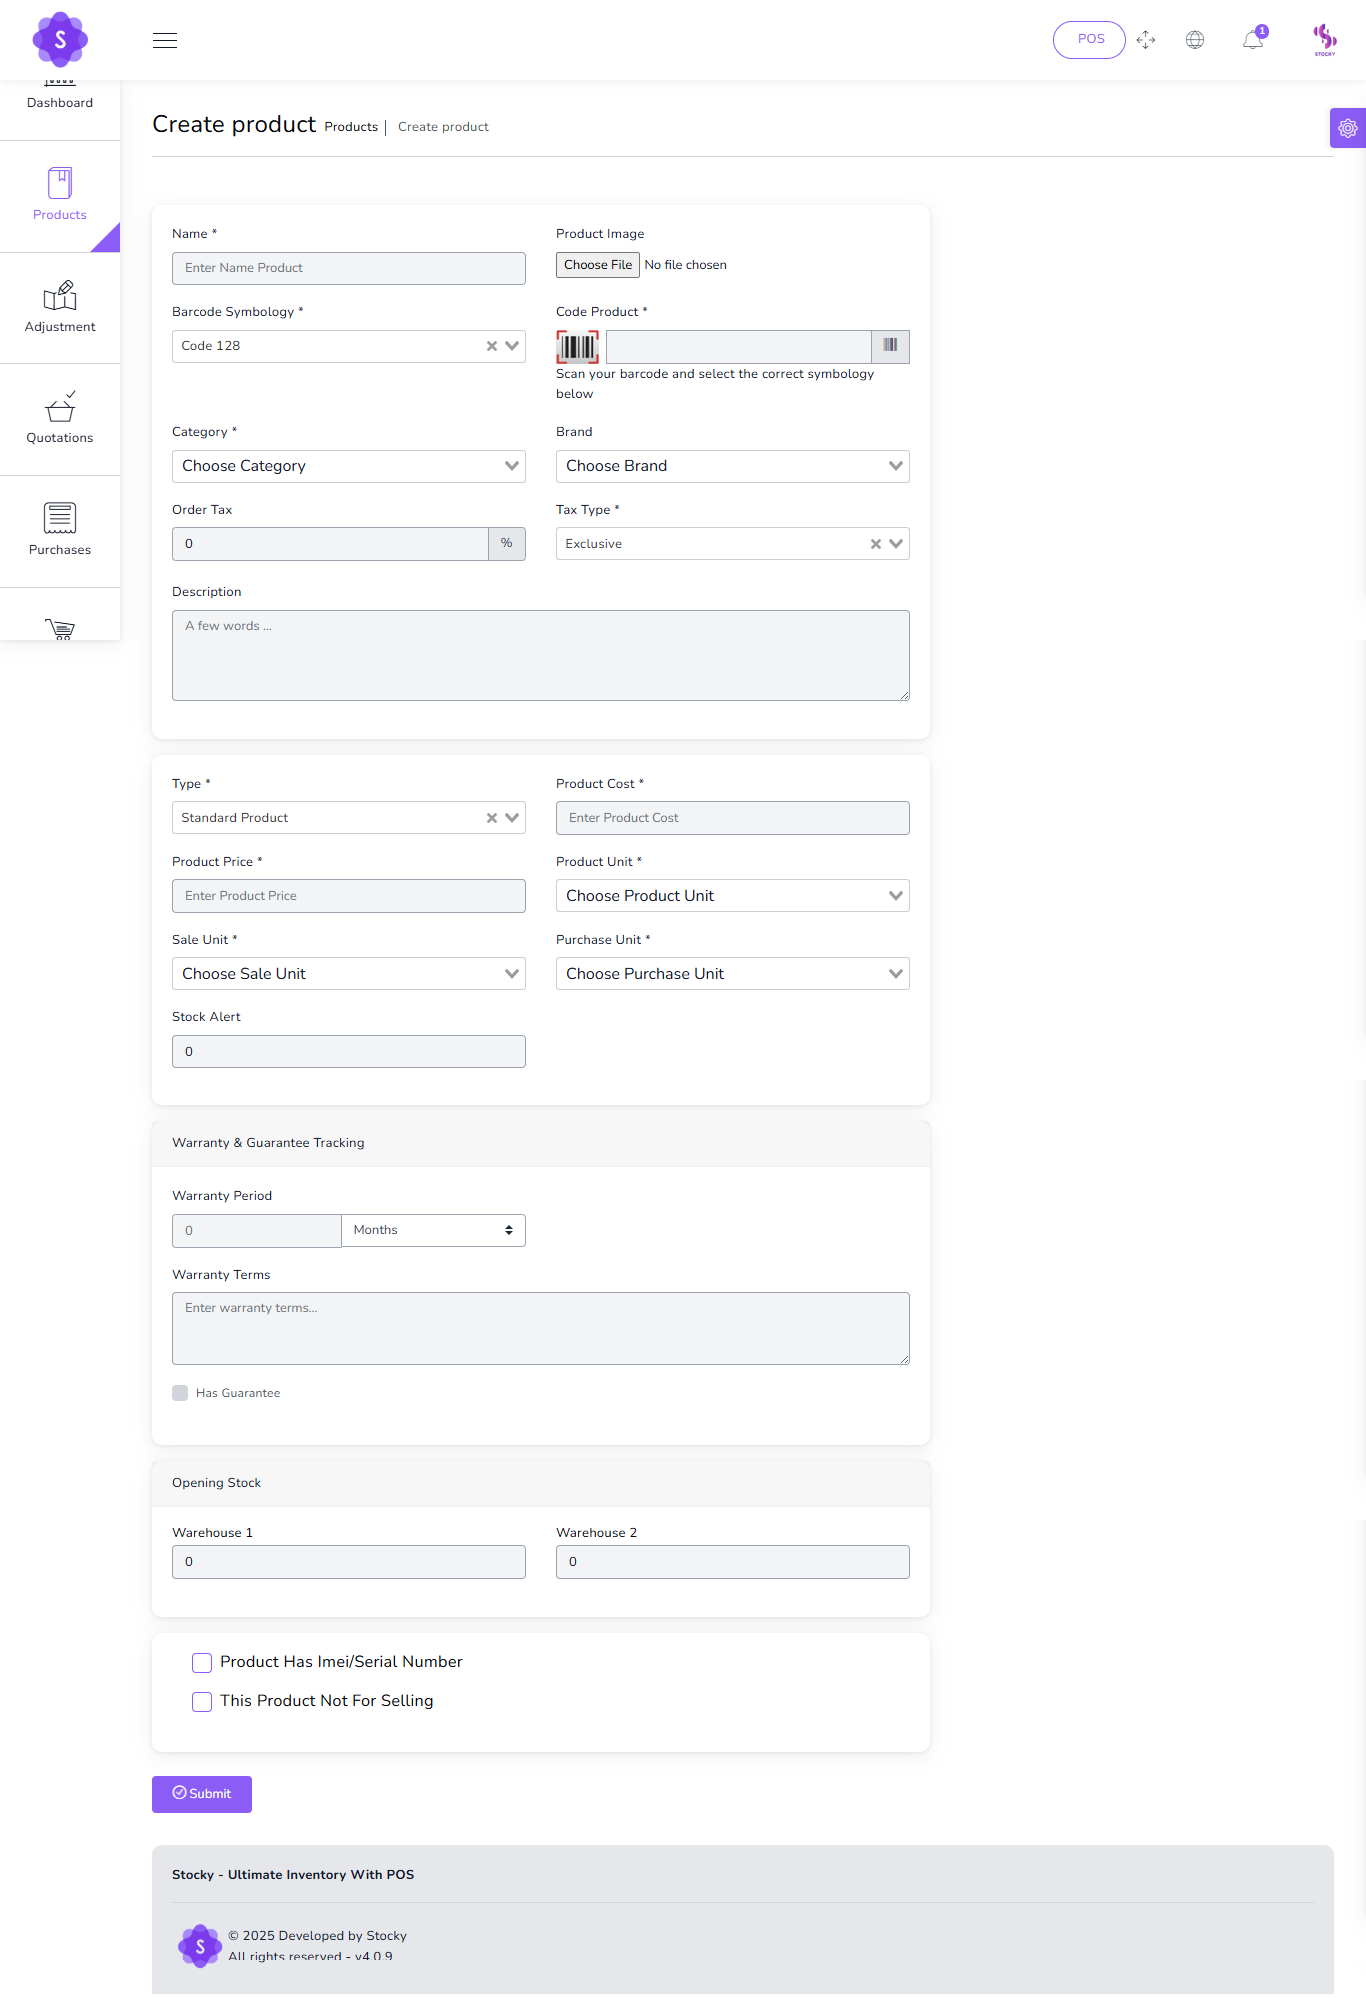
To create a new product it's very easy
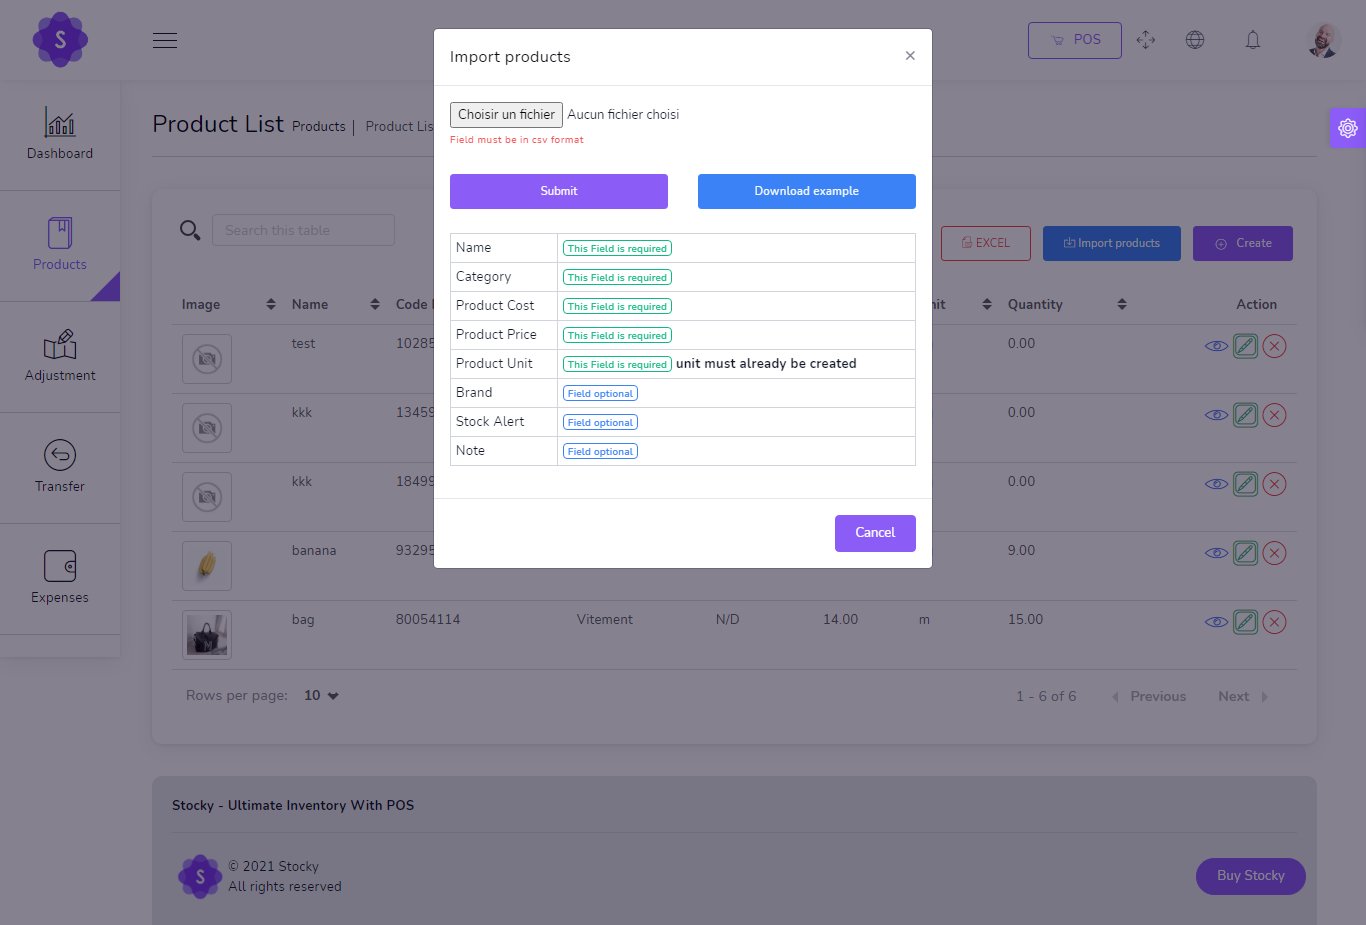
📌 Product Creation Fields:
- Product Name
(required) - Product Code
(required) - Category
(required) - Brand
(optional) - Barcode Symbology
(required) - Product Cost
(required) - Product Price
(required) - Product Unit
(required) - Sale Unit
(required) - Purchase Unit
(required) - Stock Alert
(optional) - Order Tax
(optional) - Tax Method
(optional) - Note
(optional) - You can add multiple variants of a product
You can manage product list
⚙️ Product Management Features:
- Edit Product
- View Product Details
- Delete Product
- Generate Product List in PDF
- Generate Product List in Excel
- Filter products by code, name, or category

Print Barcode
Opening Stock Import
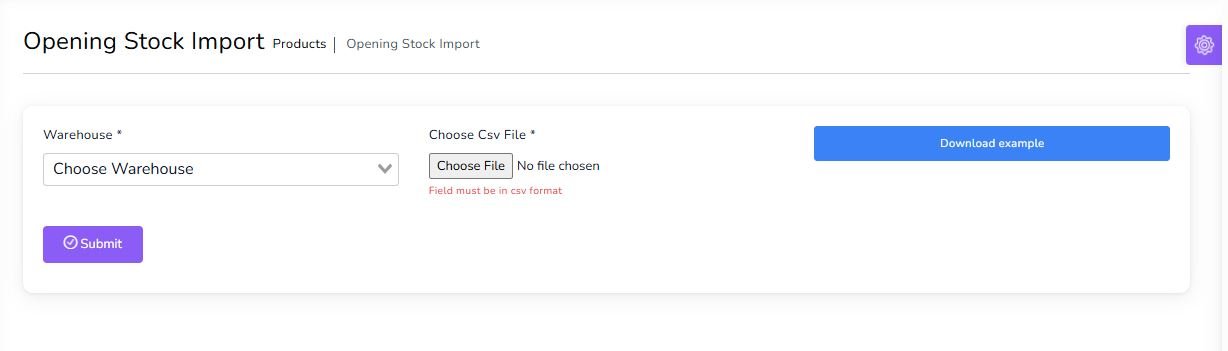
Import Products by CSV
Transfers
to create a new Transfer it's very easy
- From Warehouse
(required) - To Warehouse
(required) - Status
(required)
You can manage Transfer list
- Edit Transfer
- View Details Transfer
- Delete Transfer
- Generate Transfer list in PDF
- Generate Transfer list in Excel
- Filter Transfer by Reference , To warehouse , From Warehouse , Status
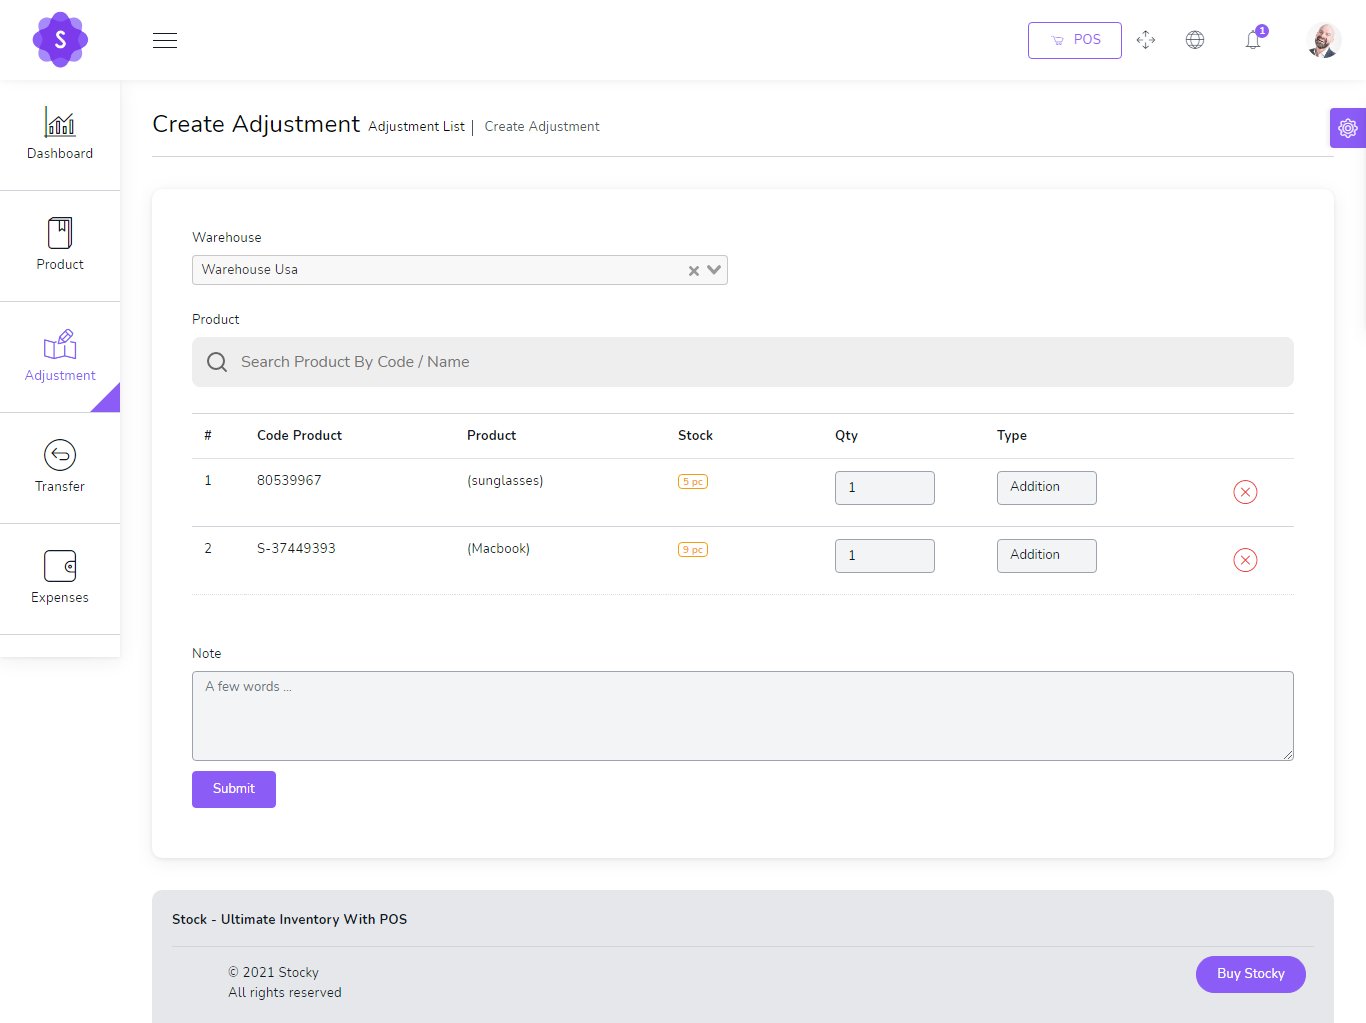
Adjustments
to create a new Adjustment it's very easy
- Warehouse
(required) - Select Product
(required)
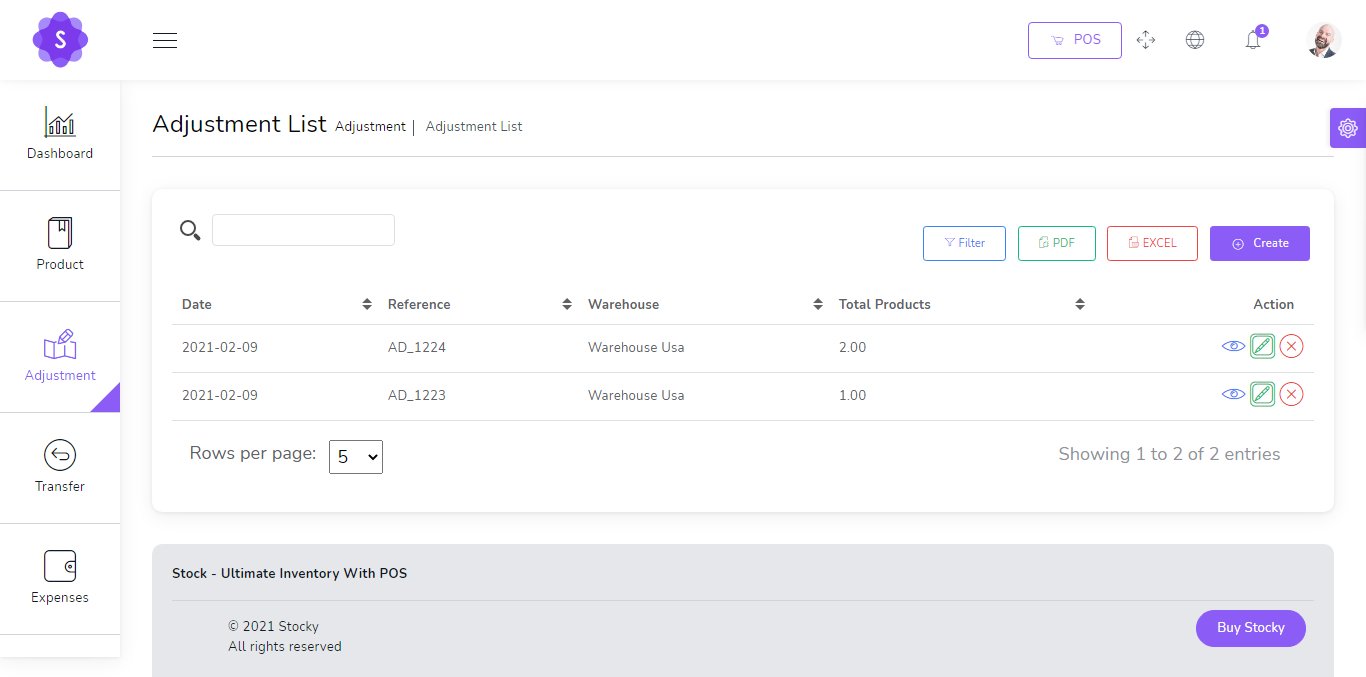
You can manage Adjustment list
- Edit Adjustment
- View Details Adjustment
- Delete Adjustment
- Generate Adjustment list in PDF
- Generate Adjustment list in Excel
- Filter Adjustment by Dtae , Reference , warehouse
Accounts
to create a new Account it's very easy
- Account num
(required) - Account Name
(required) - Initial Balance
(required) - Details
(optional)

You can manage Account list
- Edit Account
- Delete Account
- Generate Account list in PDF
- Generate Account list in Excel

Transfer Money
to Transfer Money between Your Accounts it's very easy
- Date
(required) - Amount
(required) - From Account
(required) - To Account
(required)
You can manage Transfer Money
- Edit Transfer Money
- Delete Transfer Money
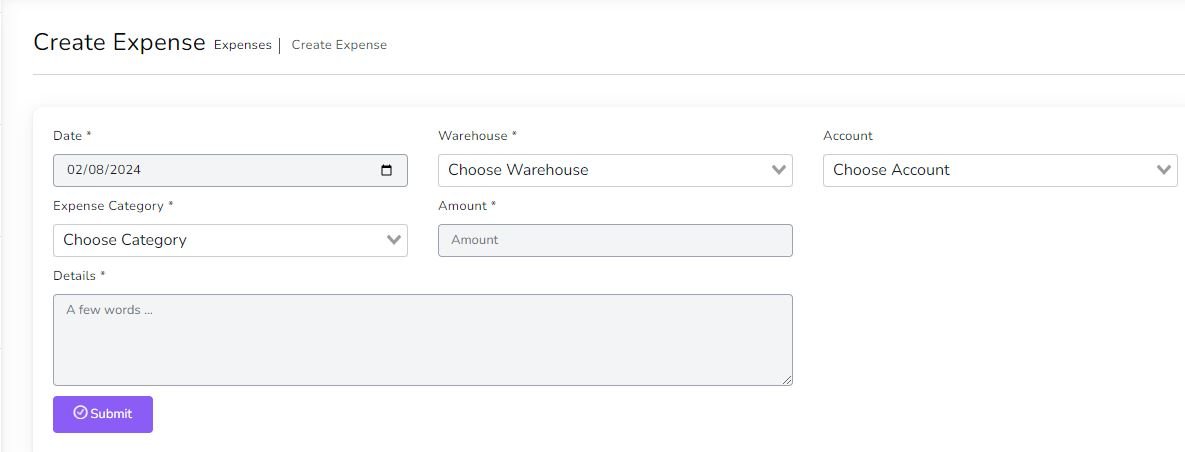
Expenses
to create a new Expense it's very easy
- Date
(required) - Warehouse
(required) - Account
(Optionnal) - Expense category
(required) - Amount
(required) - Details
(optional)
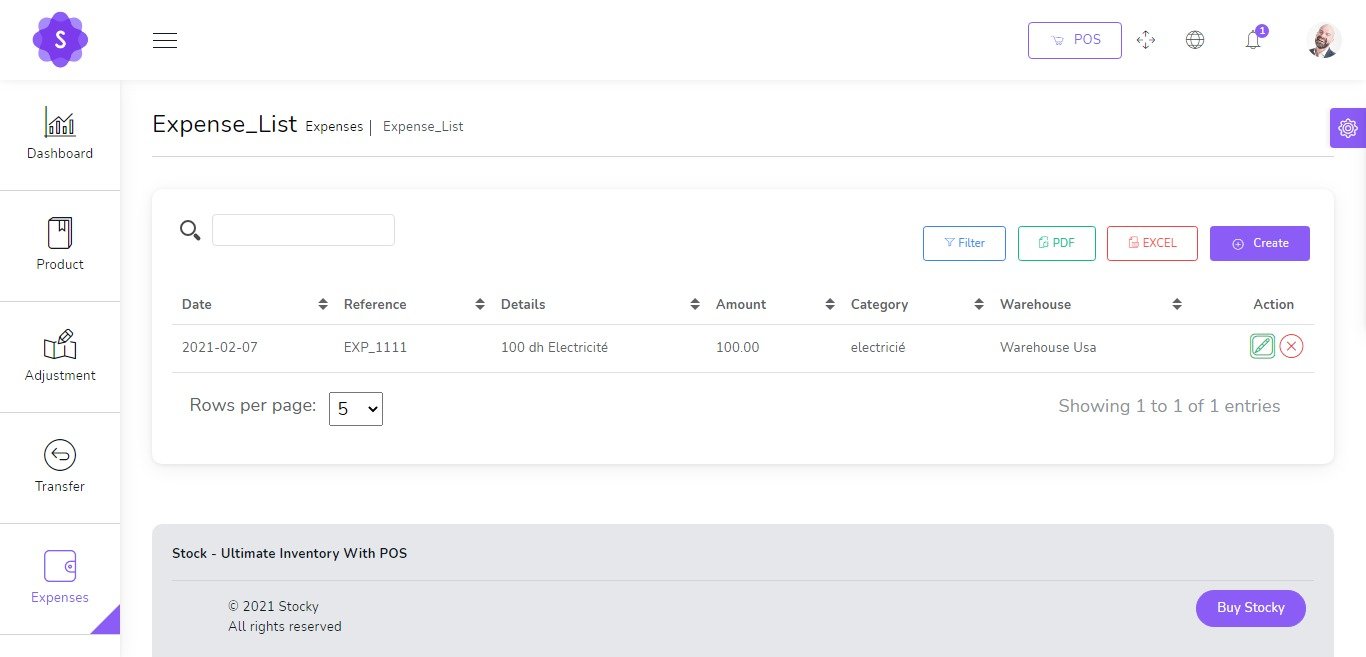
You can manage Expense list
- Edit Expense
- Delete Expense
- Generate Expense list in PDF
- Generate Expense list in Excel
- Filter Expense by Date , Reference , warehouse , Expense category, Account
Deposits
to create a new Deposit it's very easy
- Date
(required) - Account
(Optionnal) - Deposit category
(required) - Amount
(required) - Details
(optional)

You can manage Deposit list
- Edit Deposit
- Delete Deposit
- Generate Deposit list in PDF
- Generate Deposit list in Excel
- Filter Deposit by Date , Reference , Deposit category, Account

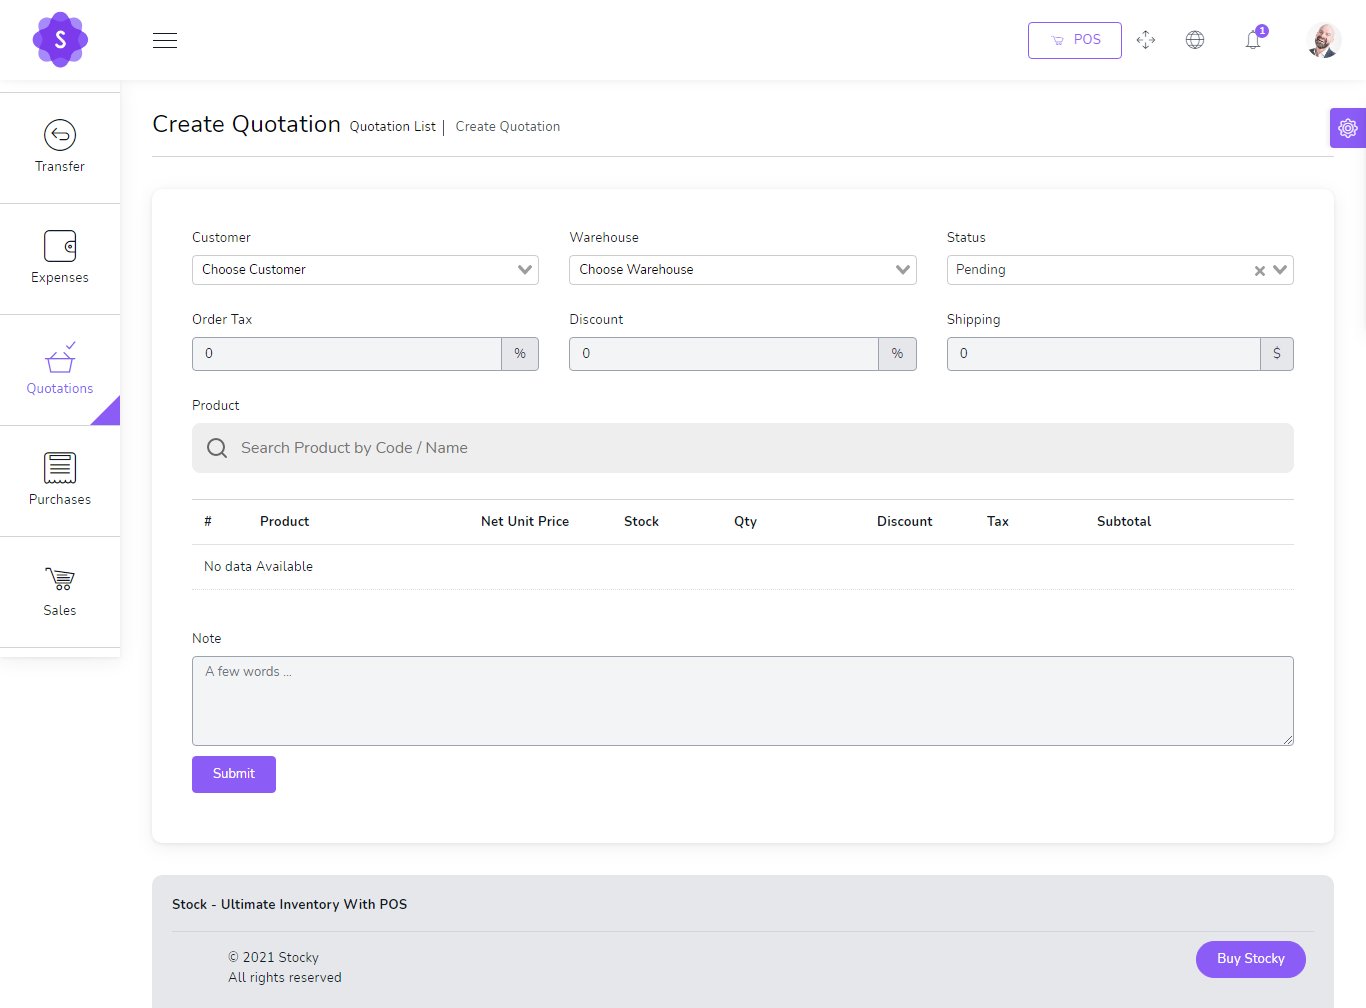
Quotations
to create a new quotation it's very easy
- Customer
(required) - Warehouse
(required) - Status
(required)
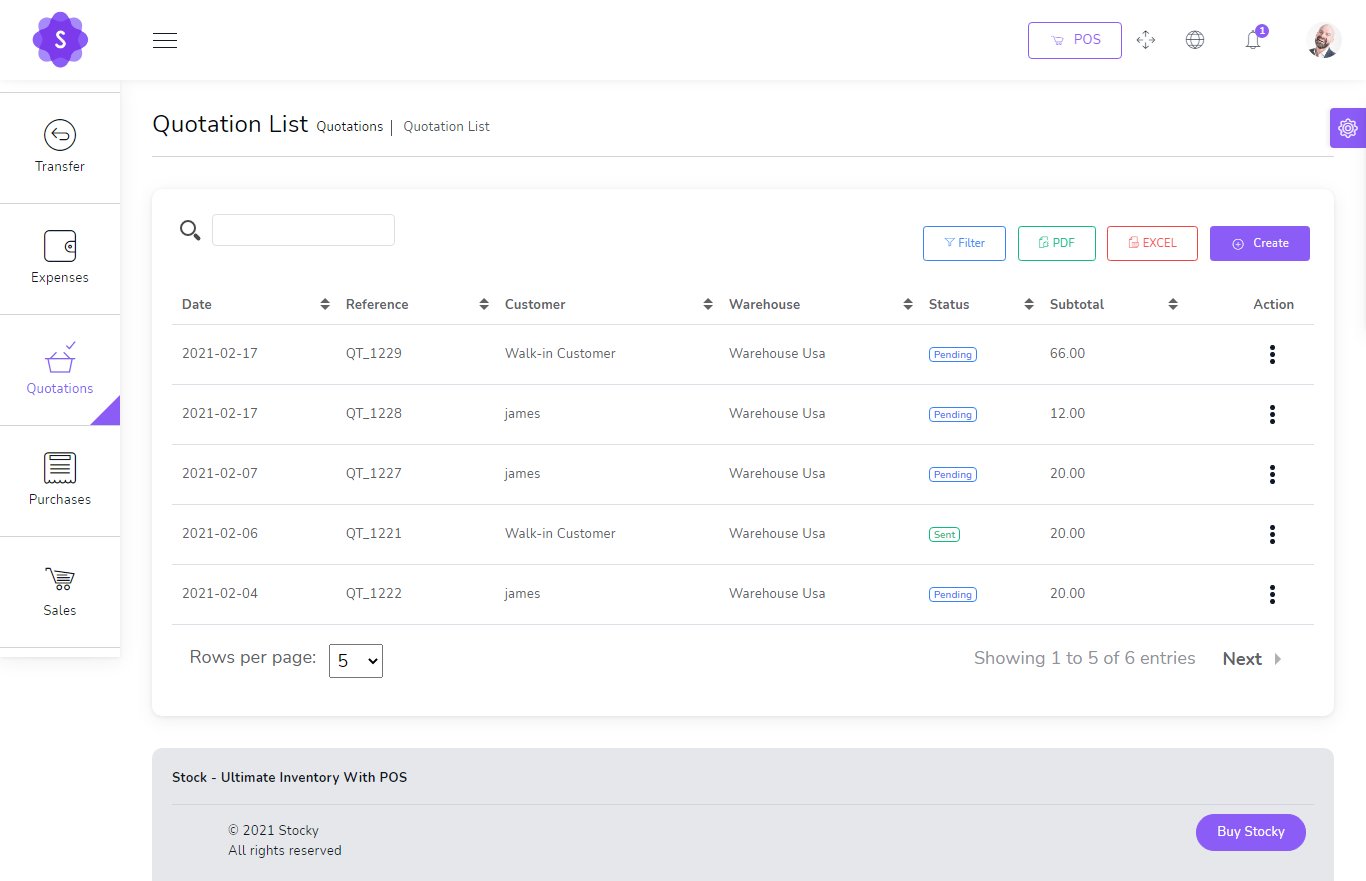
You can manage quotation list
- Edit quotation
- View Details quotation
- Delete quotation
- Change to Sale
- Send quotation on email
- Generate quotation list in PDF
- Generate quotation list in Excel
- Filter quotation by Date, Reference , Customer , Warehouse , Status
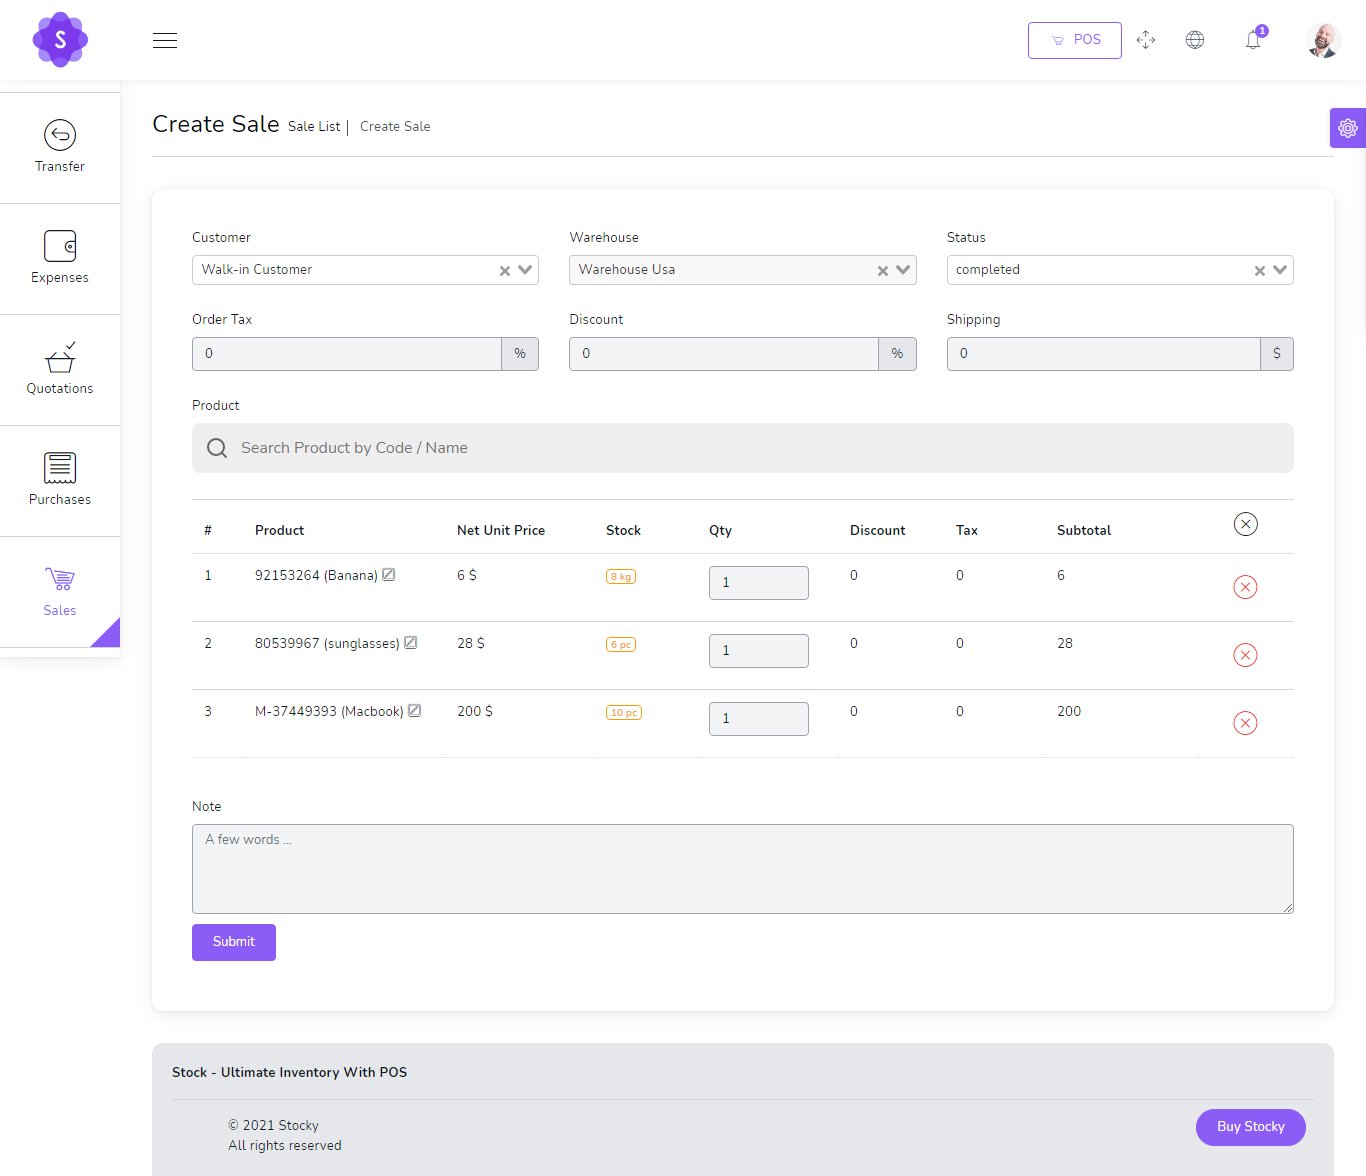
Sales
to create a new sale it's very easy
- Customer
(required) - Warehouse
(required) - Status
(required)
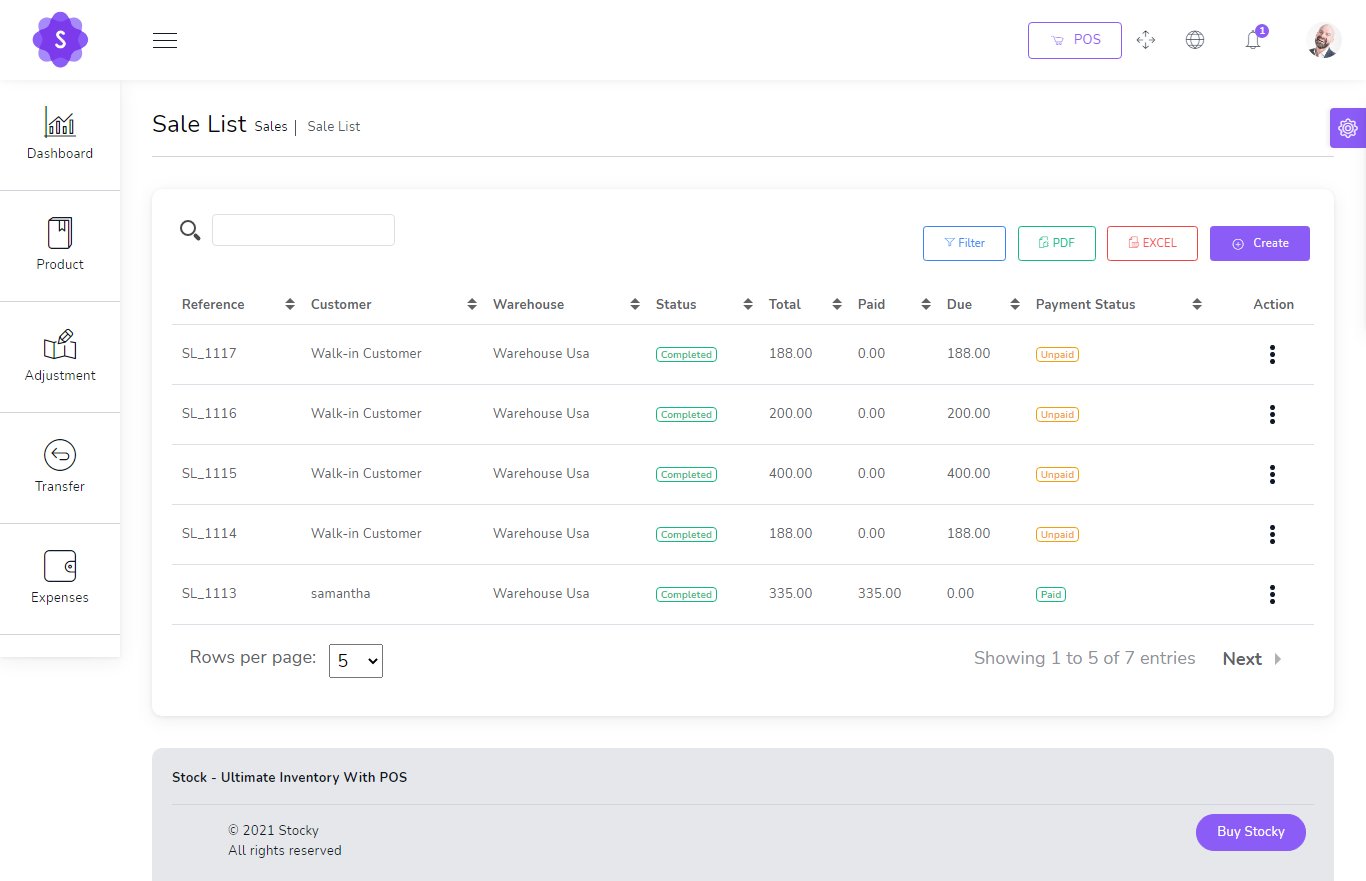
You can manage sale list
- Edit sale
- View Details sale
- Delete sale
- Change to Sale
- Send sale on email
- Generate sale list in PDF
- Generate sale list in Excel
- Filter sale by Date, Reference , Customer , Warehouse , Status , Payment status
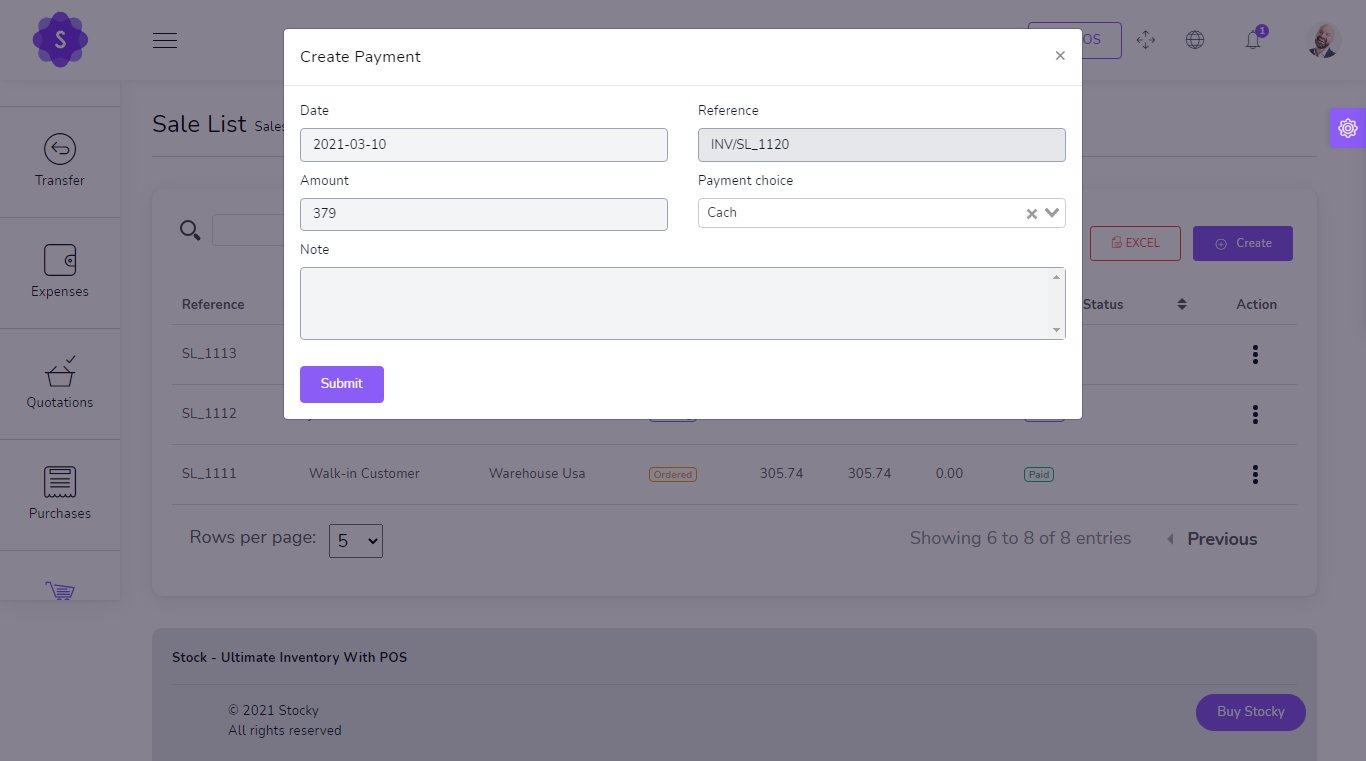
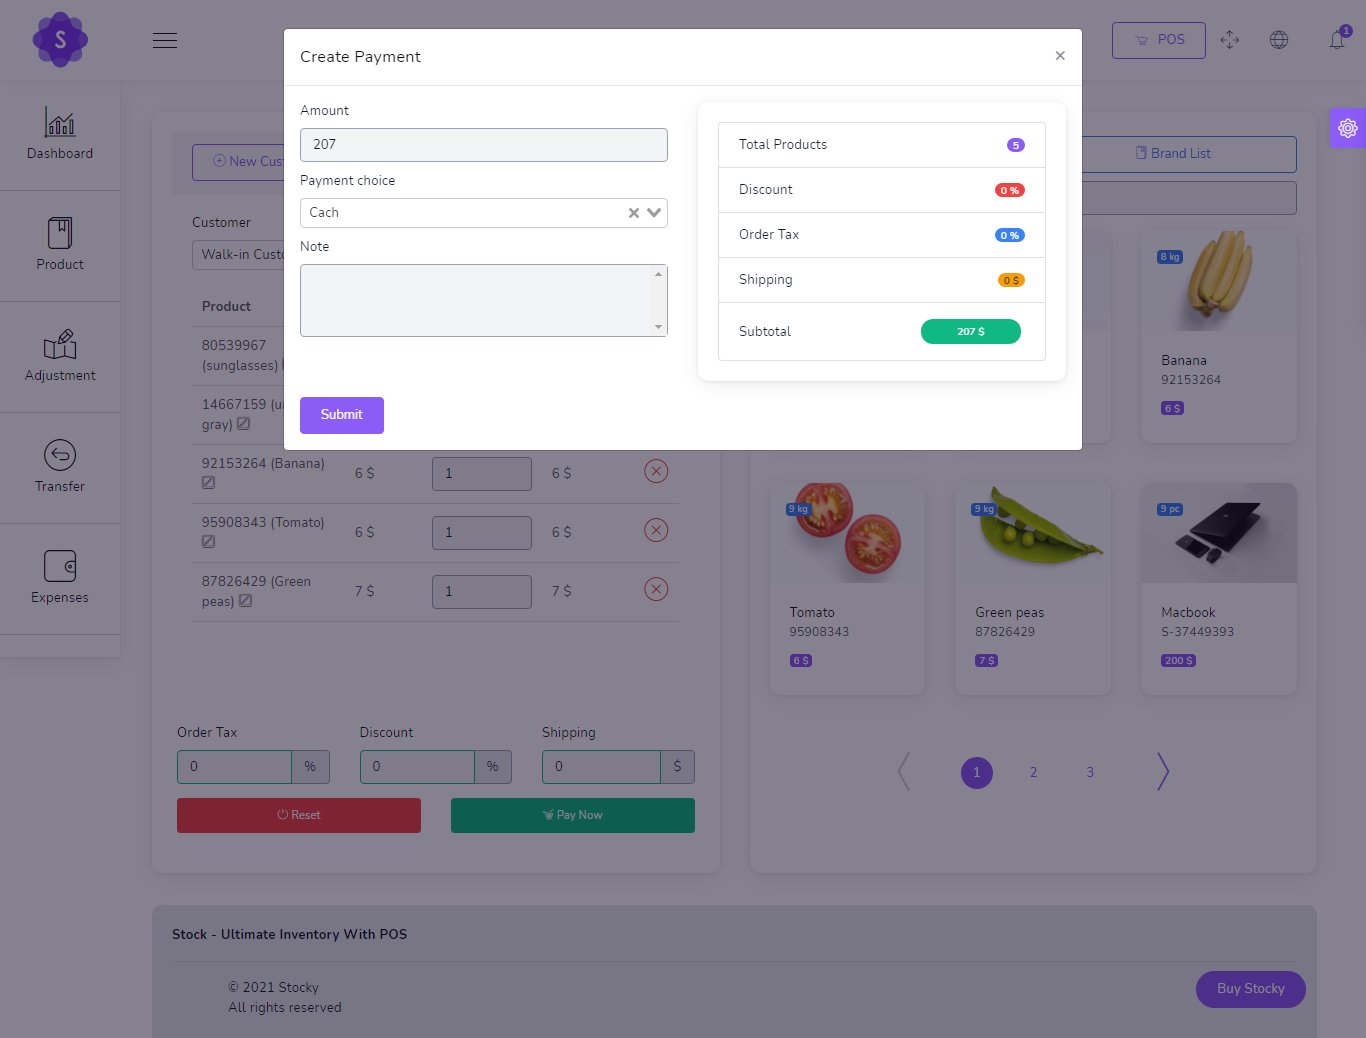
Show Payment

Add Payment
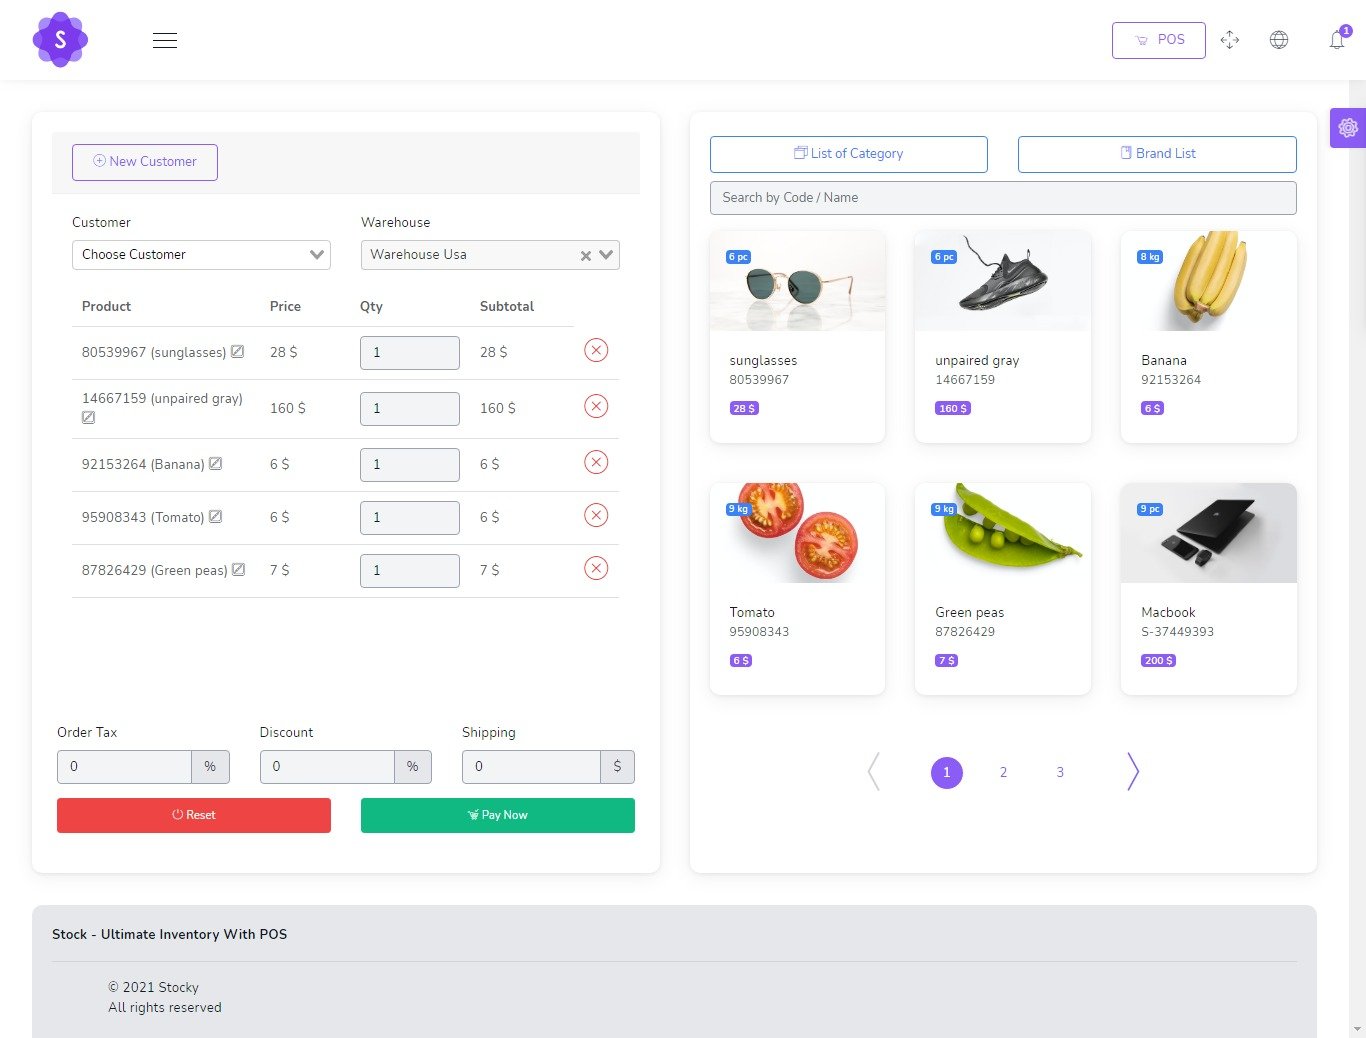
Sales POS
Easy POS
- Barcode Scanner
- you can search for product by name or code
- Filter Product by Brand , Category
POS Payment
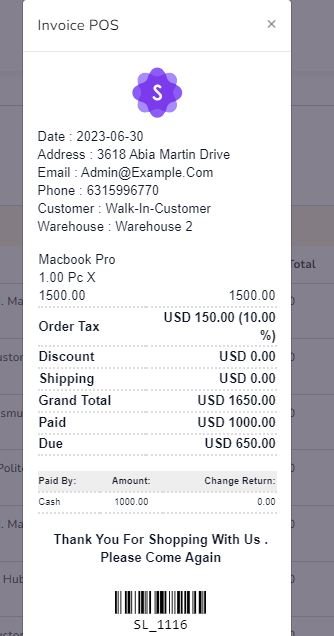
POS Invoice
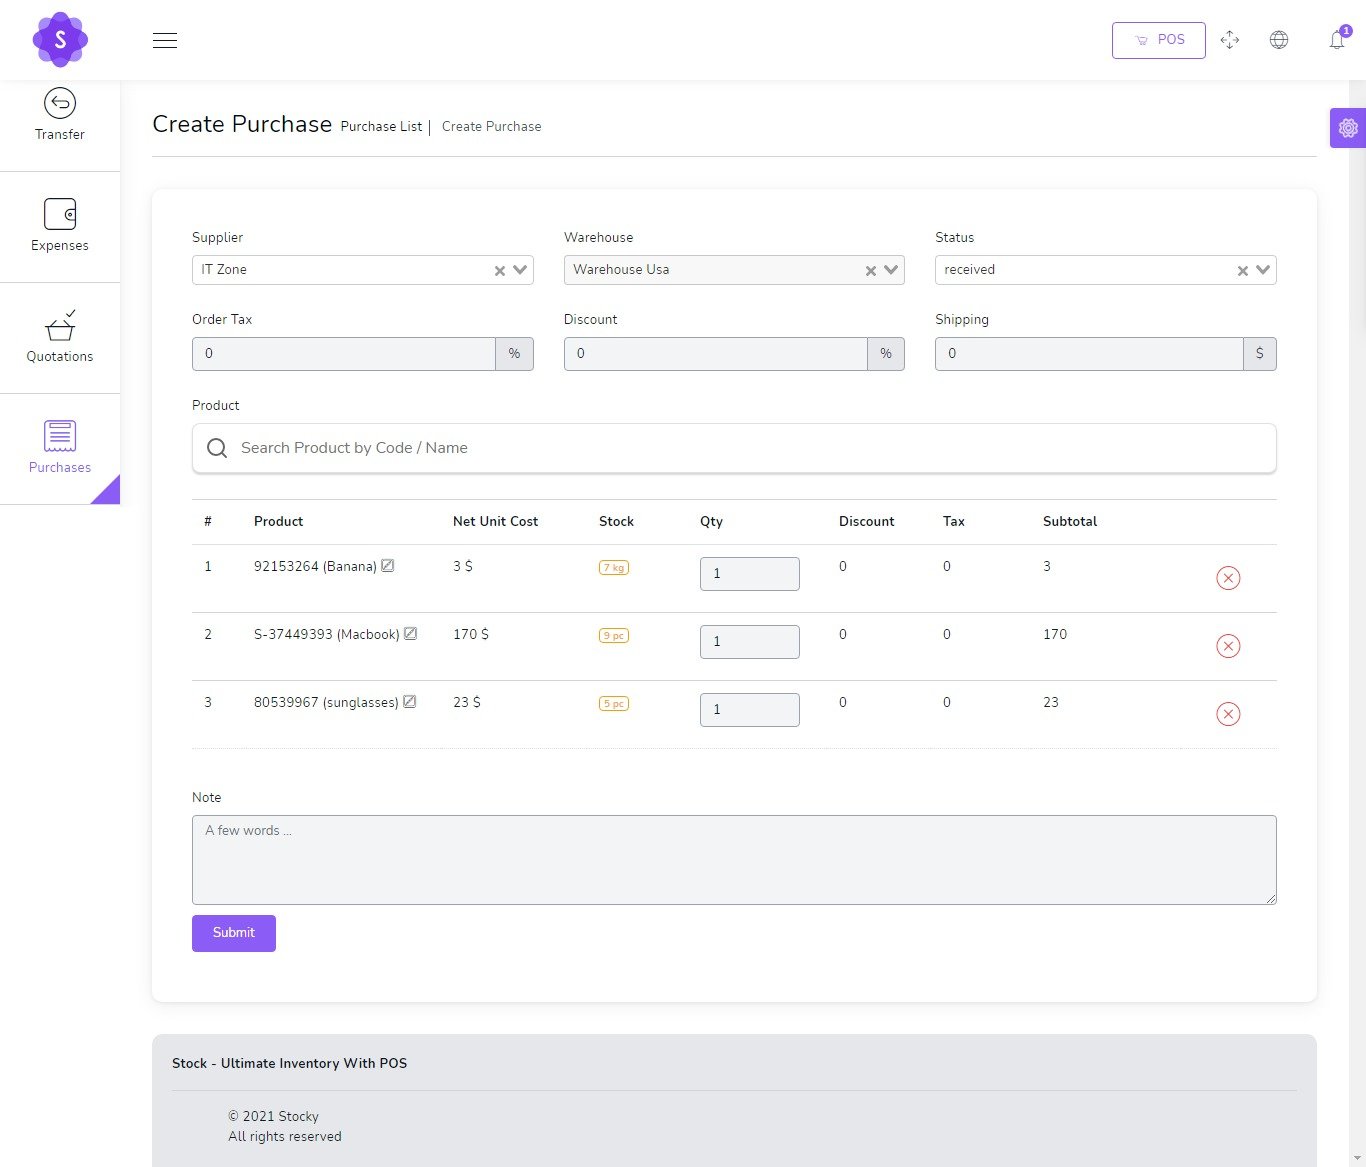
Purchases
to create a new purchase it's very easy
- Supplier
(required) - Warehouse
(required) - Status
(required)
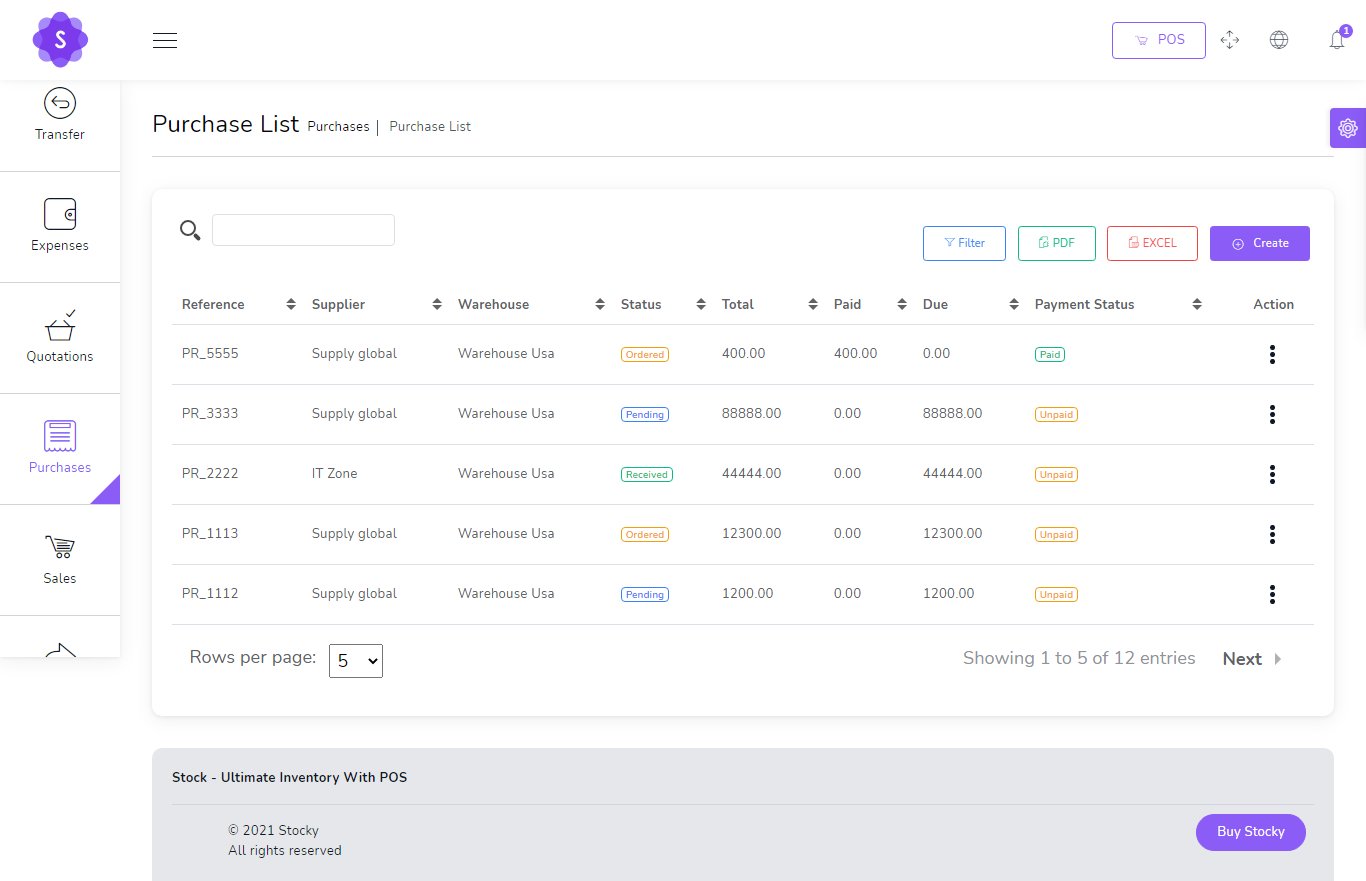
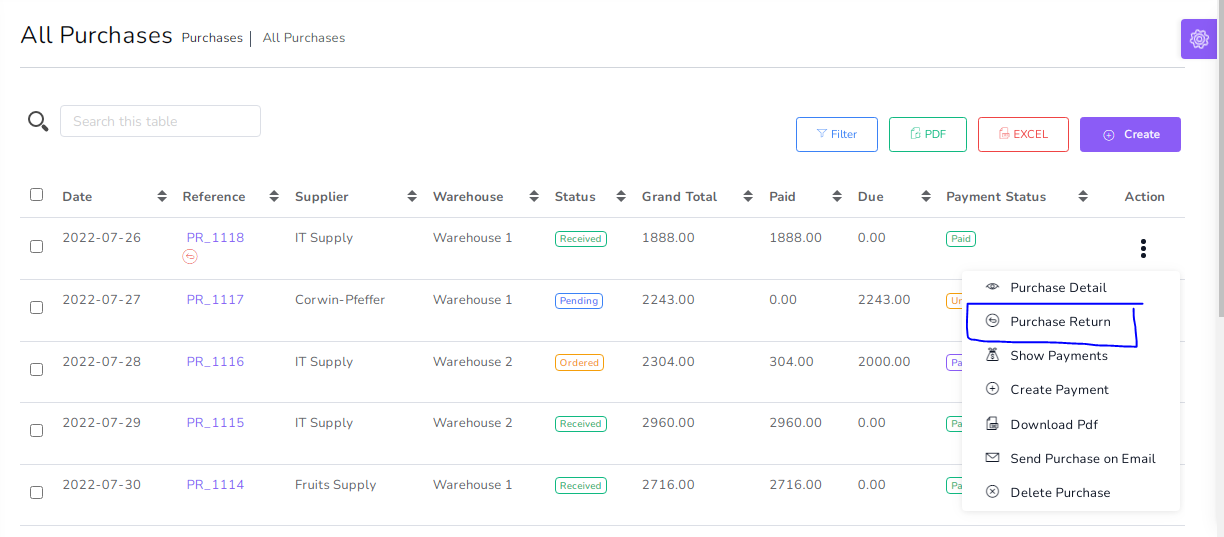
You can manage purchase list
- Edit purchase
- View Details purchase
- Delete purchase
- Send purchase on email
- Generate purchase list in PDF
- Generate purchase list in Excel
- Filter purchase by Date, Reference , Supplier , Warehouse , Status , Payment status
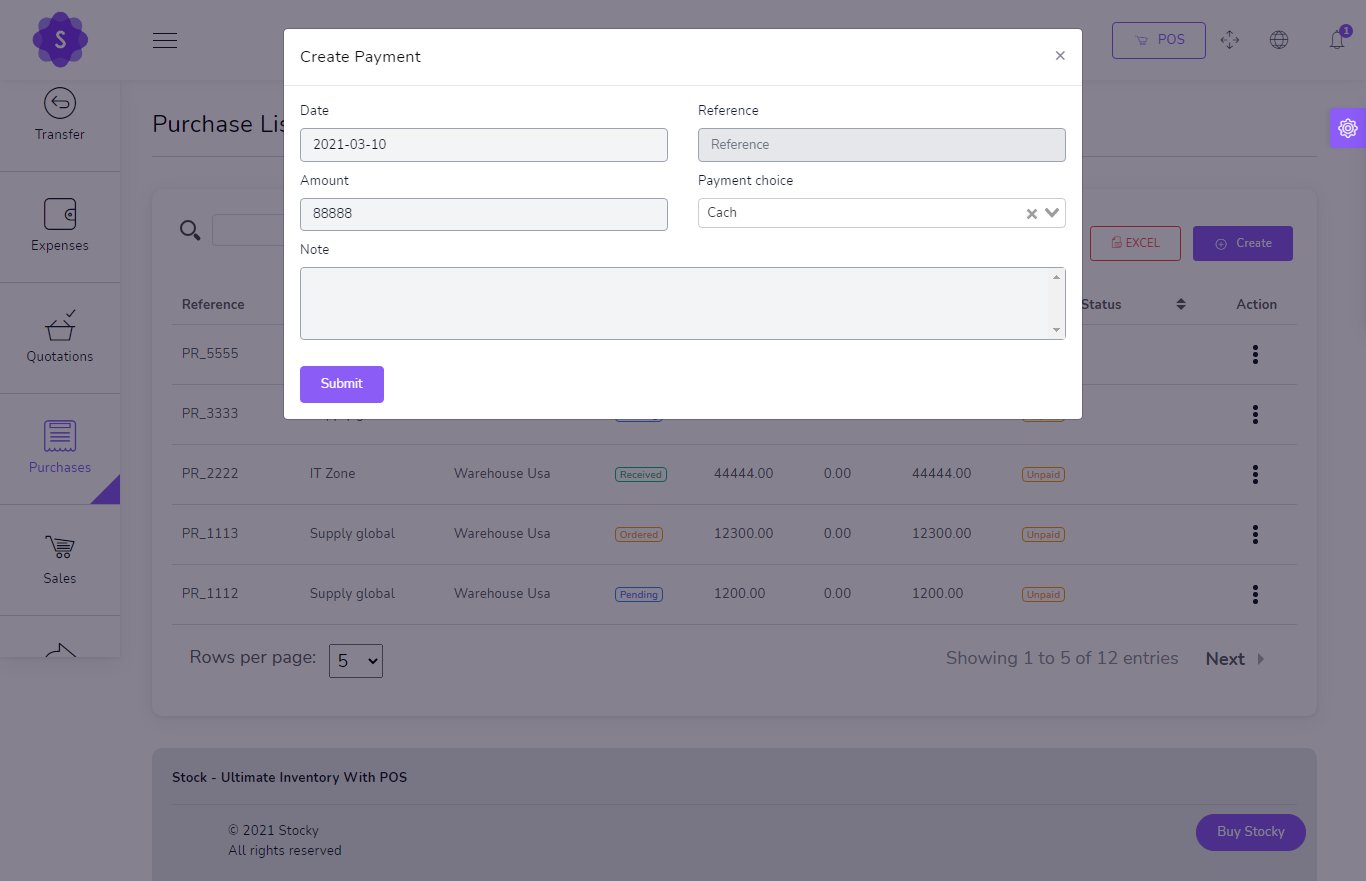
Show Payment
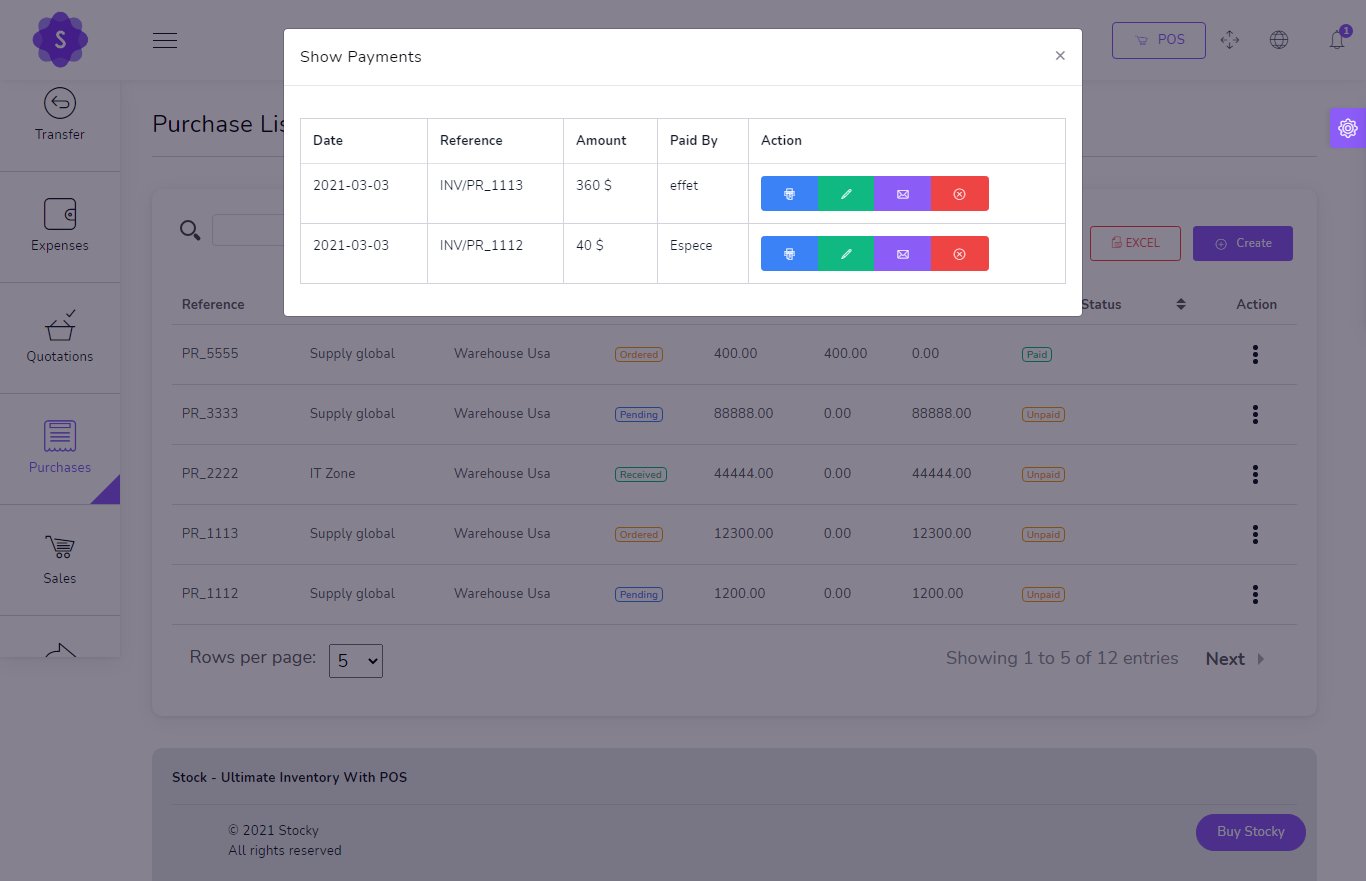
Add Payment
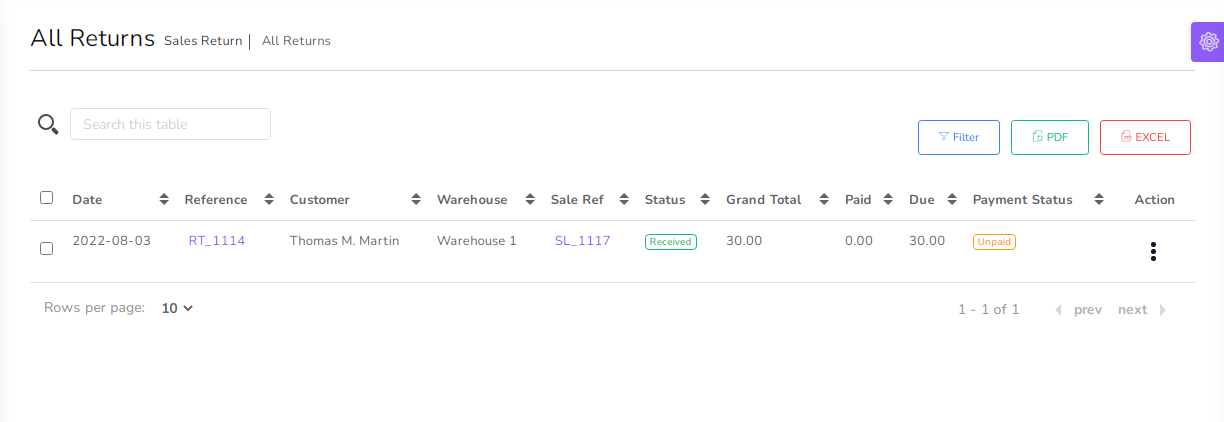
Sale Returns
to create a new Sale Return it's very easy
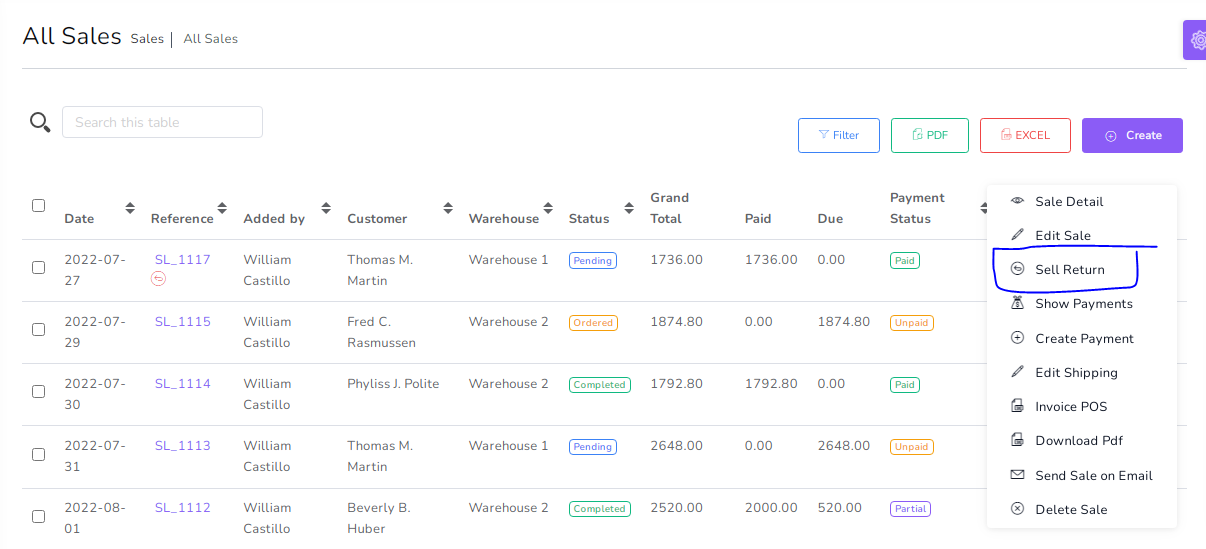
You can manage Sale Return list
- Edit Sale Return
- View Details Sale Return
- Delete Sale Return
- Send Sale Return on email
- Generate Sale Return list in PDF
- Generate Sale Return list in Excel
- Filter Sale Return by Date, Reference , Customer , Warehouse , Status , Payment status
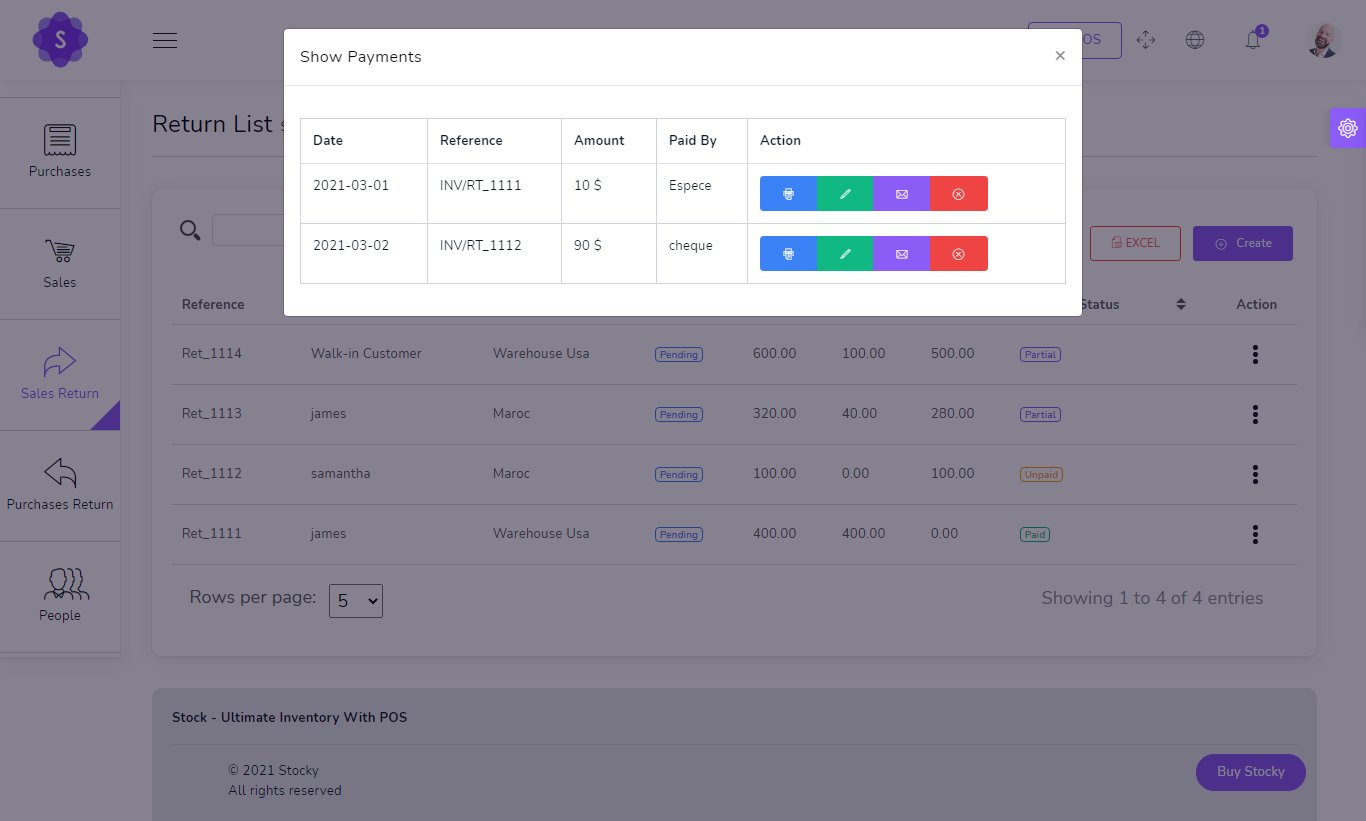
Show Payment
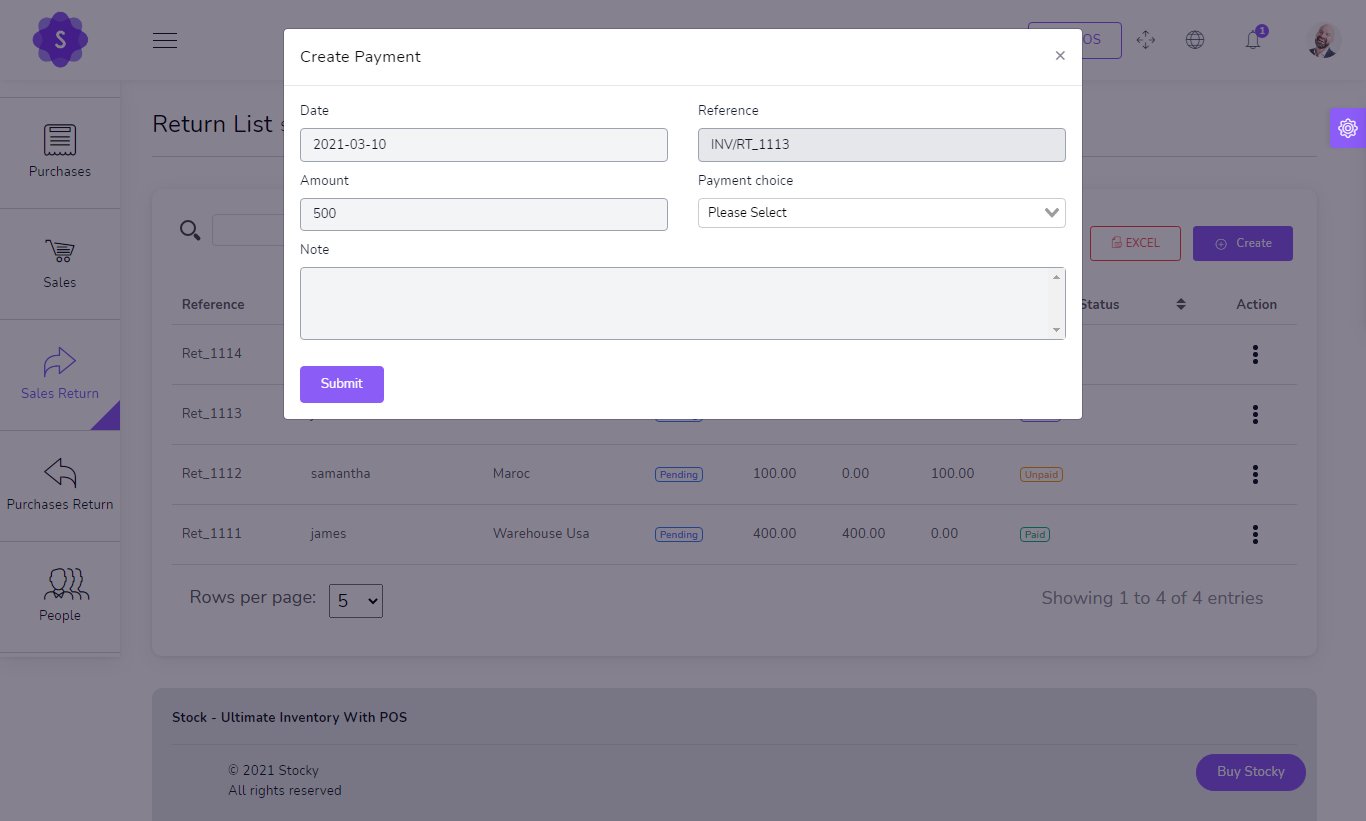
Add Payment
Purchase Returns
to create a new Purchase Return it's very easy
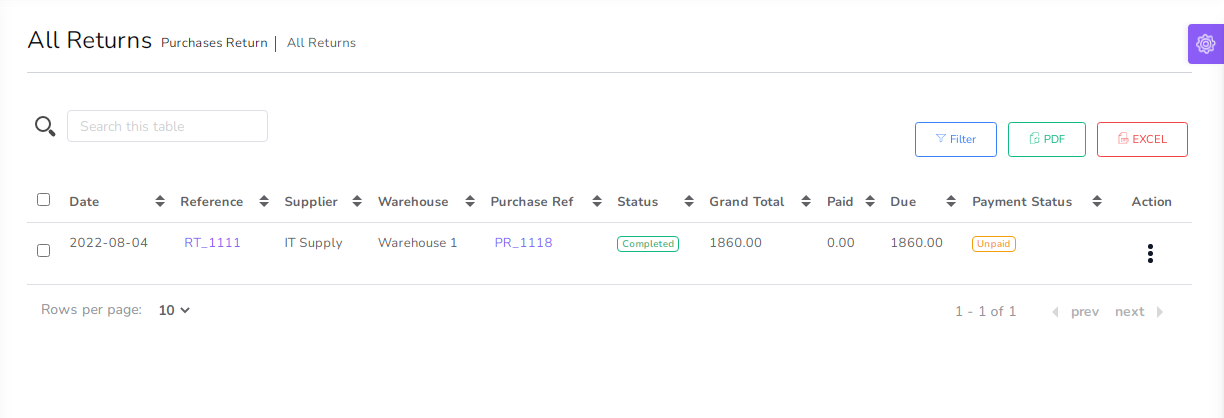
You can manage Purchase Return list
- Edit Purchase Return
- View Details Purchase Return
- Delete Purchase Return
- Send Purchase Return on email
- Generate Purchase Return list in PDF
- Generate Purchase Return list in Excel
- Filter Purchase Return by Date, Reference , Supplier , Warehouse , Status , Payment status
Show Payment
Add Payment
Customers
to create a new Customer it's very easy
- Name
(required) - Email
(required)

You can manage customer list
- Pay all sell due in single payment
- Pay all sell Return due in single payment
- Edit customer
- Delete customer
- Generate customer list in PDF
- Generate customer list in Excel
- Search customer
- Filter customer by Name ,Code , phone , Email
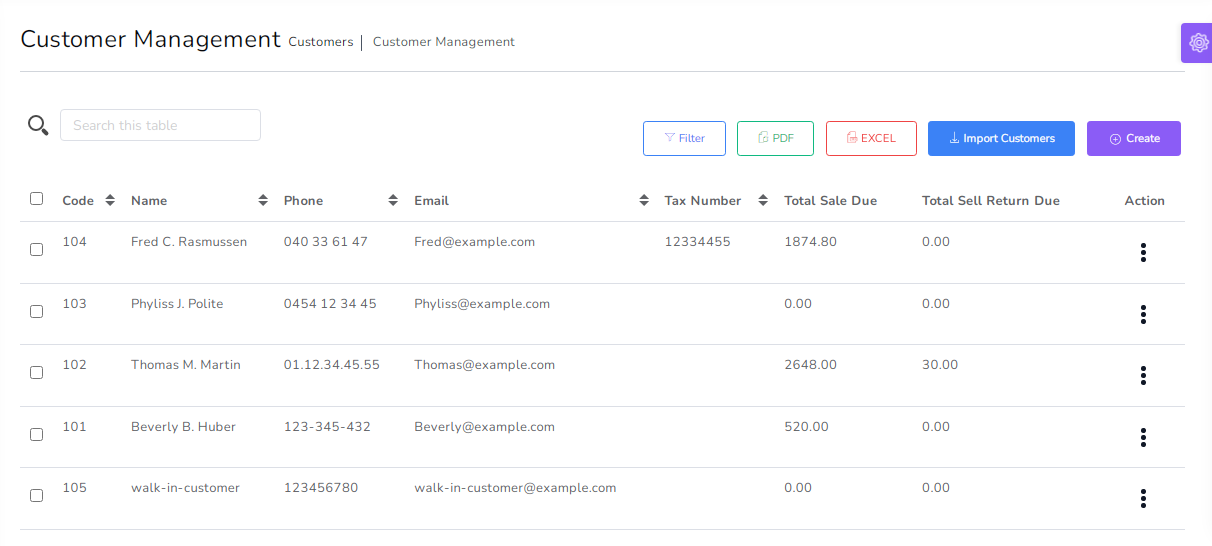
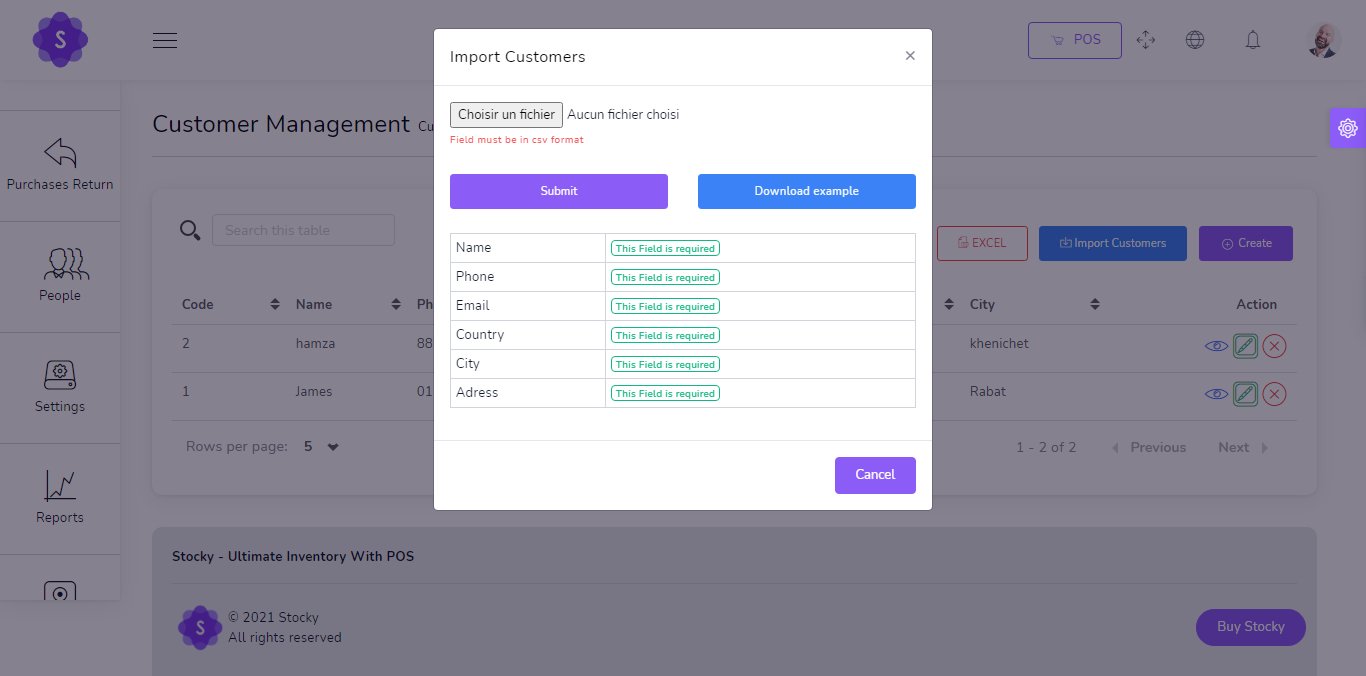
Import Customers by csv
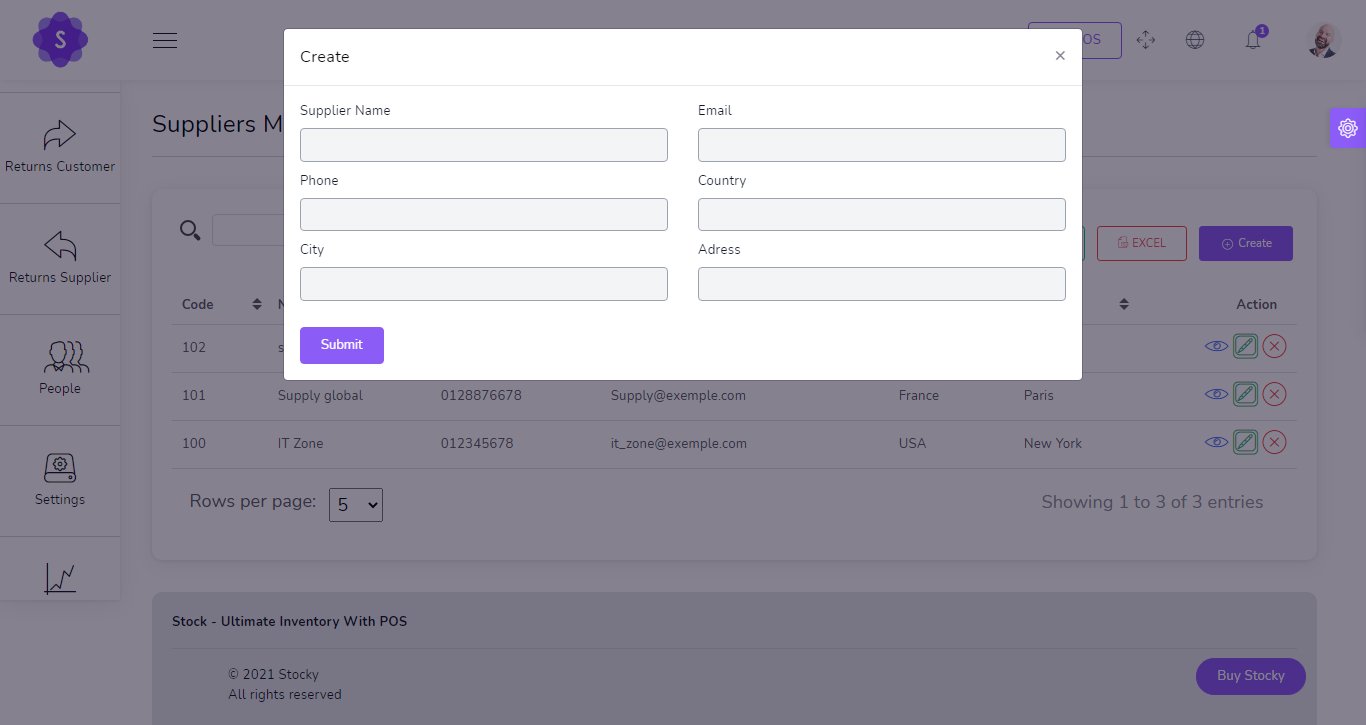
Suppliers
to create a new Supplier it's very easy
- Name
(required) - Email
(required)
You can manage Supplier list
- Pay all Purchase due in single payment
- Pay all Purchase Return due in single payment
- Edit Supplier
- Delete Supplier
- Generate Supplier list in PDF
- Generate Supplier list in Excel
- Search Supplier
- Filter customer by Name ,Code , phone , Email
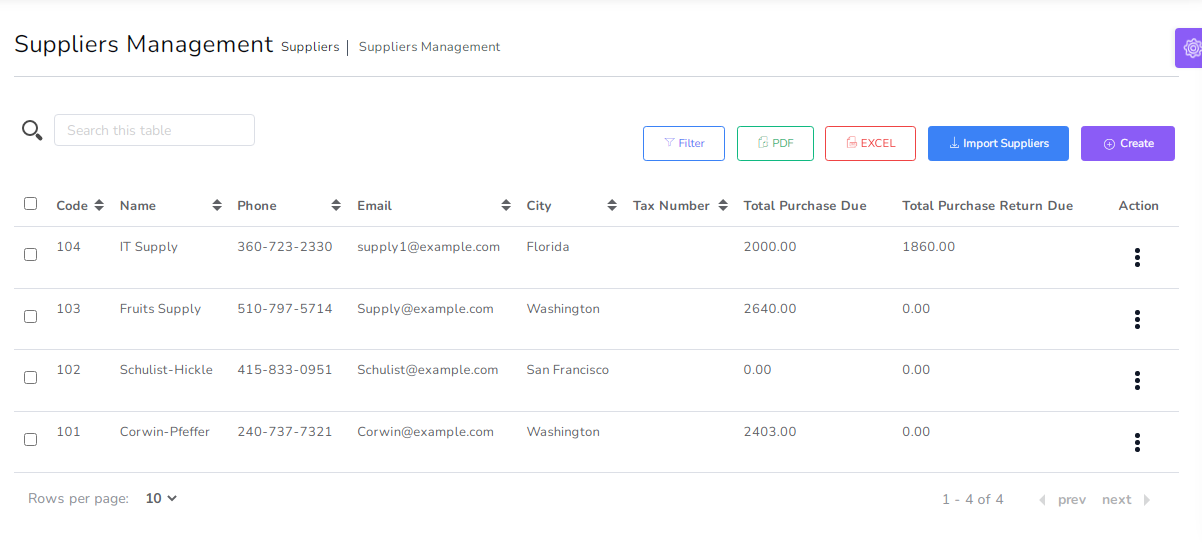
Import Suppliers by csv

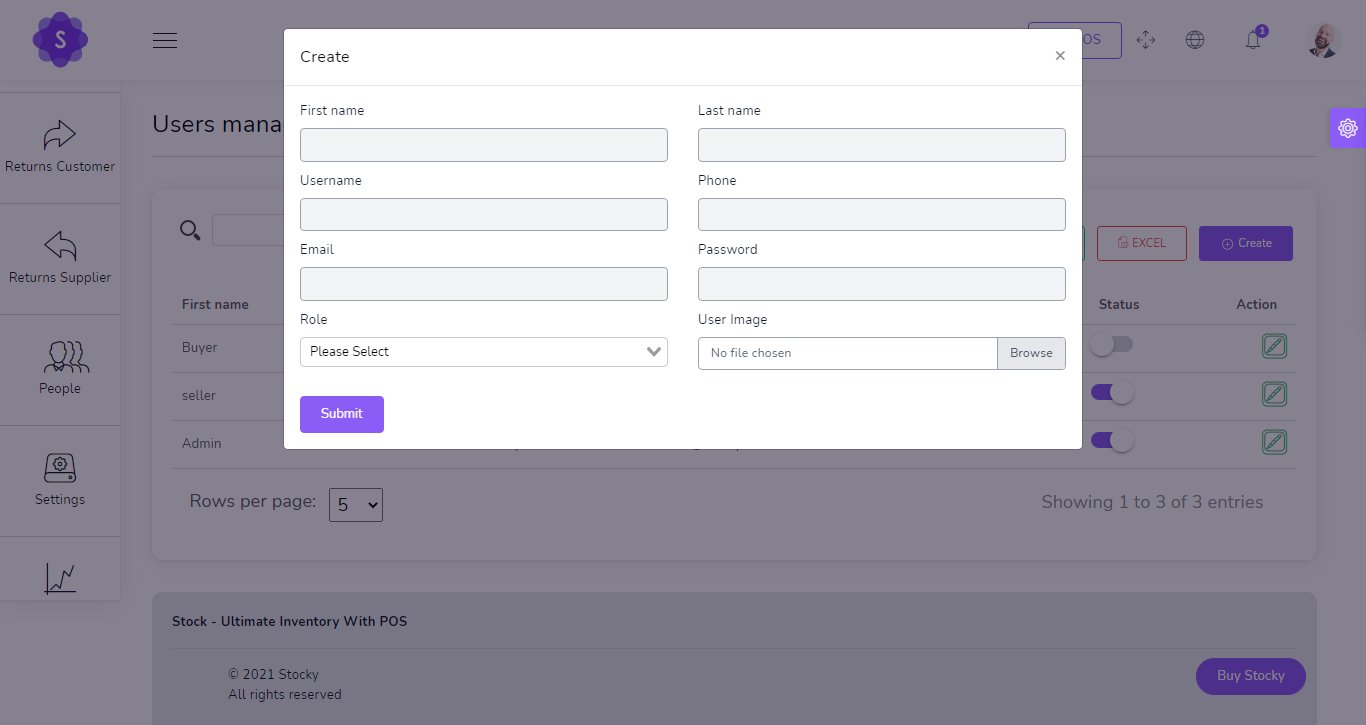
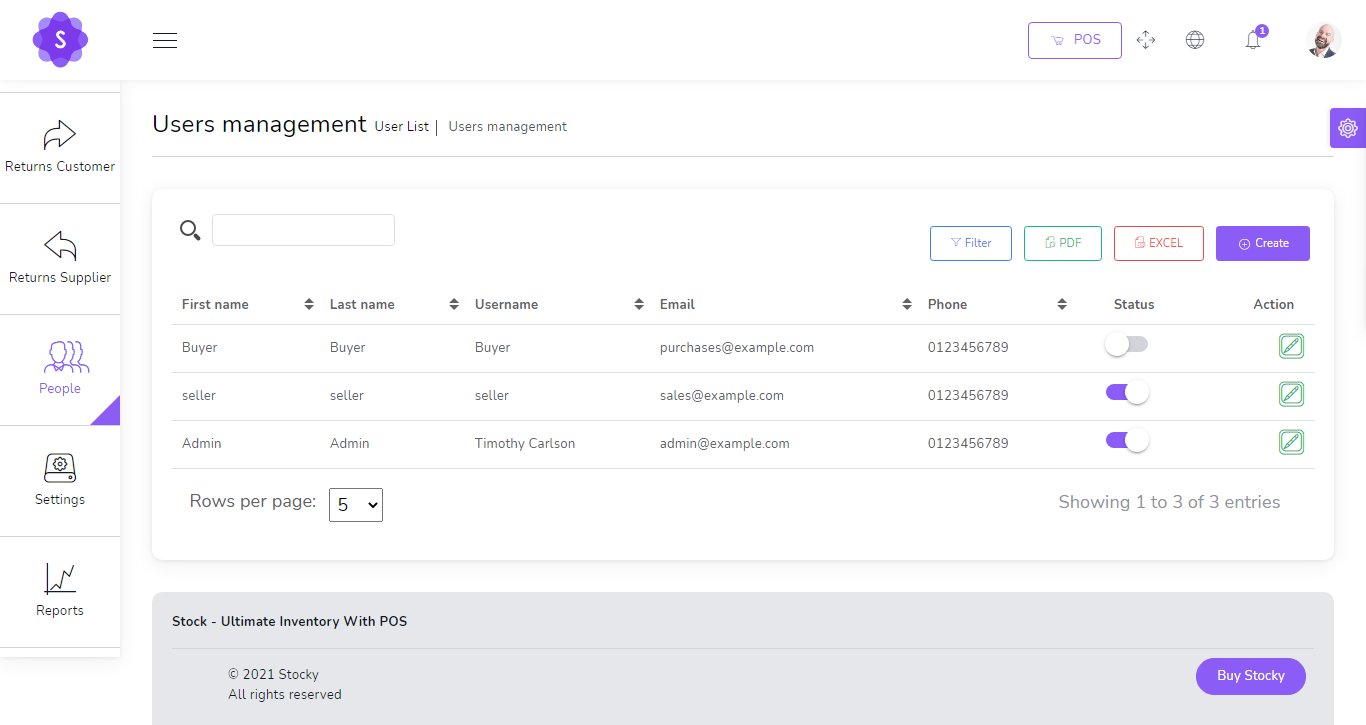
Users
to create a new User it's very easy
- First Name
(required) - Last Name
(required) - Username
(required) - Phone
(required) - Email
(required) - Password
(required) - Role
(required) - Avatar
(Optional)
You can manage User list
- Change Status User
- Edit User
- Generate User list in PDF
- Generate User list in Excel
- Search User
- Filter User by username , phone , Email , Status
📁 Project List
This section displays an overview of all the projects in the system, including their current status.

- ✅ Completed: Number of finished projects.
- ⏸️ Not Started: Projects created but not yet started.
- 🔄 In Progress: Projects that are currently active.
- ❌ Cancelled: Projects that have been cancelled.
Additional Features:
- 🔍 Search projects by title, customer, or company.
- 📤 Export project list to PDF or Excel.
- ➕ Click Create to add a new project.
📝 Create Project
This form allows users to register a new project with complete details.

- Title*: Enter the name of the project.
- Start Date*: Set when the project begins.
- Finish Date*: Set when the project should be completed.
- Customer*: Choose the client or project owner.
- Company*: Select the company responsible for the project.
- Assigned Employees: Assign a team to work on the project.
- Status*: Set the current status of the project.
- Details: Add any relevant notes or information.
🗂️ Task List
This section provides an overview of all tasks associated with various projects.

- ✅ Completed: Tasks that have been marked as done.
- ⏸️ Not Started: Tasks that are created but not yet started.
- 🔄 In Progress: Tasks currently being worked on.
- ❌ Cancelled: Tasks that were canceled or no longer required.
Other Features:
- 🔍 Search tasks by title, project, or company.
- 📤 Export task list to PDF or Excel format.
- ➕ Use the Create button to add a new task.
📝 Create Task
This form allows you to create a new task and assign it to a project and team.

- Title*: Task title or short description.
- Start Date*: The date work on the task should begin.
- Finish Date*: The date the task is expected to be completed.
- Project*: Select the related project this task belongs to.
- Company*: Company responsible for the task execution.
- Assigned Employees: Select which team members will perform this task.
- Status*: Choose the current state of the task (e.g. Not Started, In Progress).
- Details: Additional information or notes regarding the task.
🔁 Subscriptions List
This page allows you to view and manage all recurring subscriptions.

The table includes the following columns:
- Client: The customer subscribed to the product.
- Product: The item or service being billed.
- Warehouse: The stock location assigned for the product.
- Billing Cycle: Frequency of billing (e.g., monthly, weekly).
- Total Cycle: Number of cycles set (e.g., 12 monthly).
- Remaining Cycles: Number of invoices left to generate.
- Next Billing Date: When the next invoice is scheduled.
- Status: Active/Inactive toggle.
- Action: View, Edit, or Delete subscription.
📝 Create Subscription
This form allows you to set up a recurring product or service subscription for a customer.

- Date*: The subscription start date.
- Client*: Select the customer subscribing to the product.
- Warehouse*: Assign a stock location.
- Product*: The subscribed product or service.
- Total Cycles*: Total number of times the customer will be billed (e.g., 12 Months).
- Billing Cycle*: Choose how often the invoice is created (Monthly, Weekly, etc.).
- Price Per Cycle*: The total cost for one cycle.
- Quantity*: Number of units included per billing.
- Price Per Unit*: Individual item price, used for detailed breakdowns.
- Next Billing Date*: Date when the first (or next) invoice will be created.
- Status*: Set as Active or Inactive.
⏱️ Subscription Automation
Once a subscription is created, the system uses scheduled commands (cron jobs) to handle billing automatically.
1️⃣ Generate Invoices Automatically
php artisan subscriptions:generate-invoicesThis command will automatically create a new sale (invoice) for each active subscription based on its billing cycle (daily, weekly, monthly, yearly).
2️⃣ Send SMS Reminders
php artisan subscriptions:send-sms-remindersThis command sends reminder messages to clients for upcoming or due payments via SMS.
📌 Make sure to schedule these commands in Your Cron Job in your Cpanel to run daily or as needed.
System Settings
Payment Settings
SMS Settings

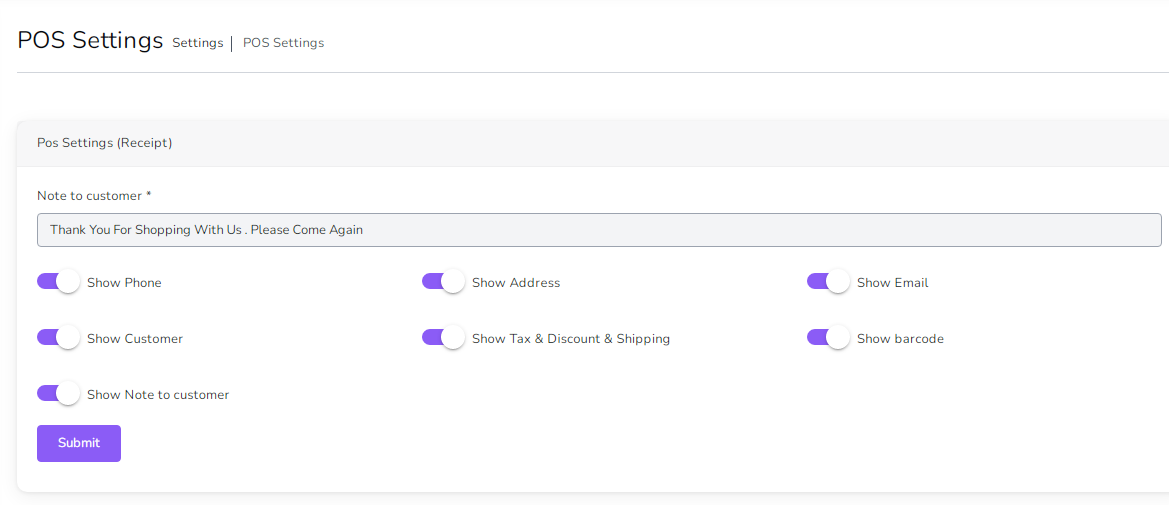
POS Settings
Mail Settings
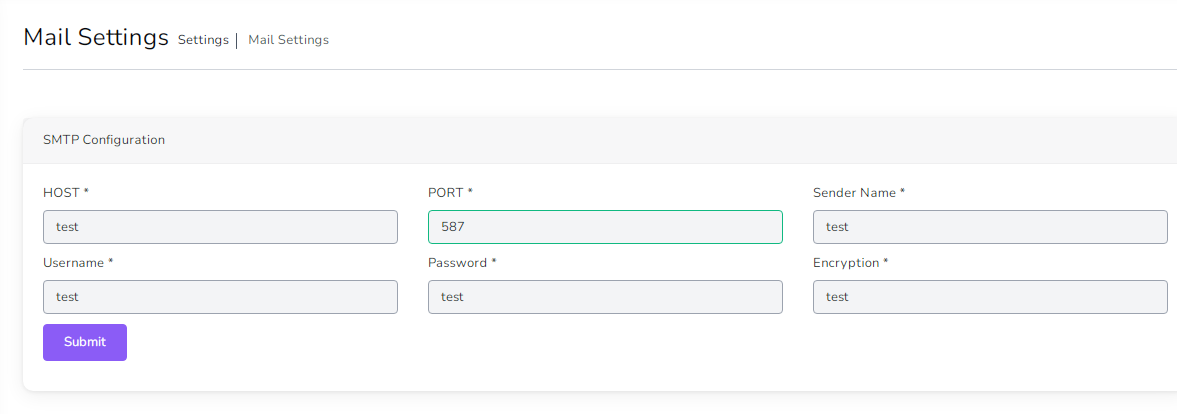
- Host : Host smtp mail server
- Port : 25 or 587 or 465 or 2525)
- Sender Name : From Name
- username : your username smtp mail server
- password : your password smtp mail server
- Encryption : tls or ssl
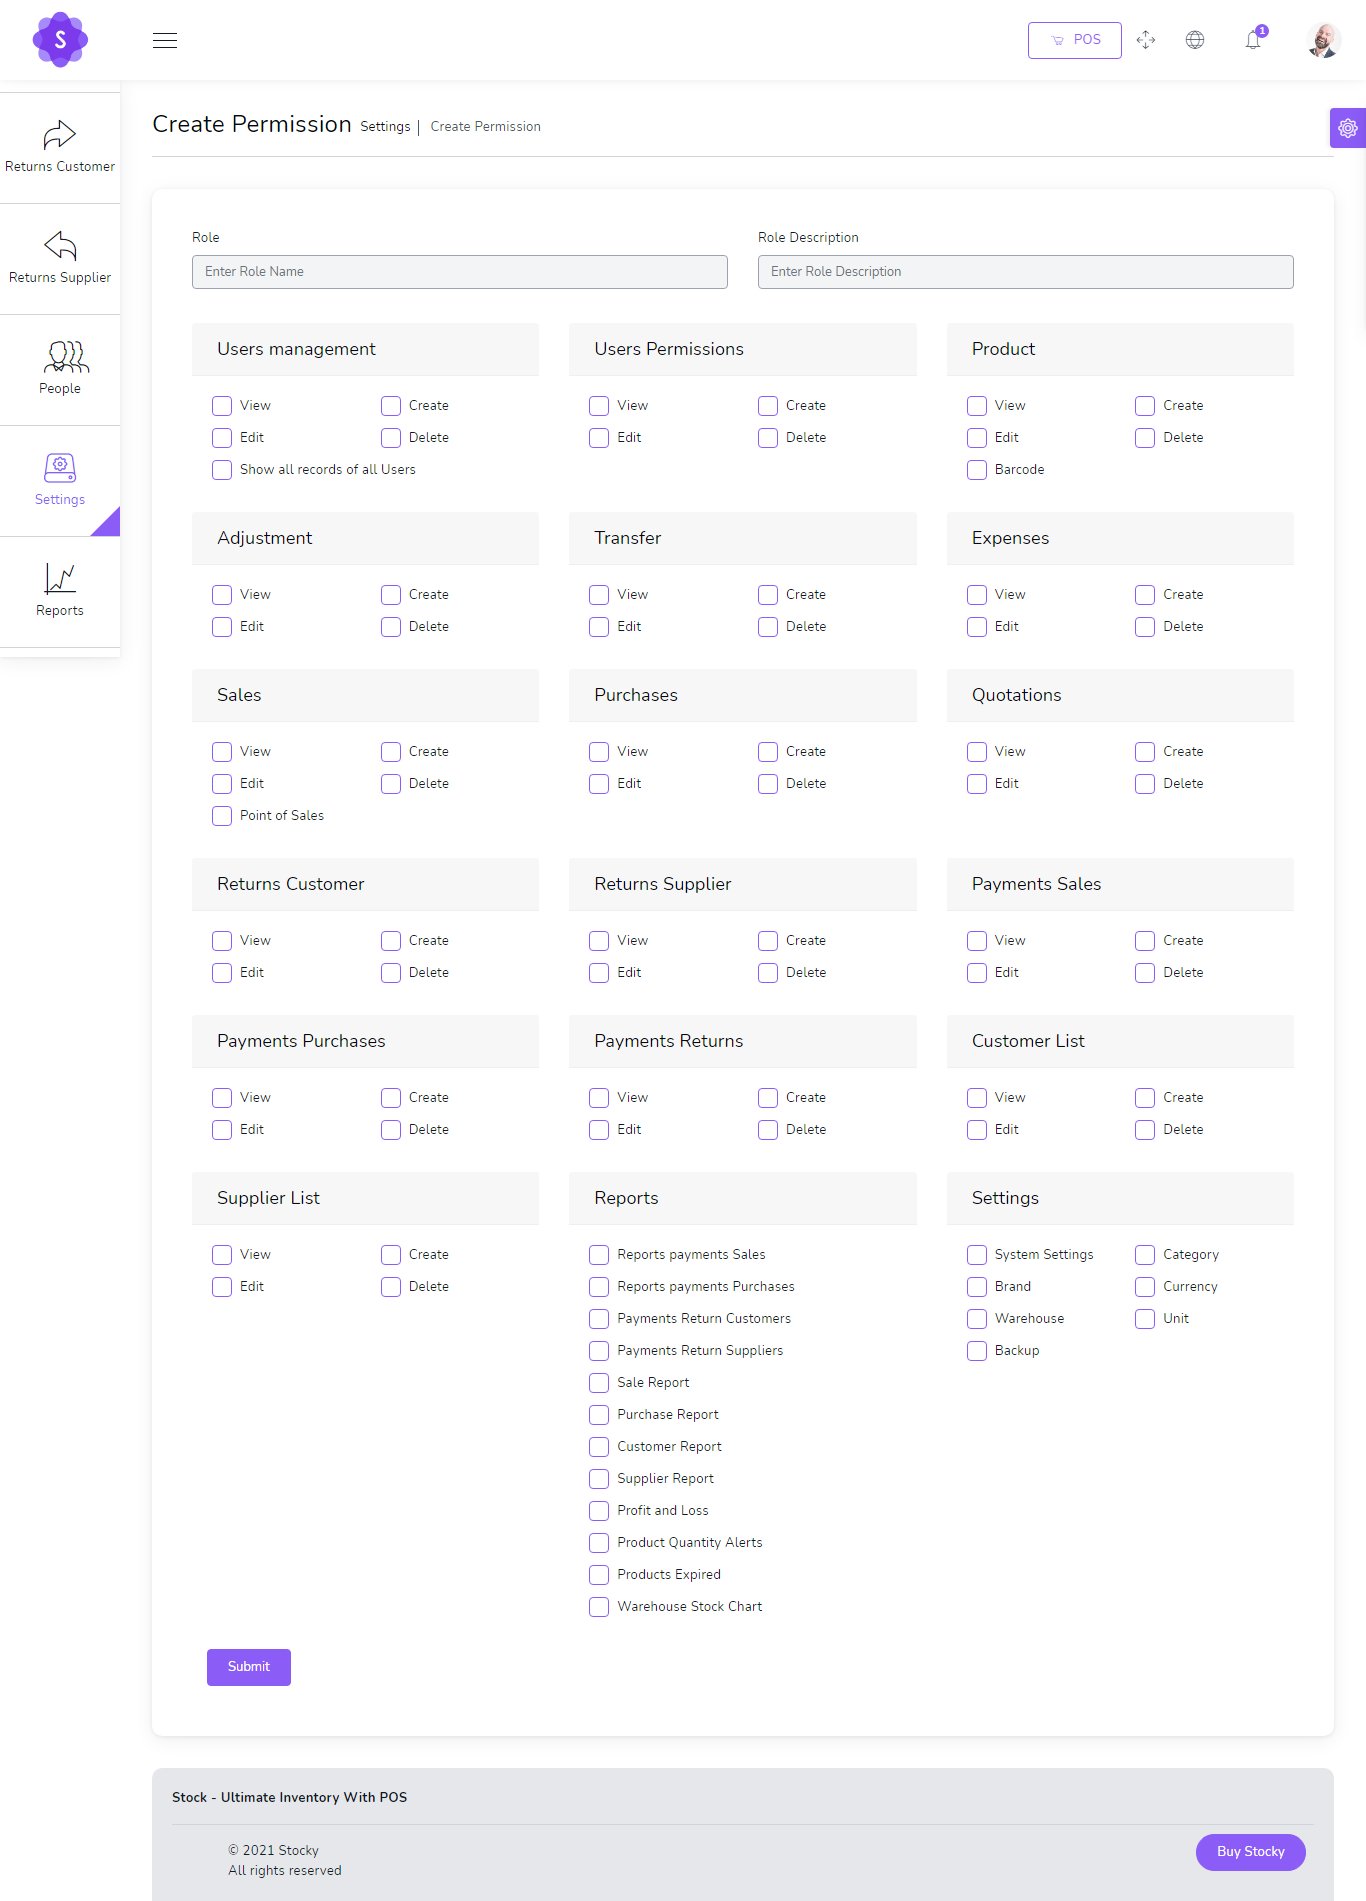
More Than 110 Permissions
if you want show all records of all users , Check Show all records of all users
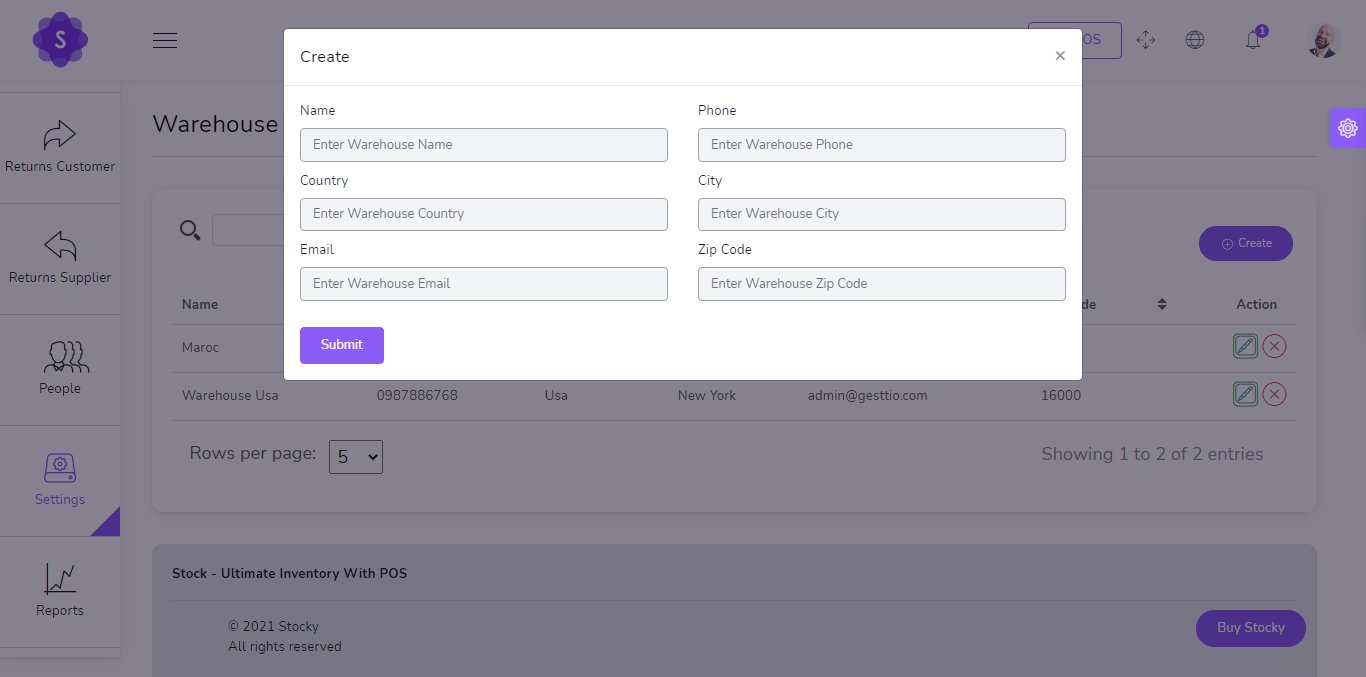
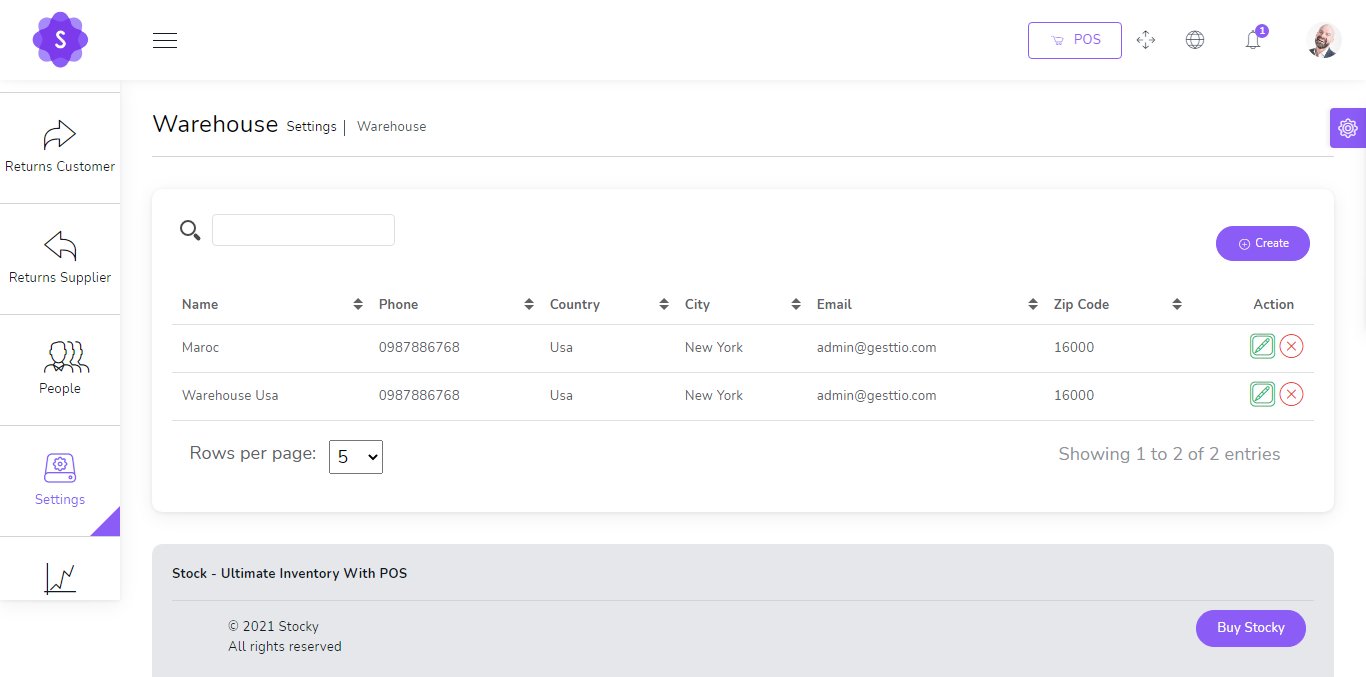
Create new Warehouse
- Name
(required) - Phone
(optional) - Country
(optional) - City
(optional) - Email
(optional) - Zip code
(optional)
You can manage Warehouse list
- Edit Warehouse
- Delete Warehouse
- Search Warehouse
You can manage Category list
- Edit Category
- Delete Category
- Search Category
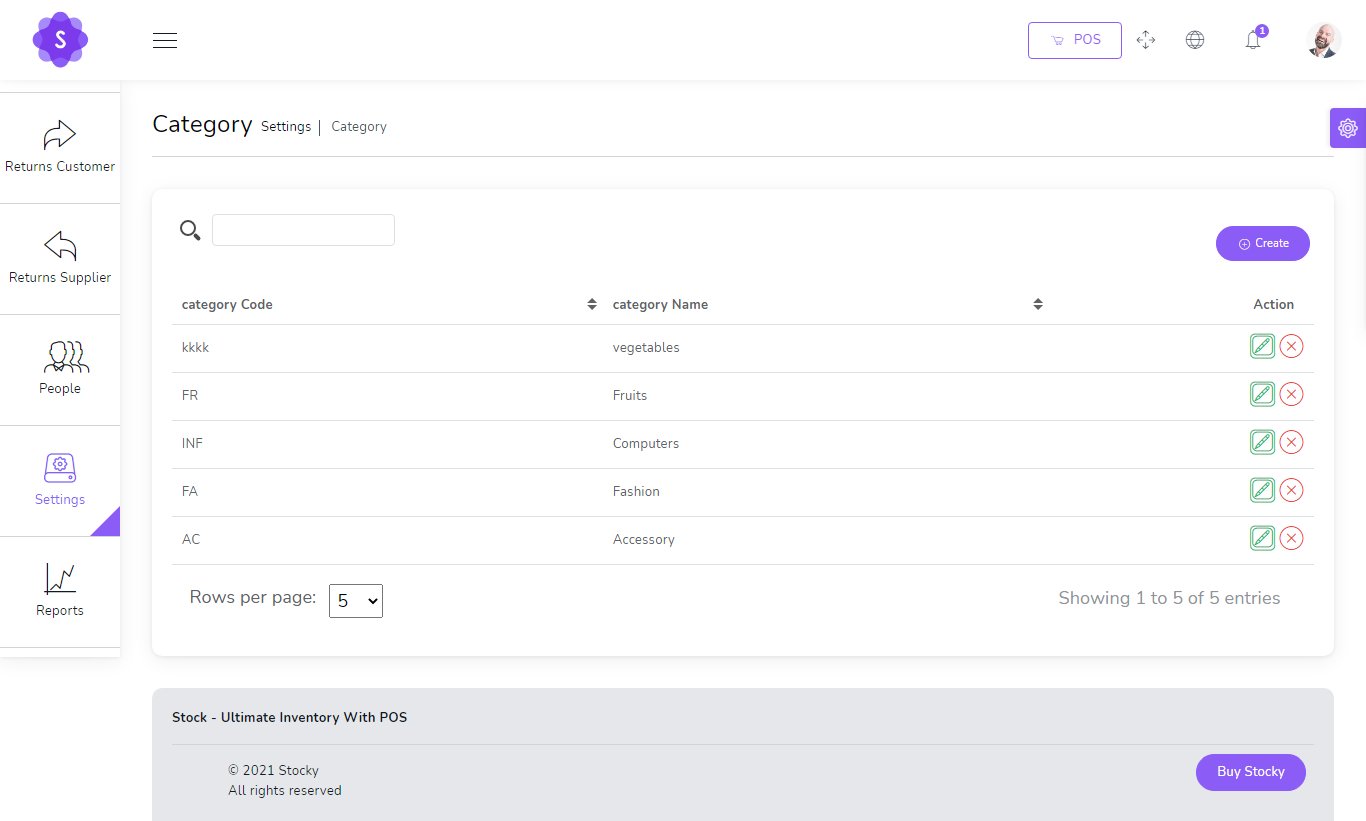
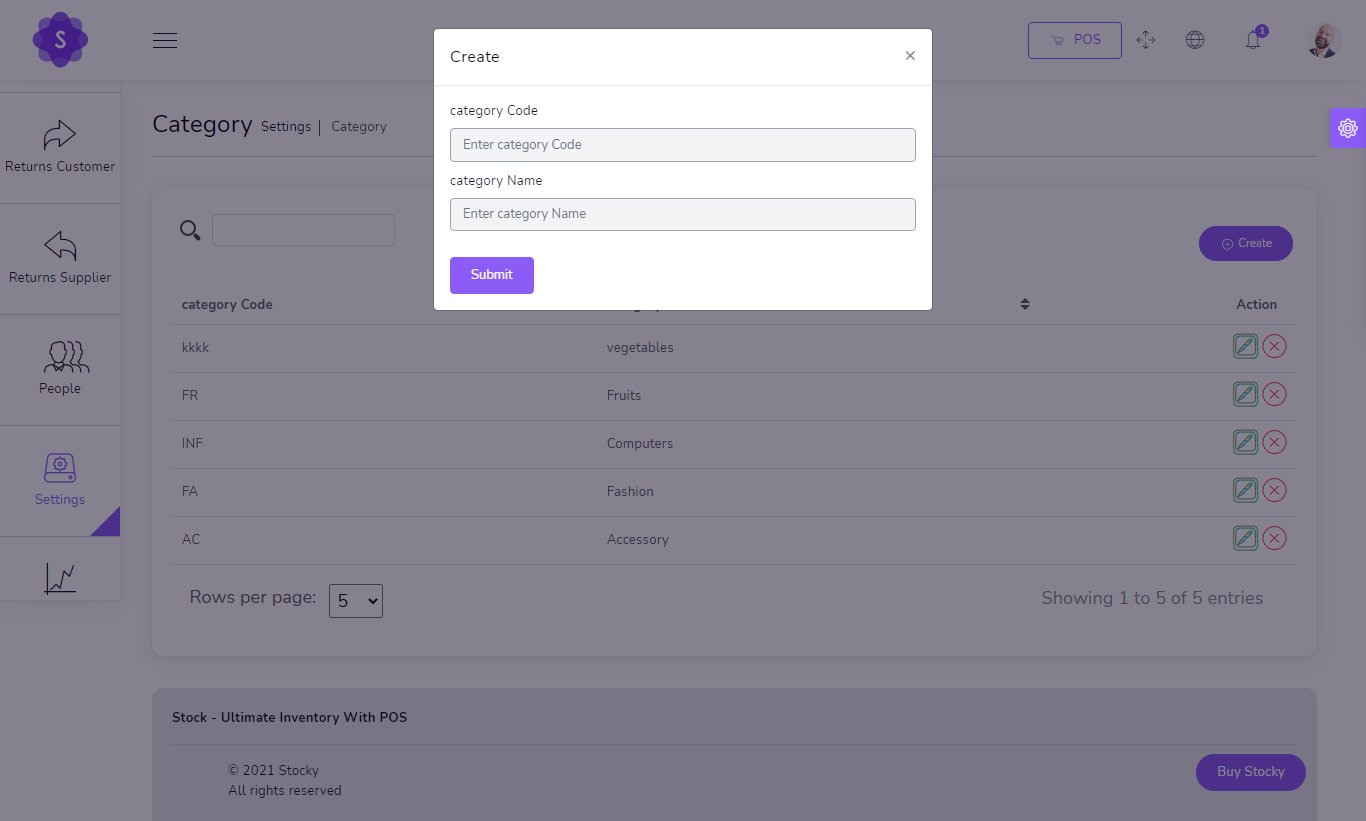
Create new Category
- Name
(required) - Code
(required)
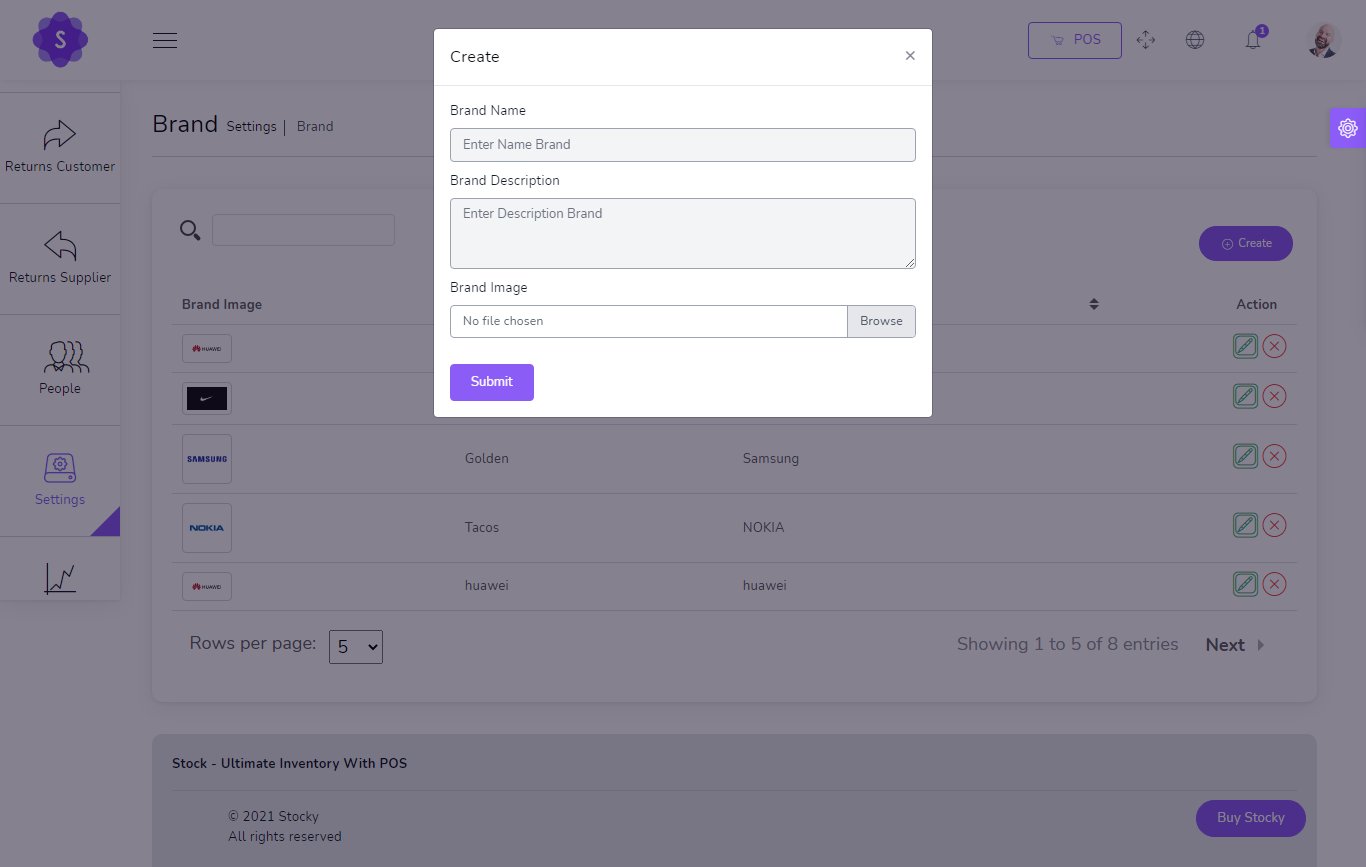
You can manage Brand list
- Edit Brand
- Delete Brand
- Search Brand
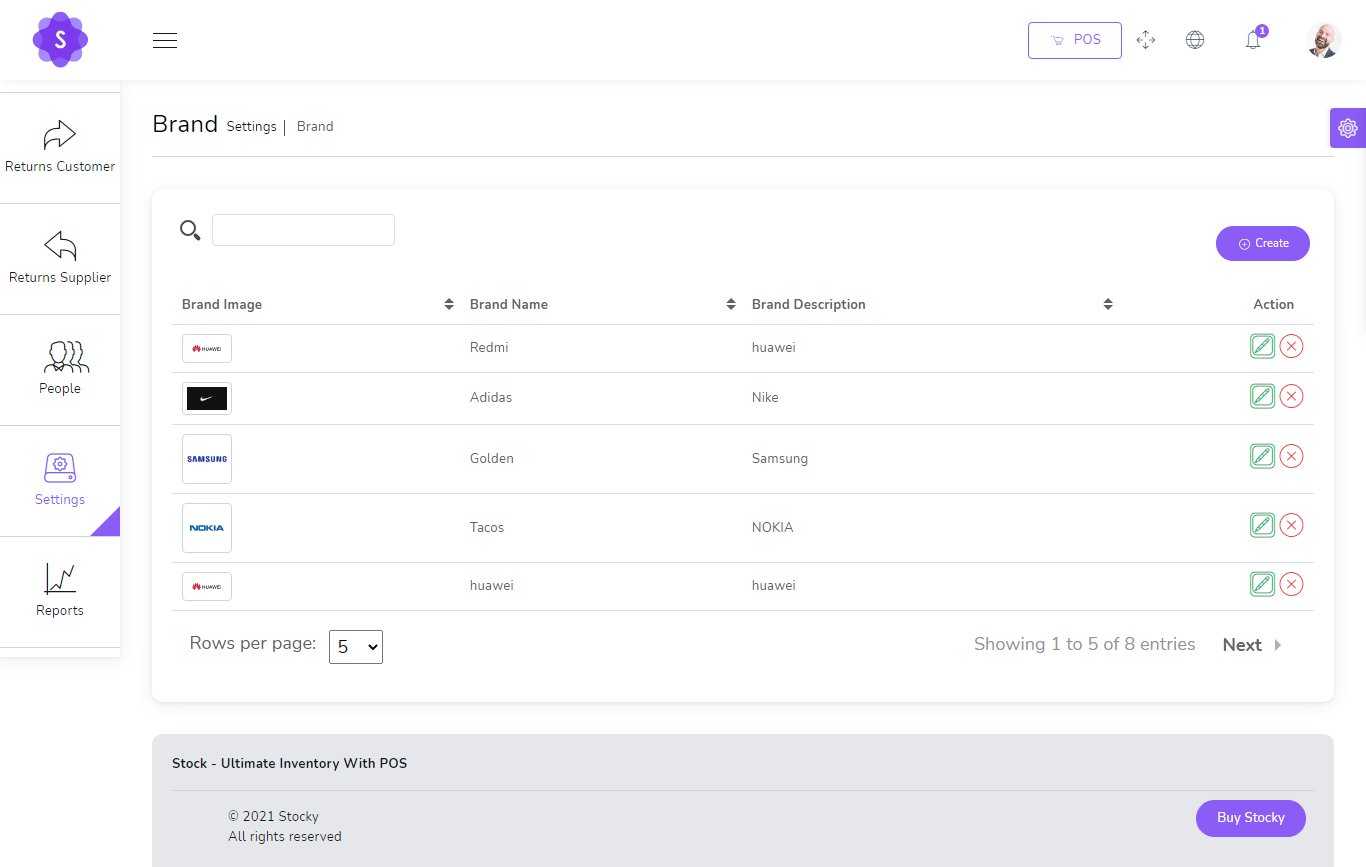
Create new Brand
- Name
(required) - Description
(optional) - Image
(optional)
You can manage Currency list
- Edit Currency
- Delete Currency
- Search Currency
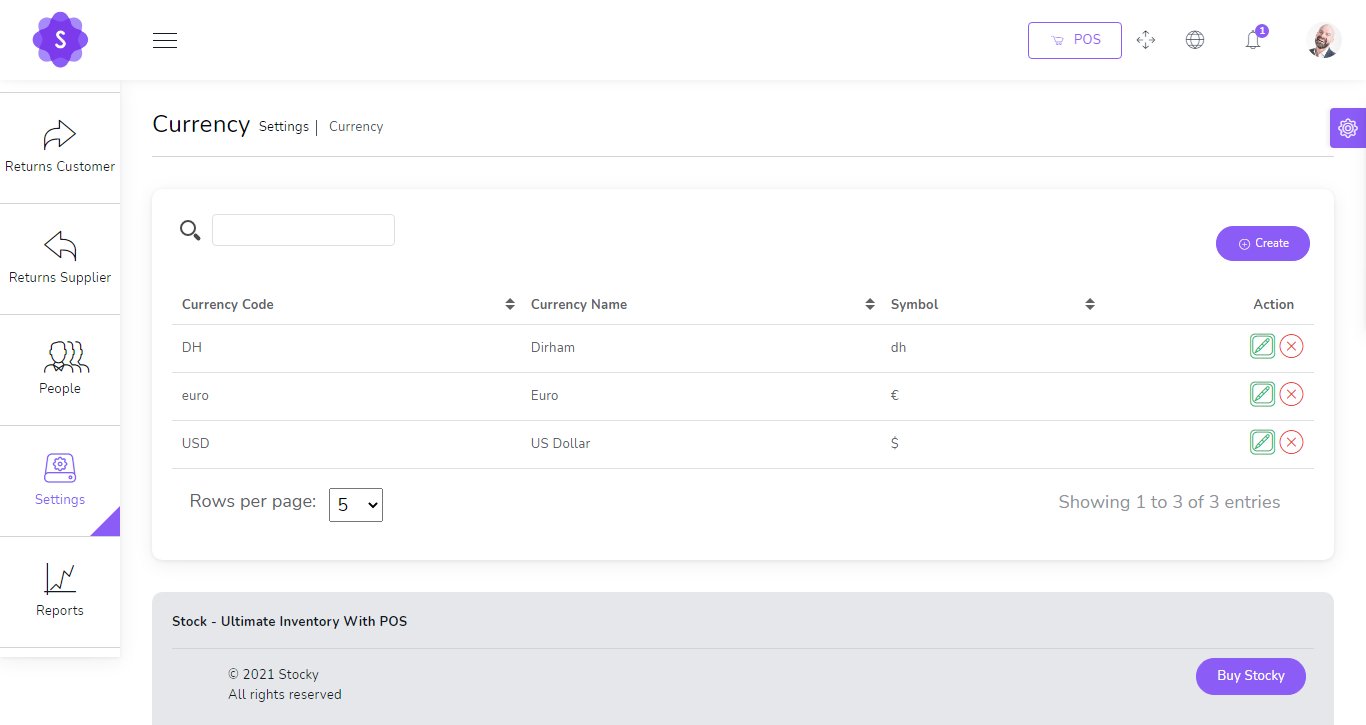
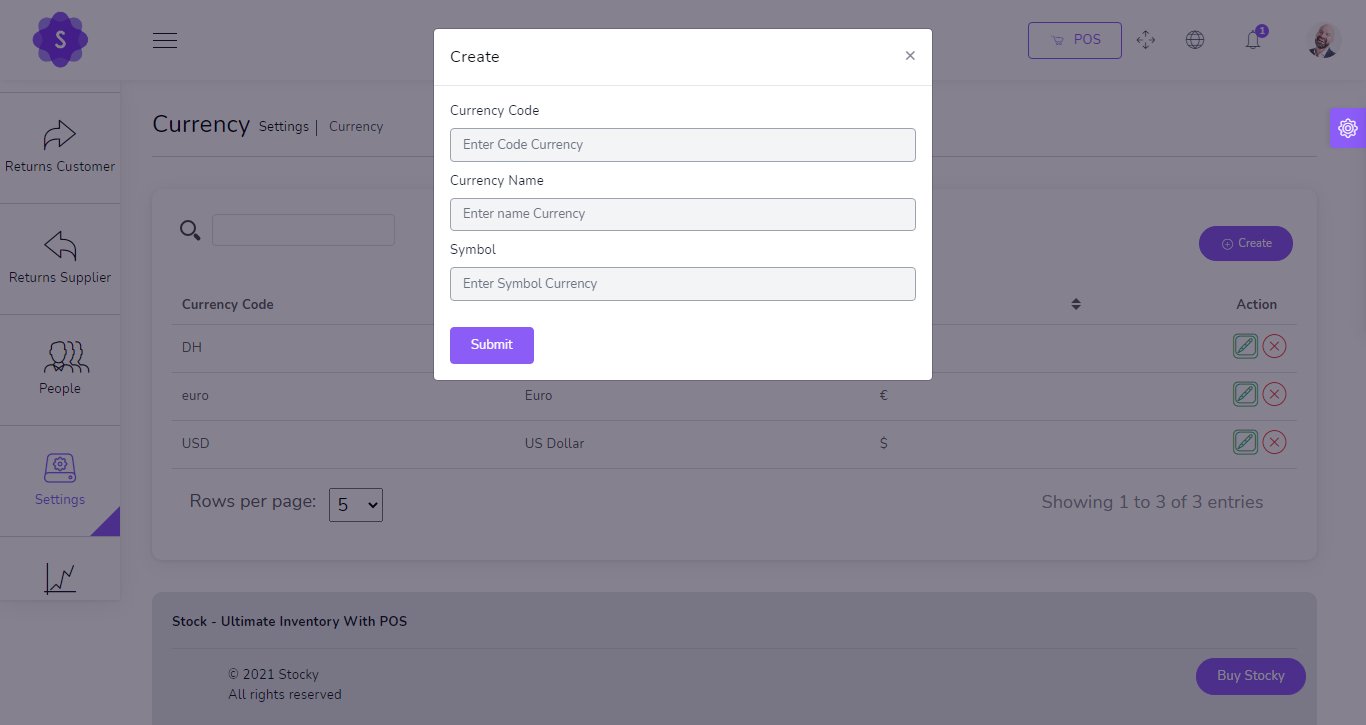
Create new Currency
No Live Exchange Just Symbol
- Code
(required) - Name
(required) - Symbol
(required)
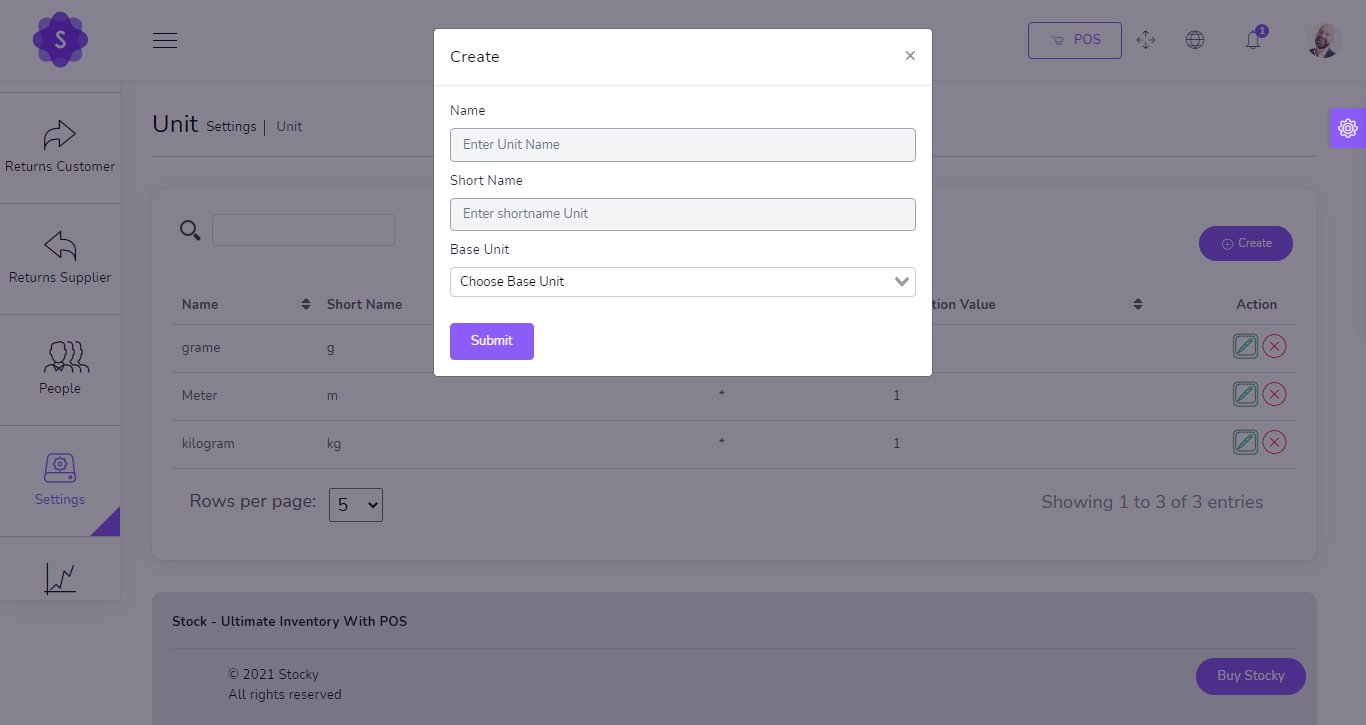
You can manage Unit list
- Edit Unit
- Delete Unit
- Search Unit
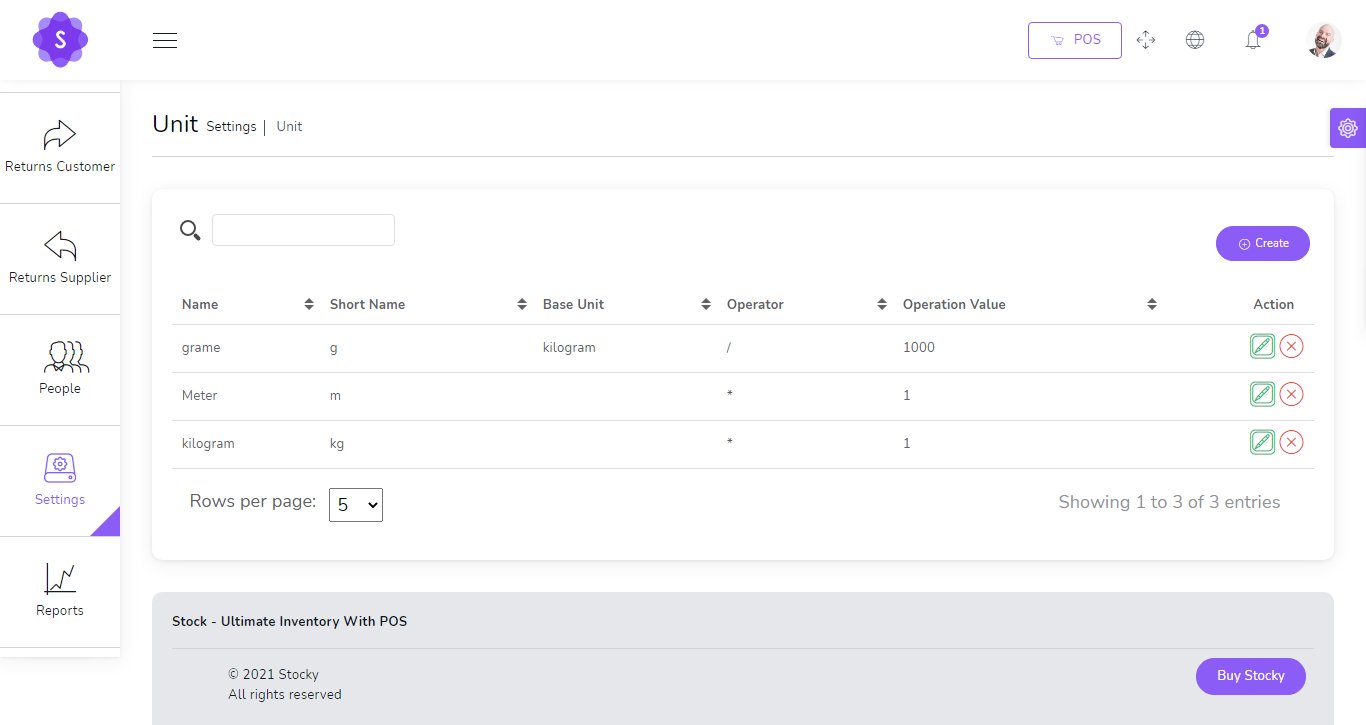
Create new Unit
- Name
(required) - Short Name
(required) - Base Unit
(optional)
Reports
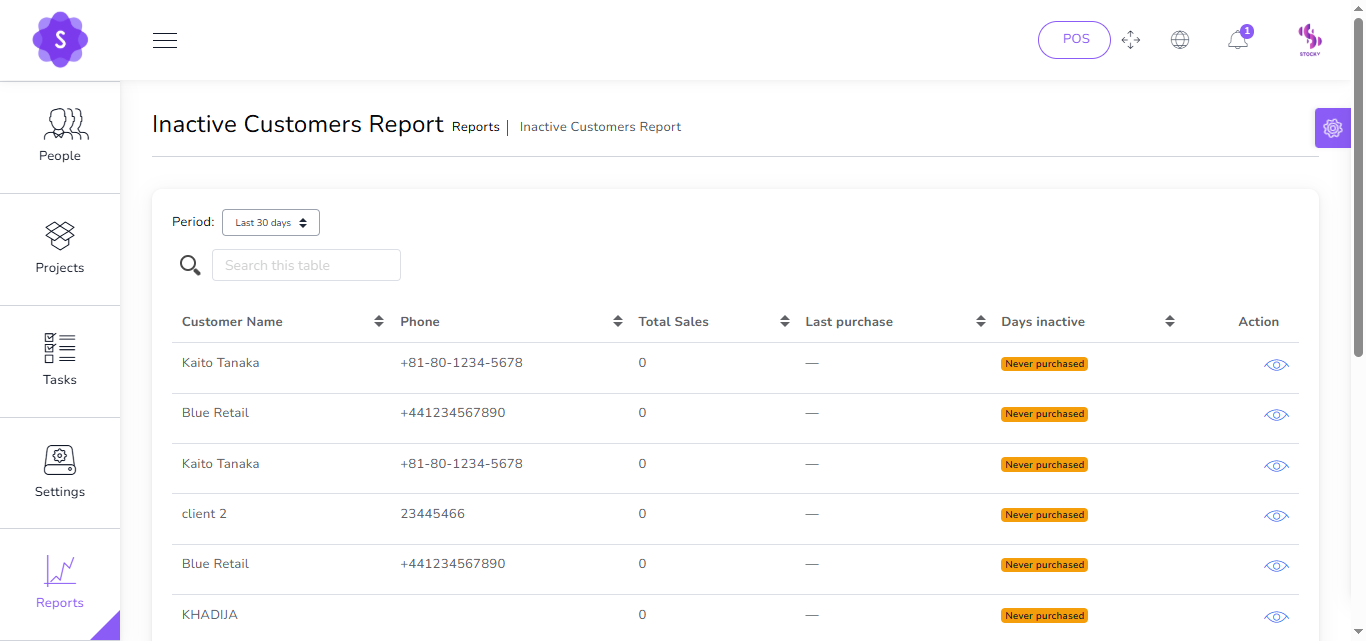
Inactive Customers Report
Identify clients with no purchases in the last 30, 60, or 90 days.
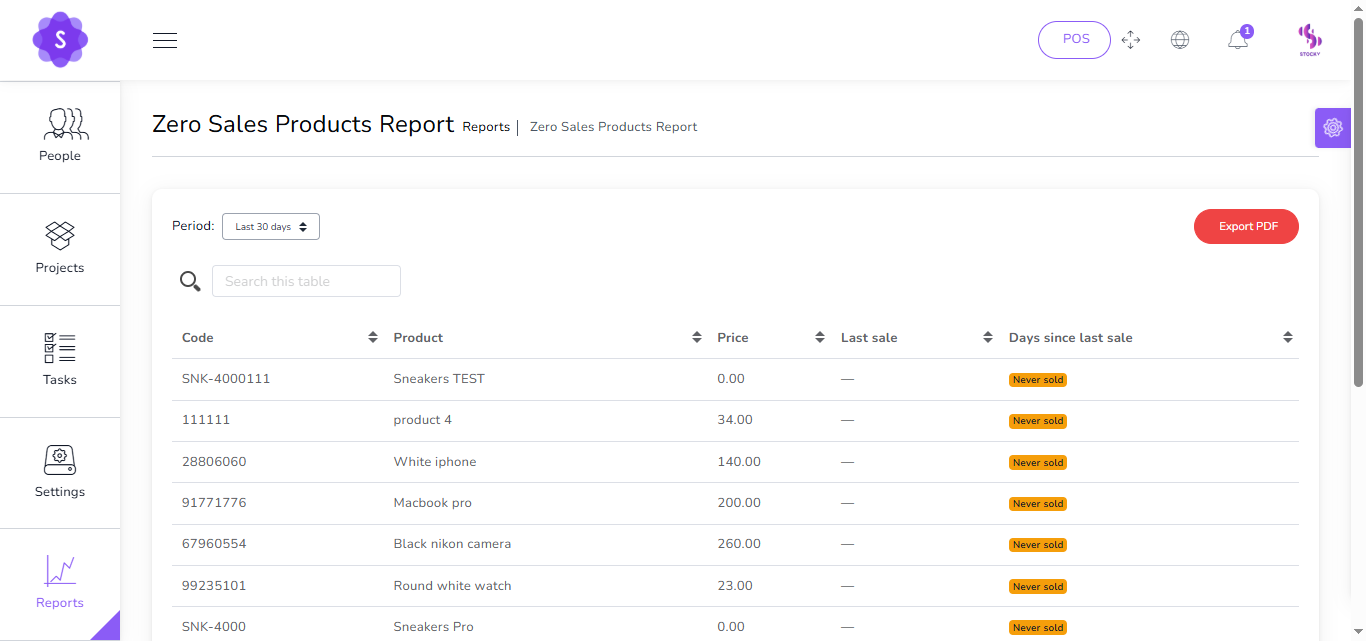
Zero Sales Products Report
Products that haven’t sold at all within a selected timeframe.
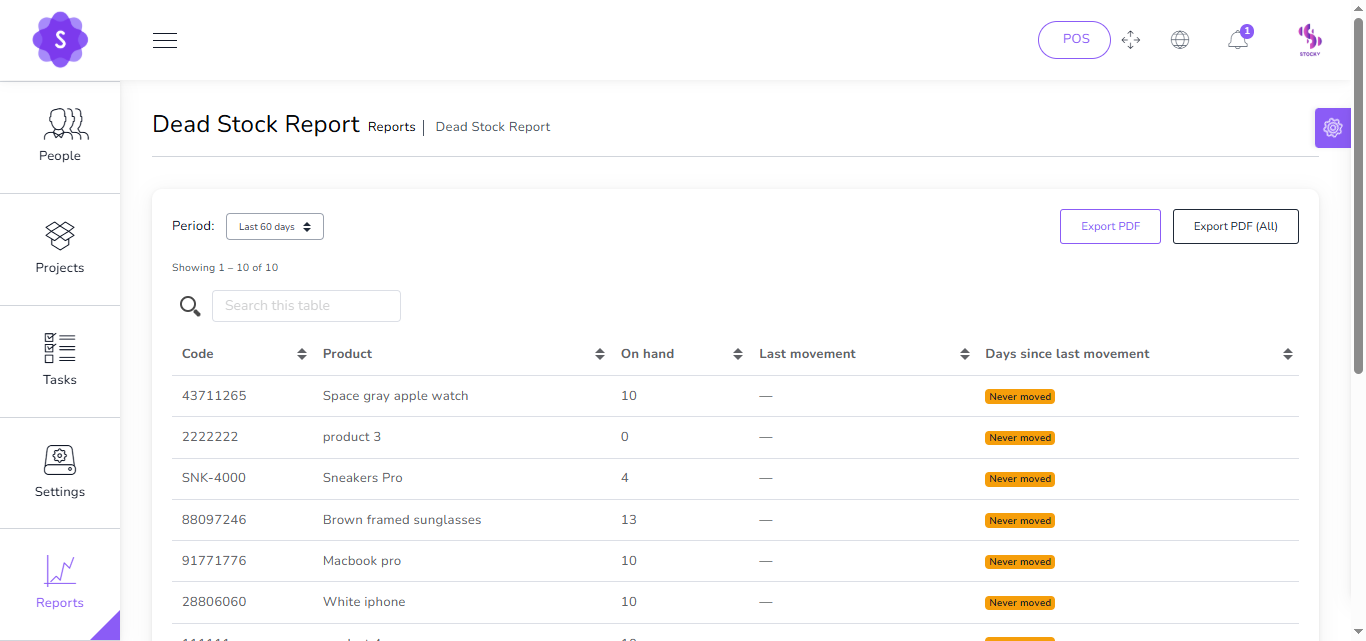
Dead Stock Report
Products with no movement or sales within a set period.
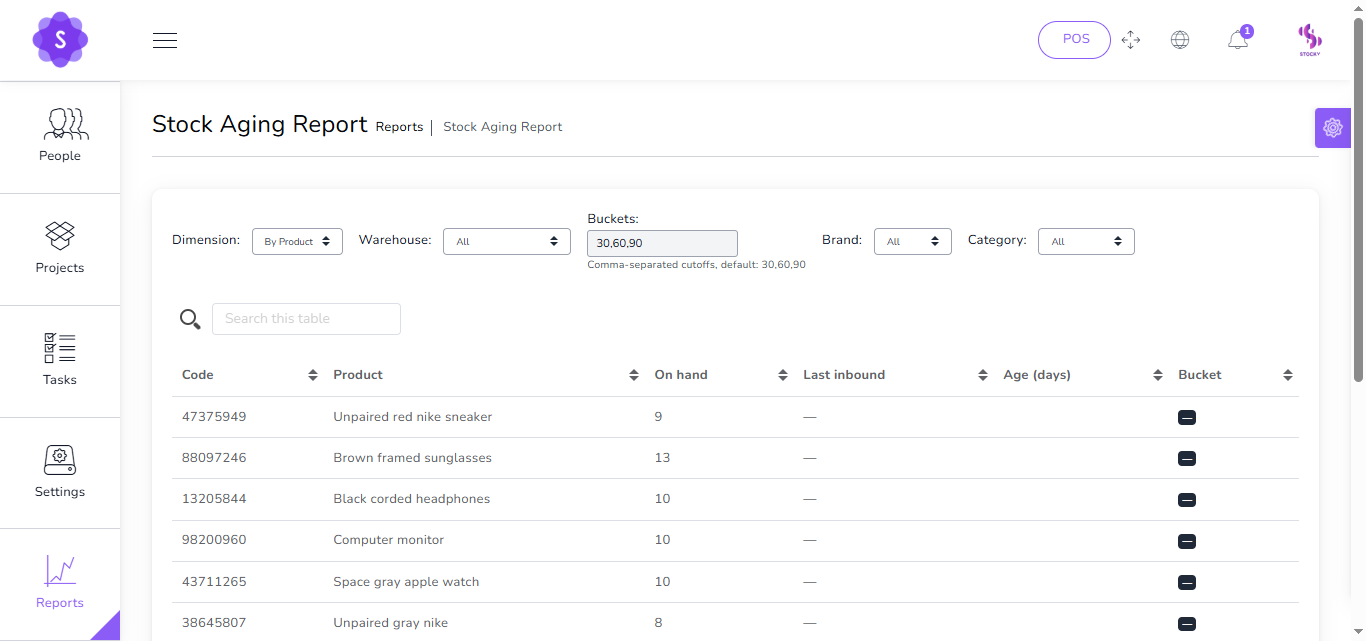
Stock Aging Report
Shows how long items have stayed in inventory, grouped by aging buckets (e.g., 0–30, 31–60, 61–90, 90+ days).
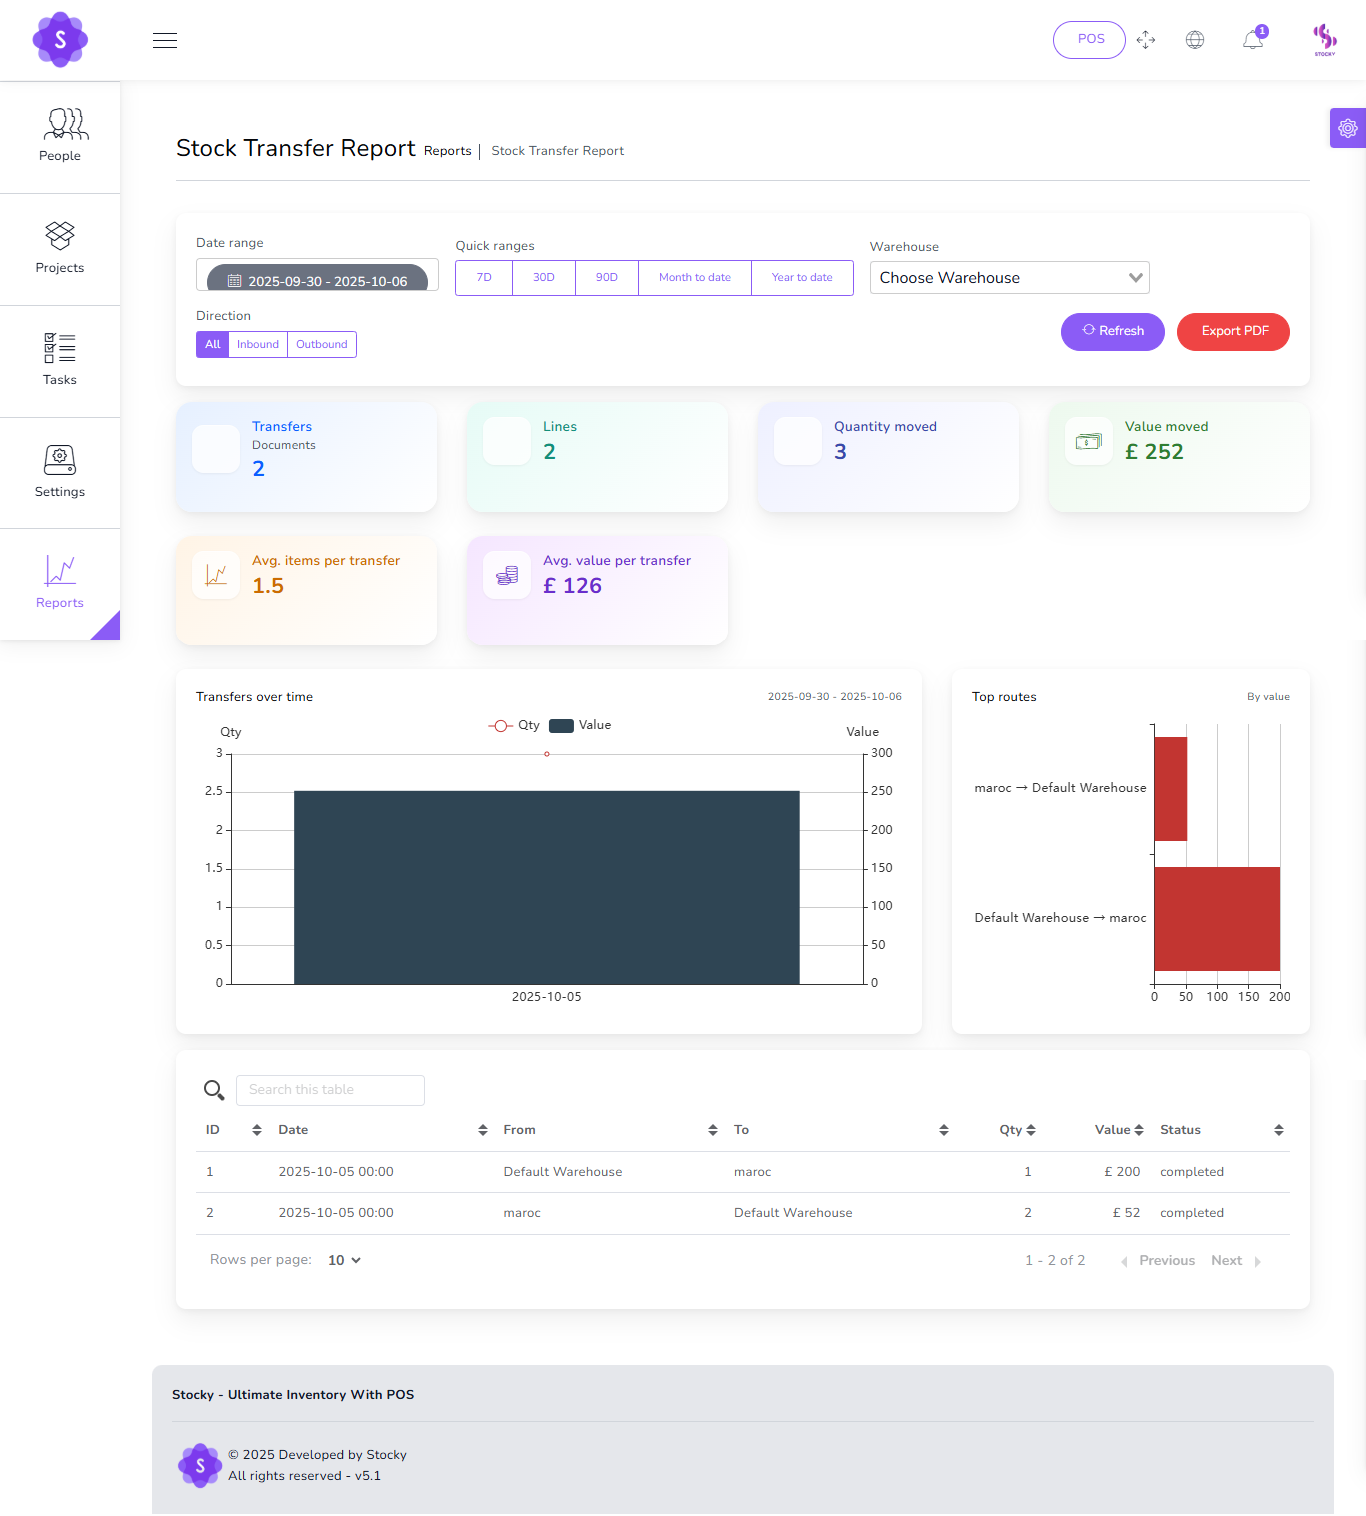
Stock Transfer Report
Analyze and visualize all stock movements between warehouses with KPIs, charts, and detailed tables.
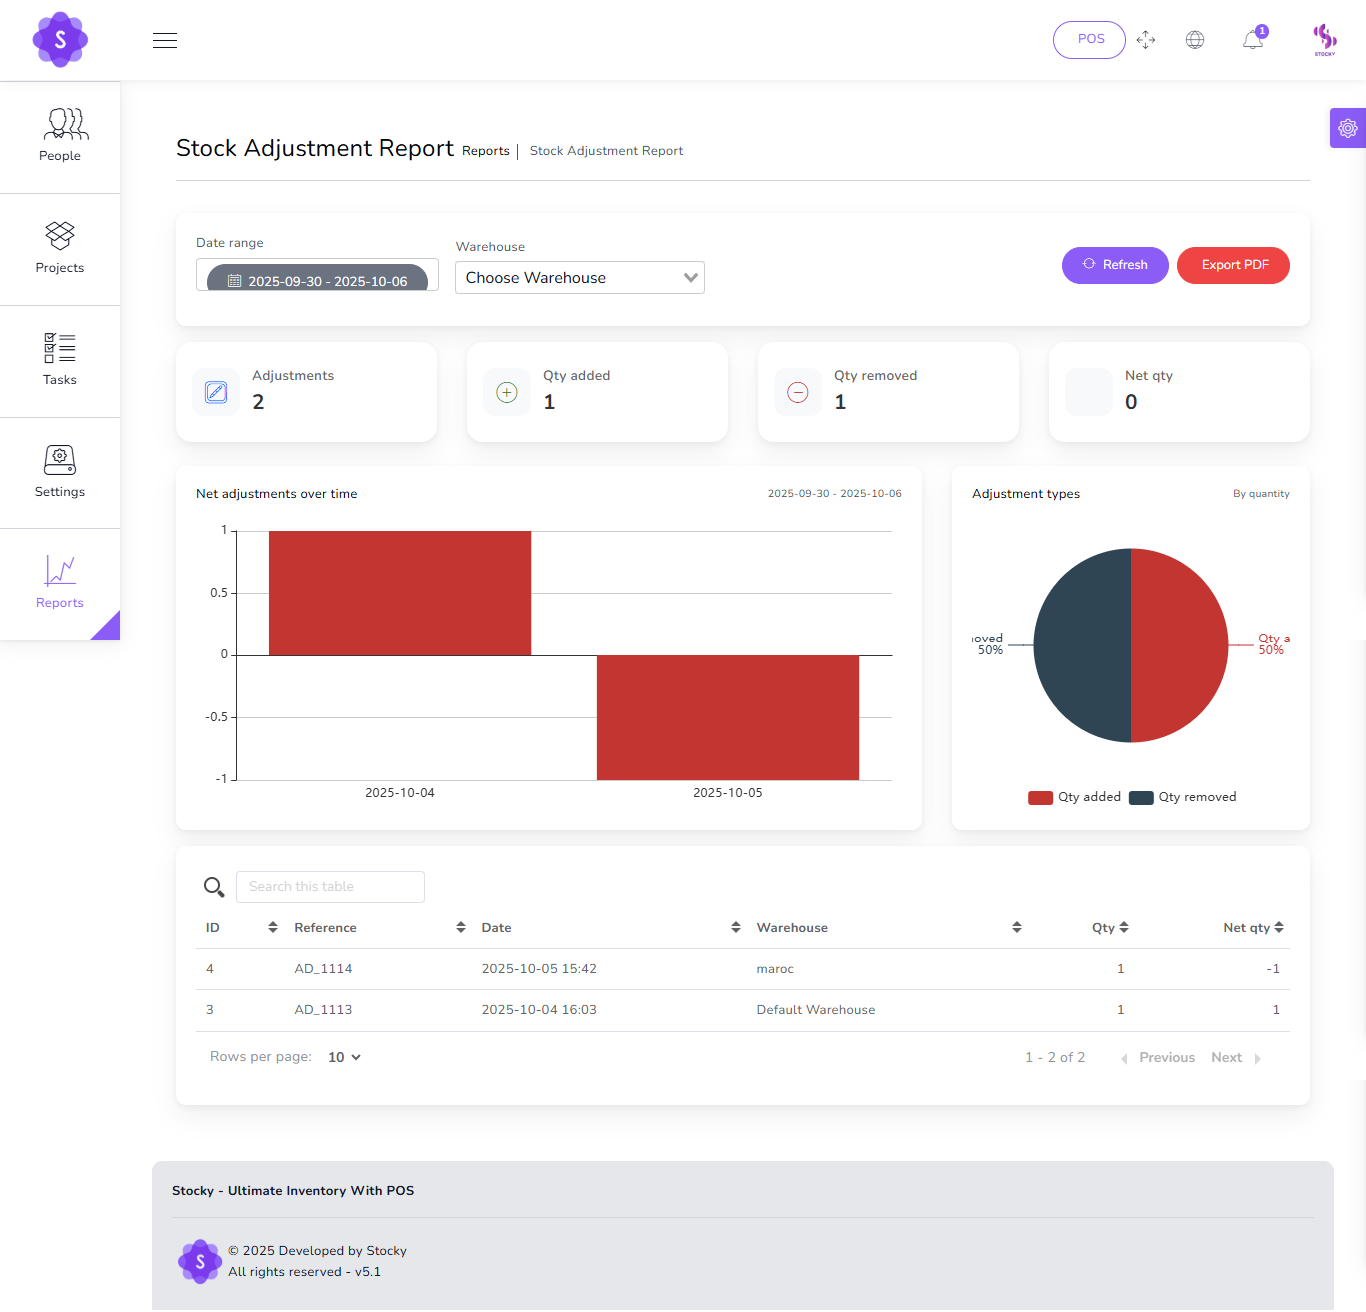
Stock Adjustment Report
Track and analyze all inventory corrections (additions and removals) with detailed KPIs, charts, and tables.
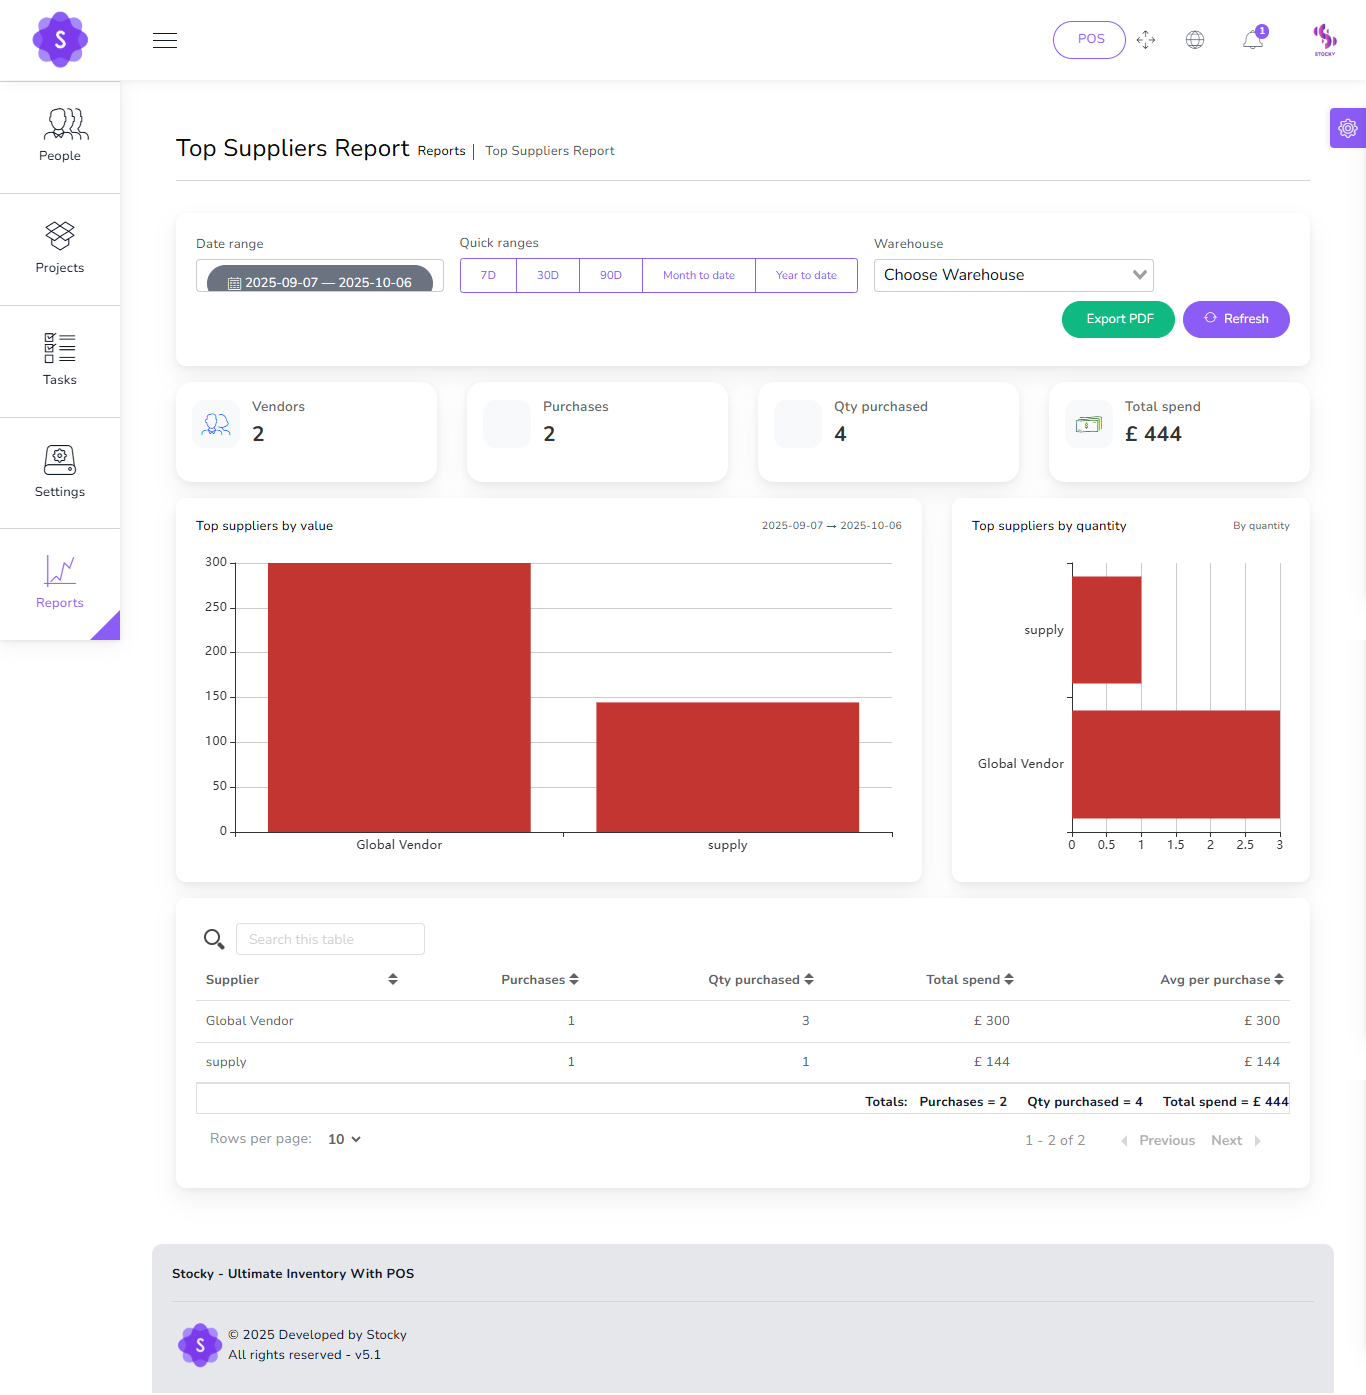
Top Suppliers Report
Purchases value & volume by vendor.
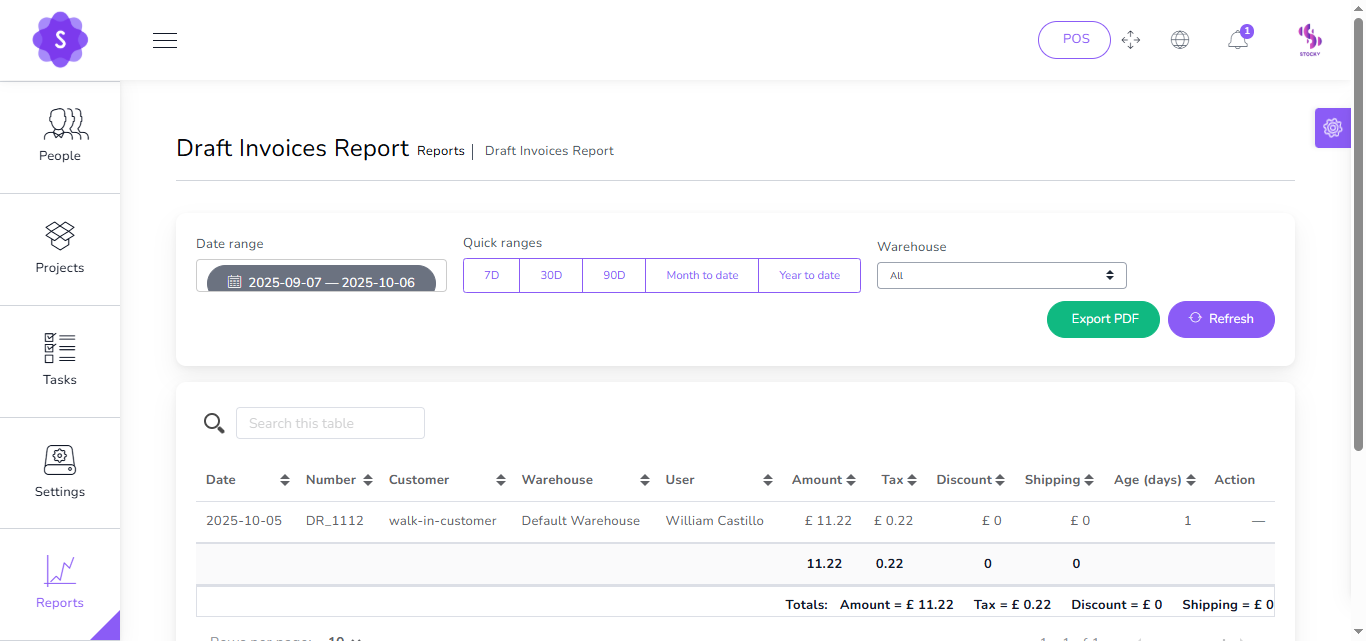
Draft Invoices Report
View invoices that were created but never finalized or sent.
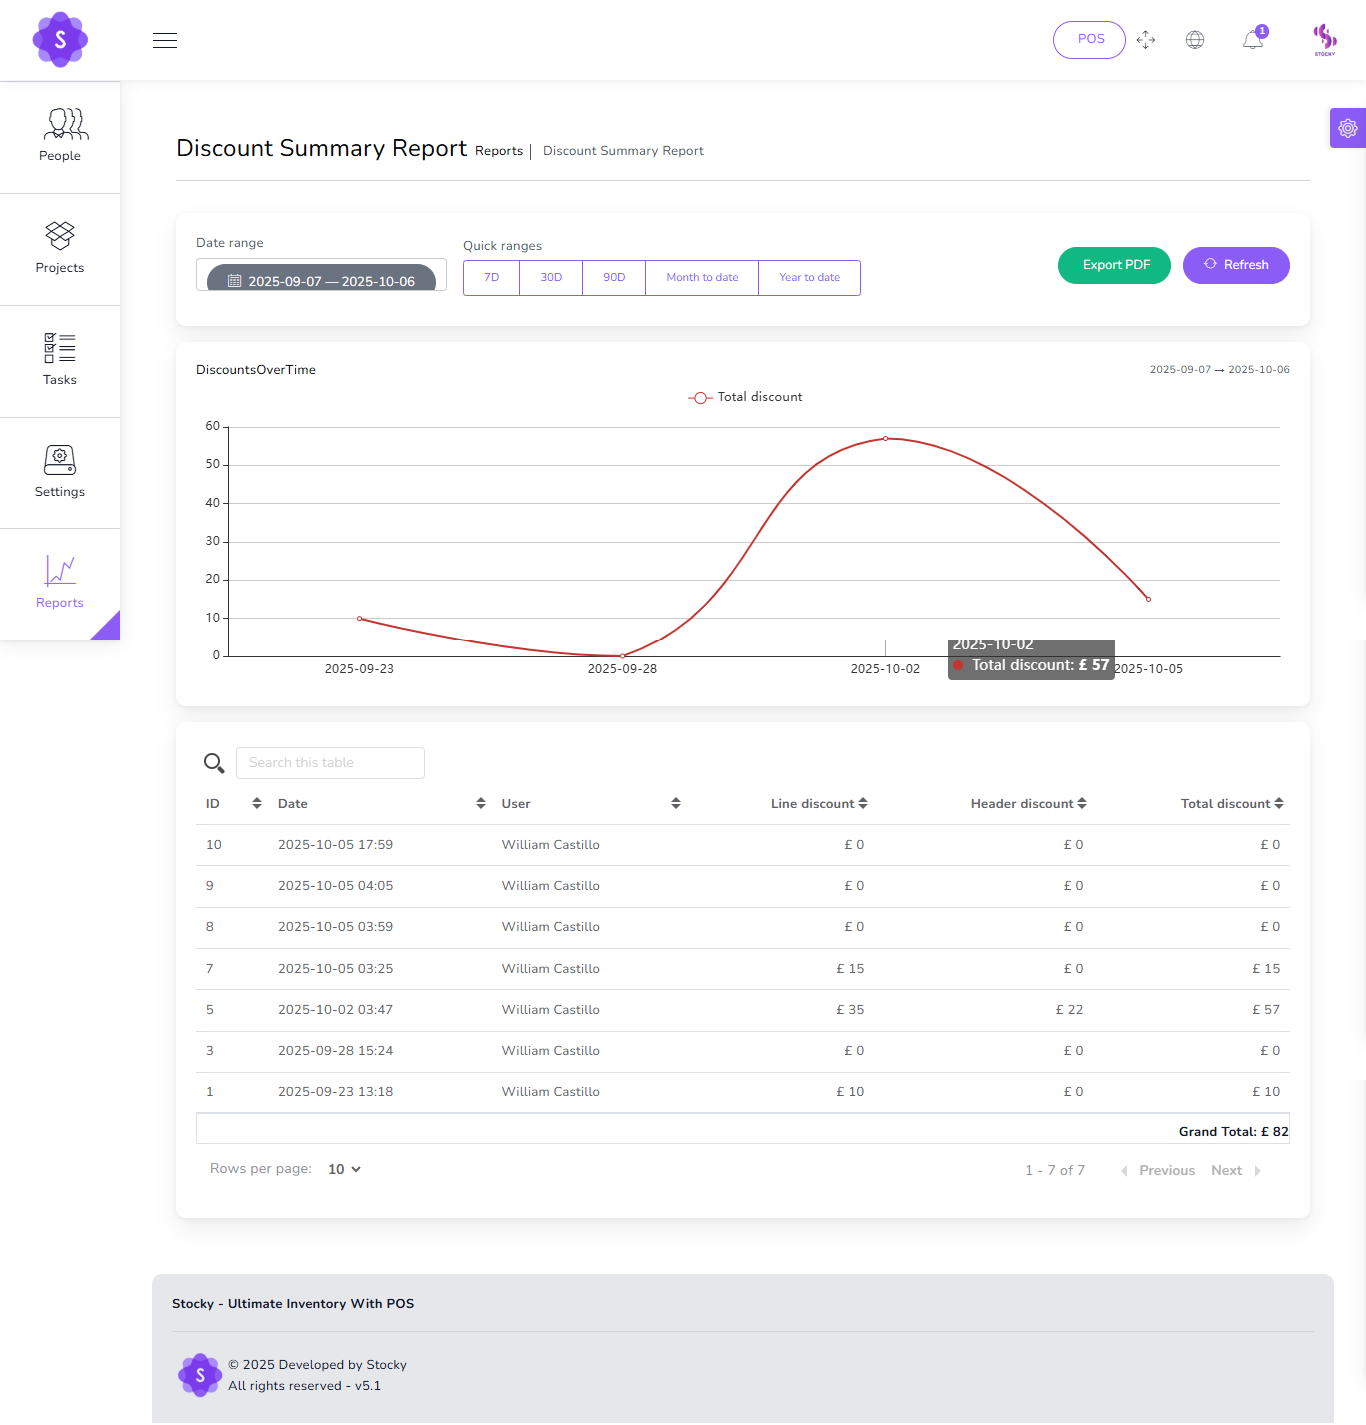
Discount Summary Report
Overview of total discount value given by date range
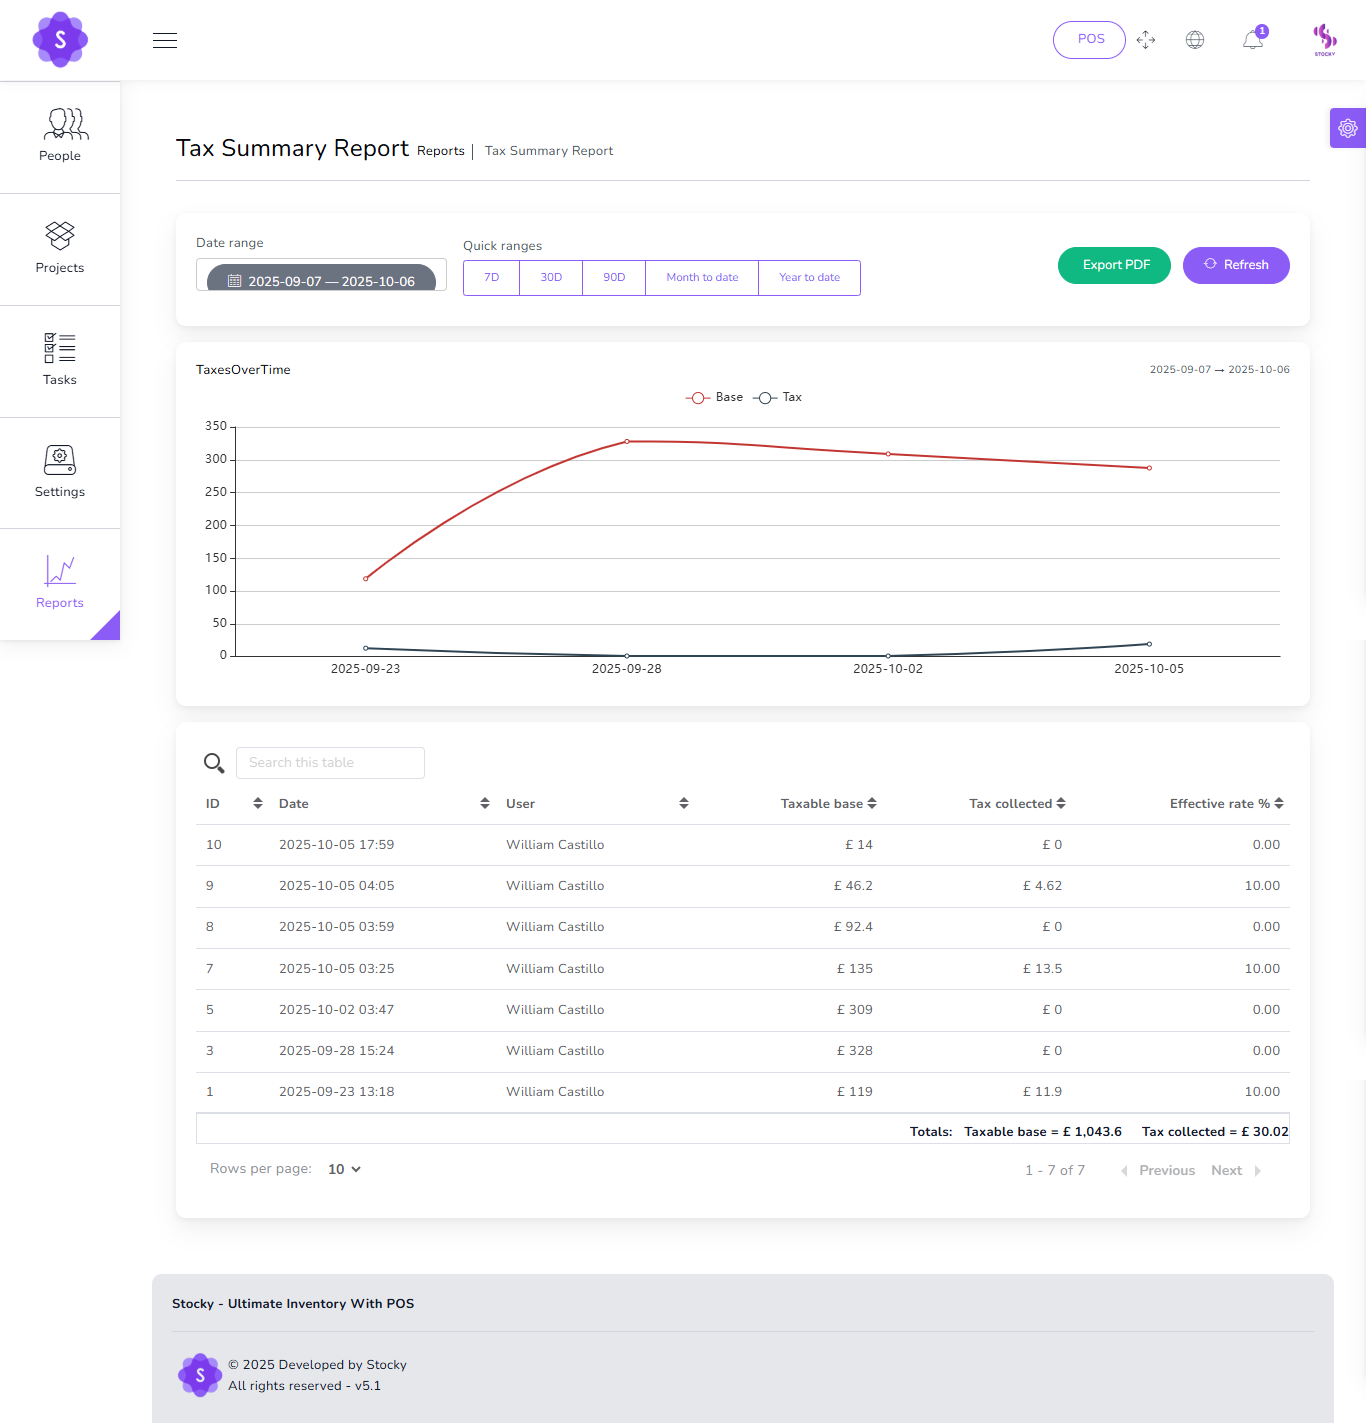
Tax Summary Report
Overview of total taxable base and tax collected using the date range picker.
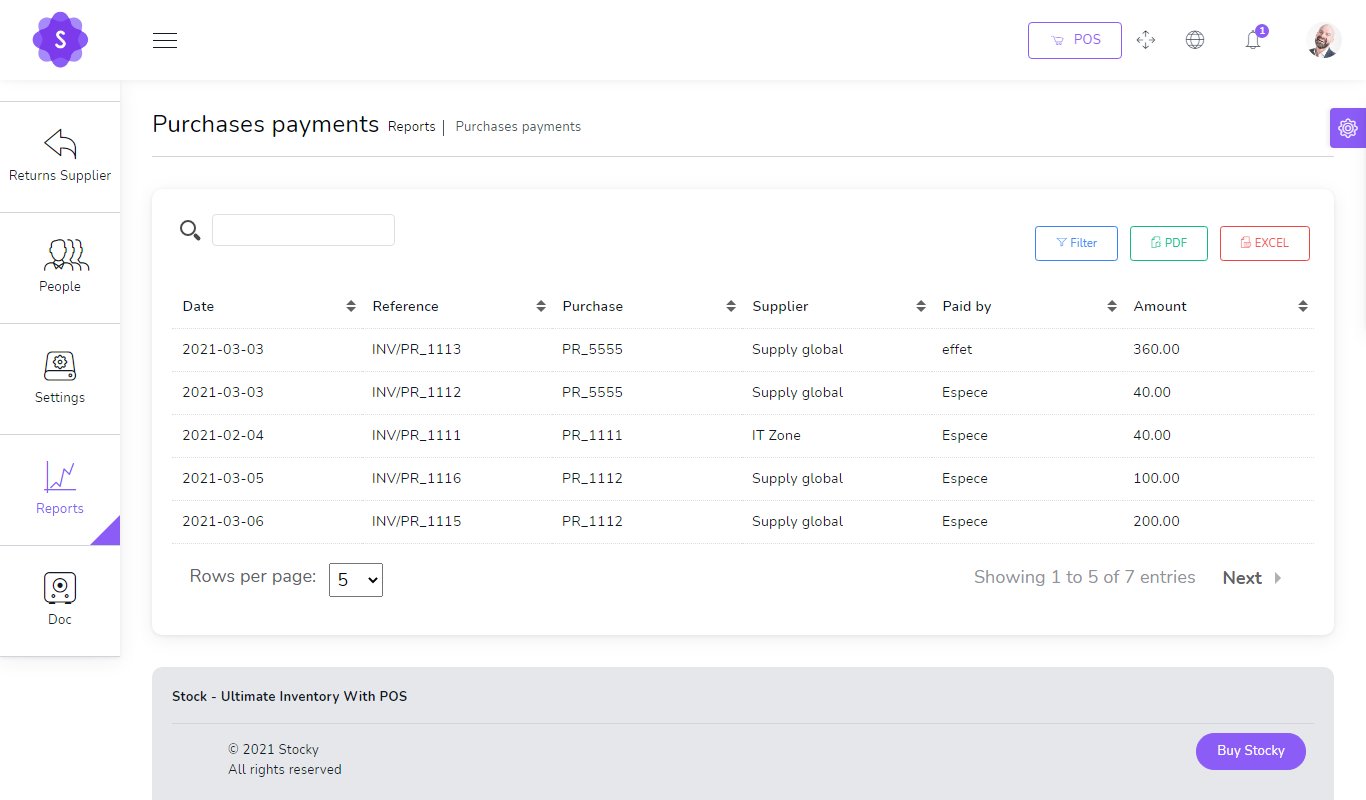
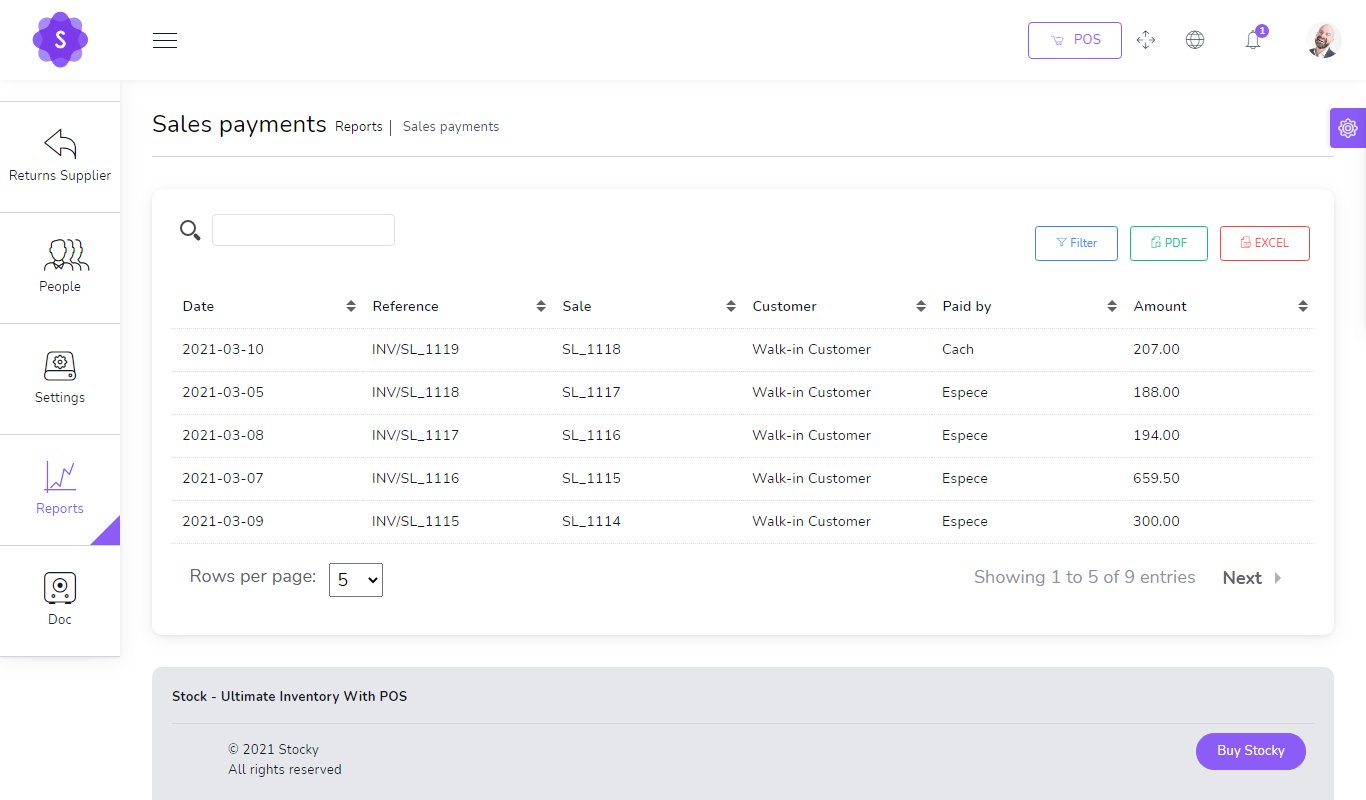
Payments Purchases
Payments Sales
Profit & Loss

Inventory Valuation

Expenses Report

Deposits Report

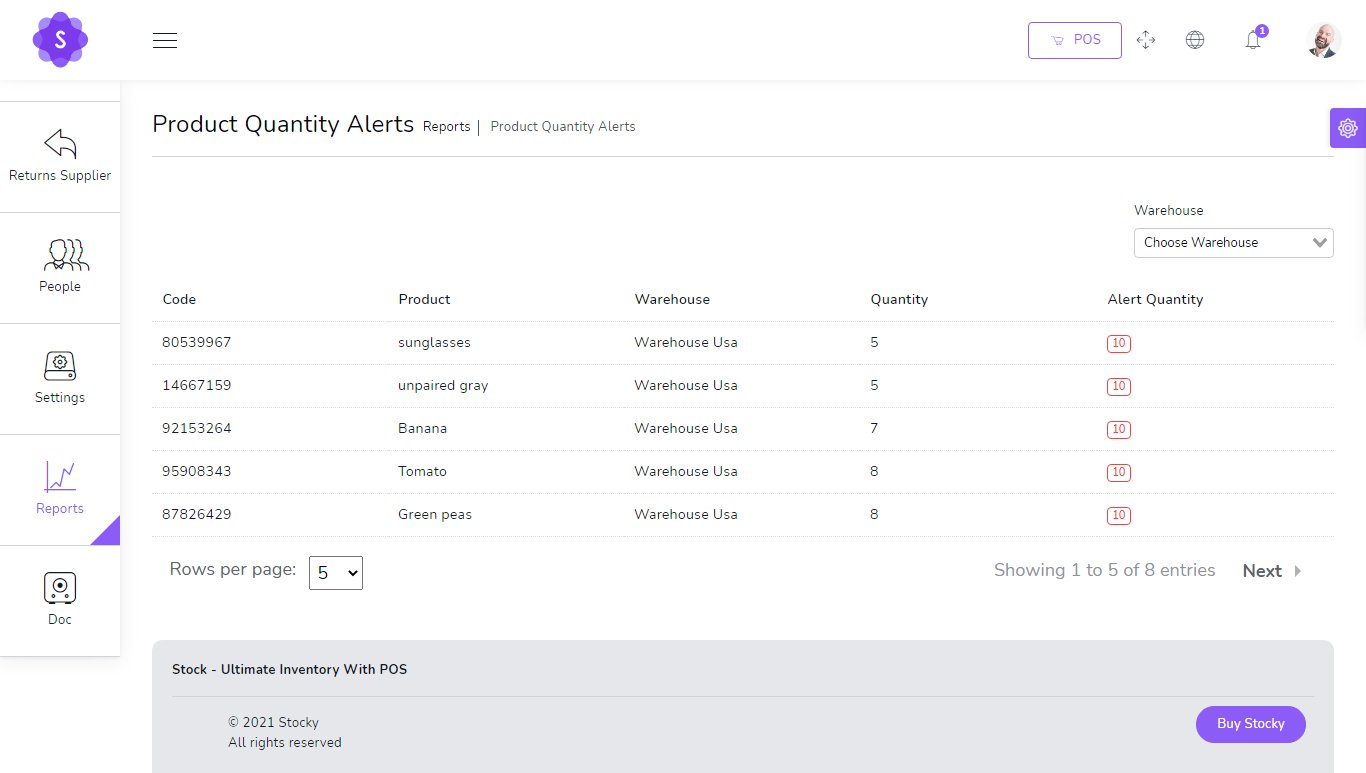
Product Alert
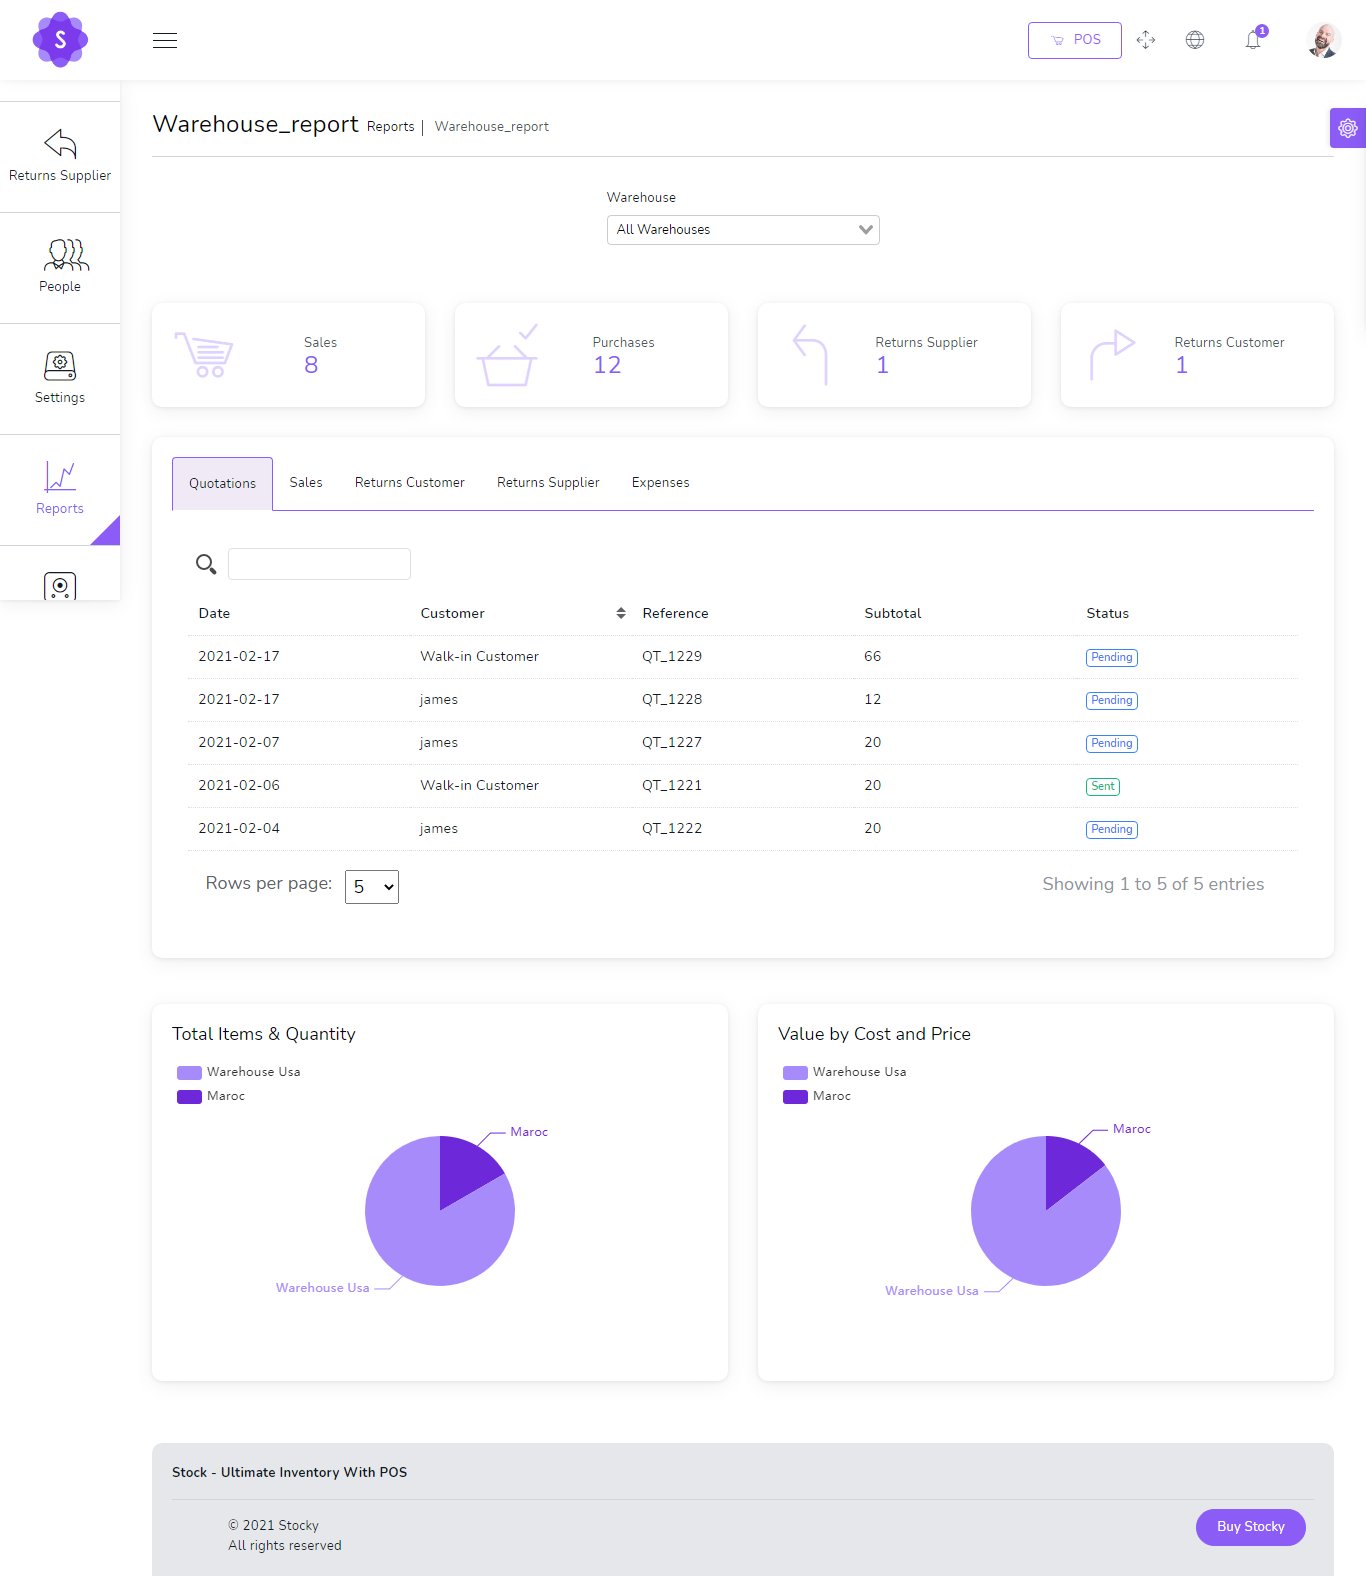
Warehouse report
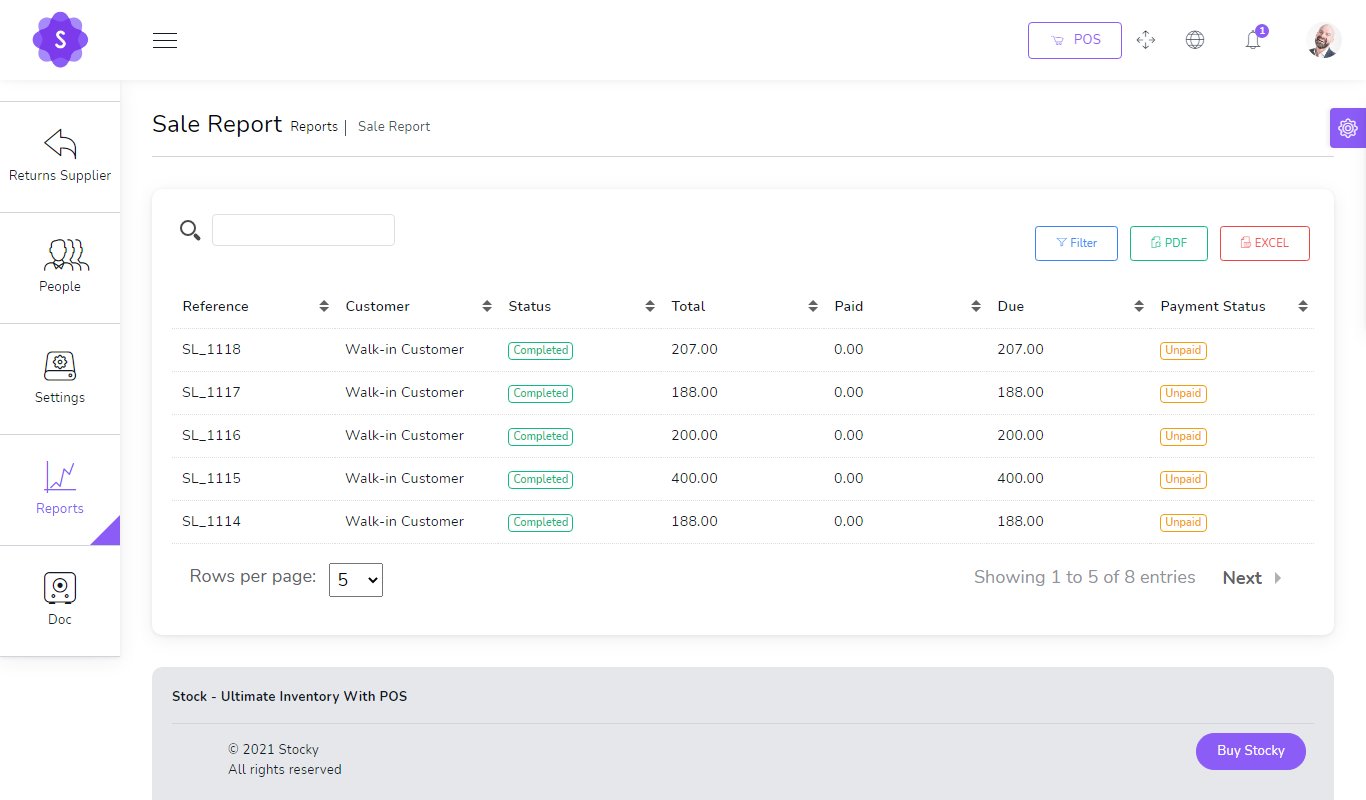
Sales report
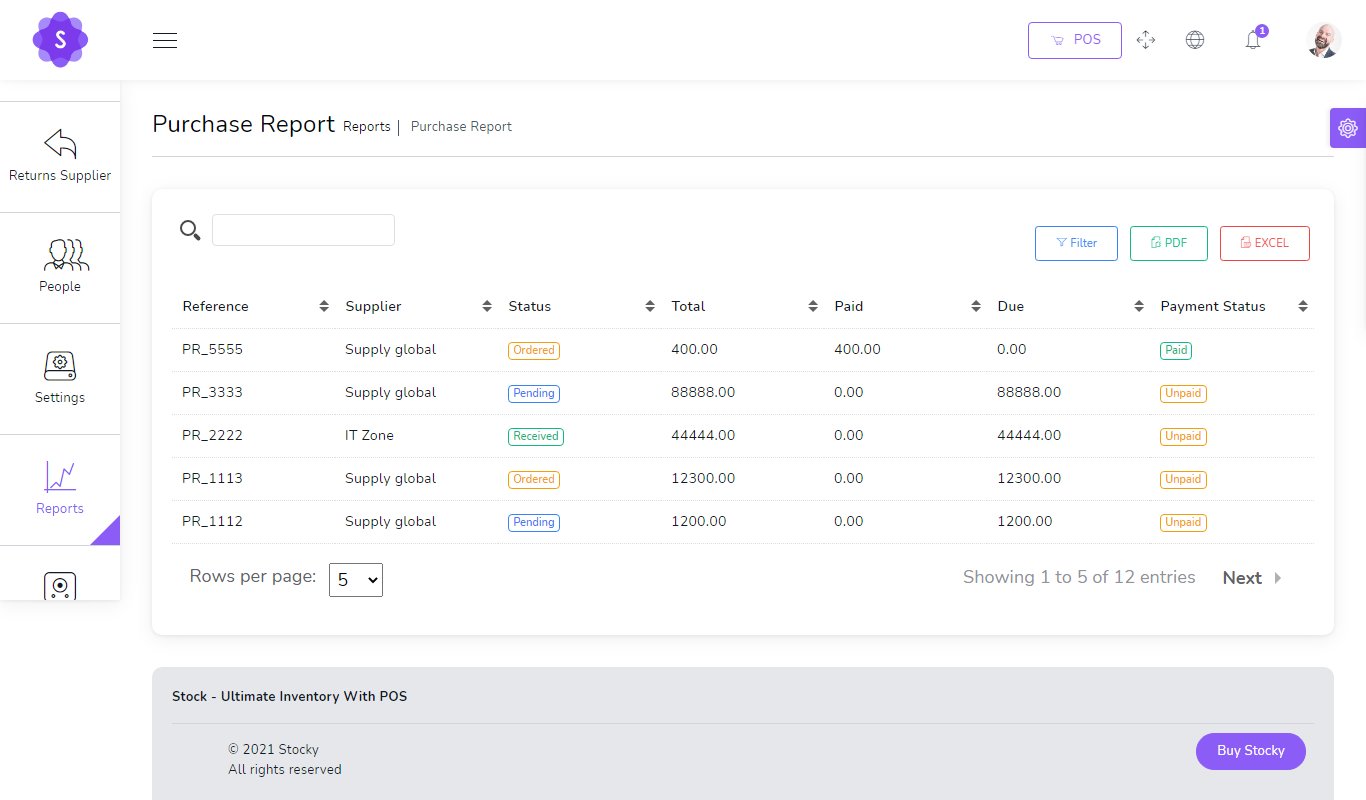
Purchases report
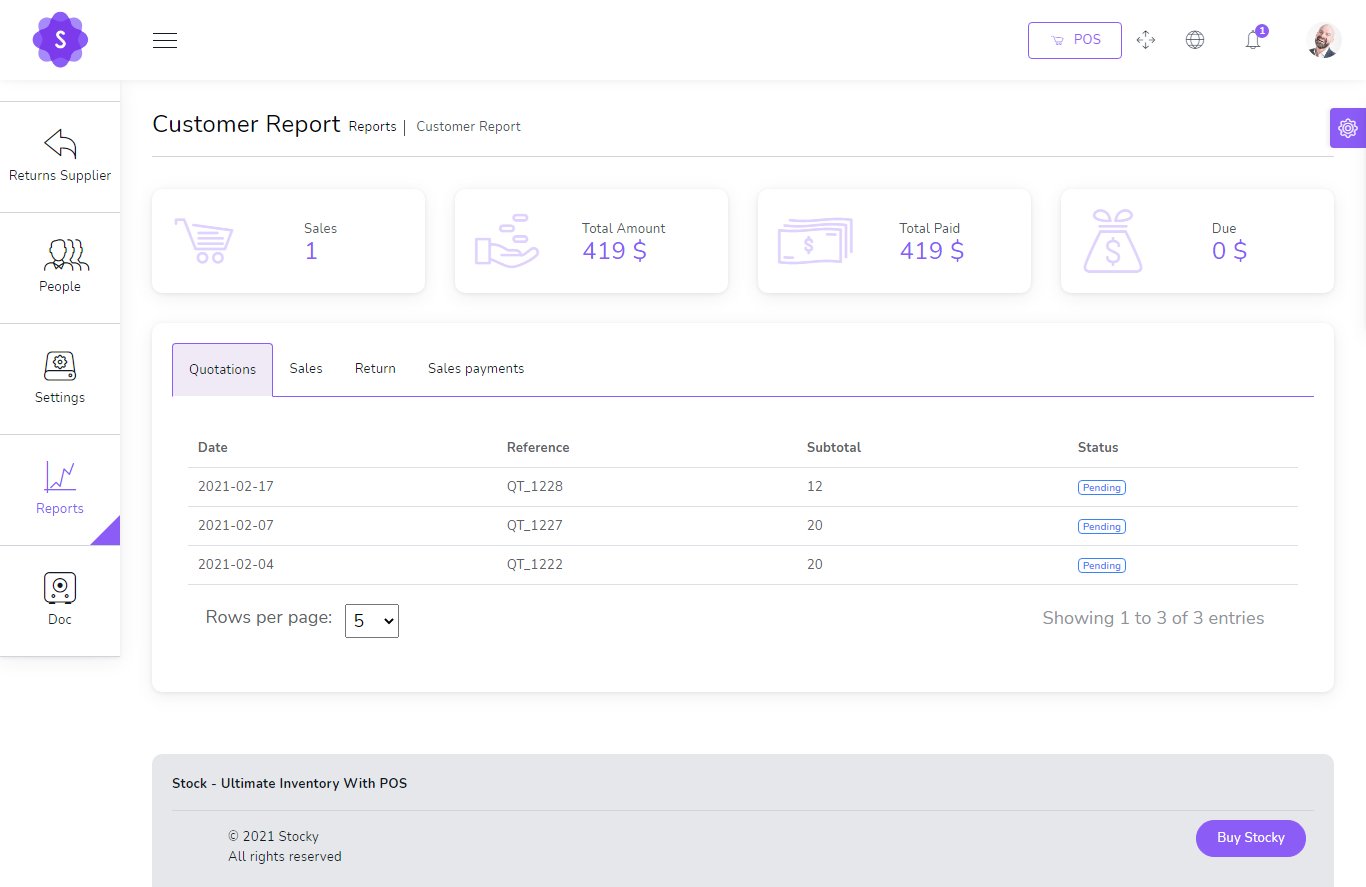
Customers report
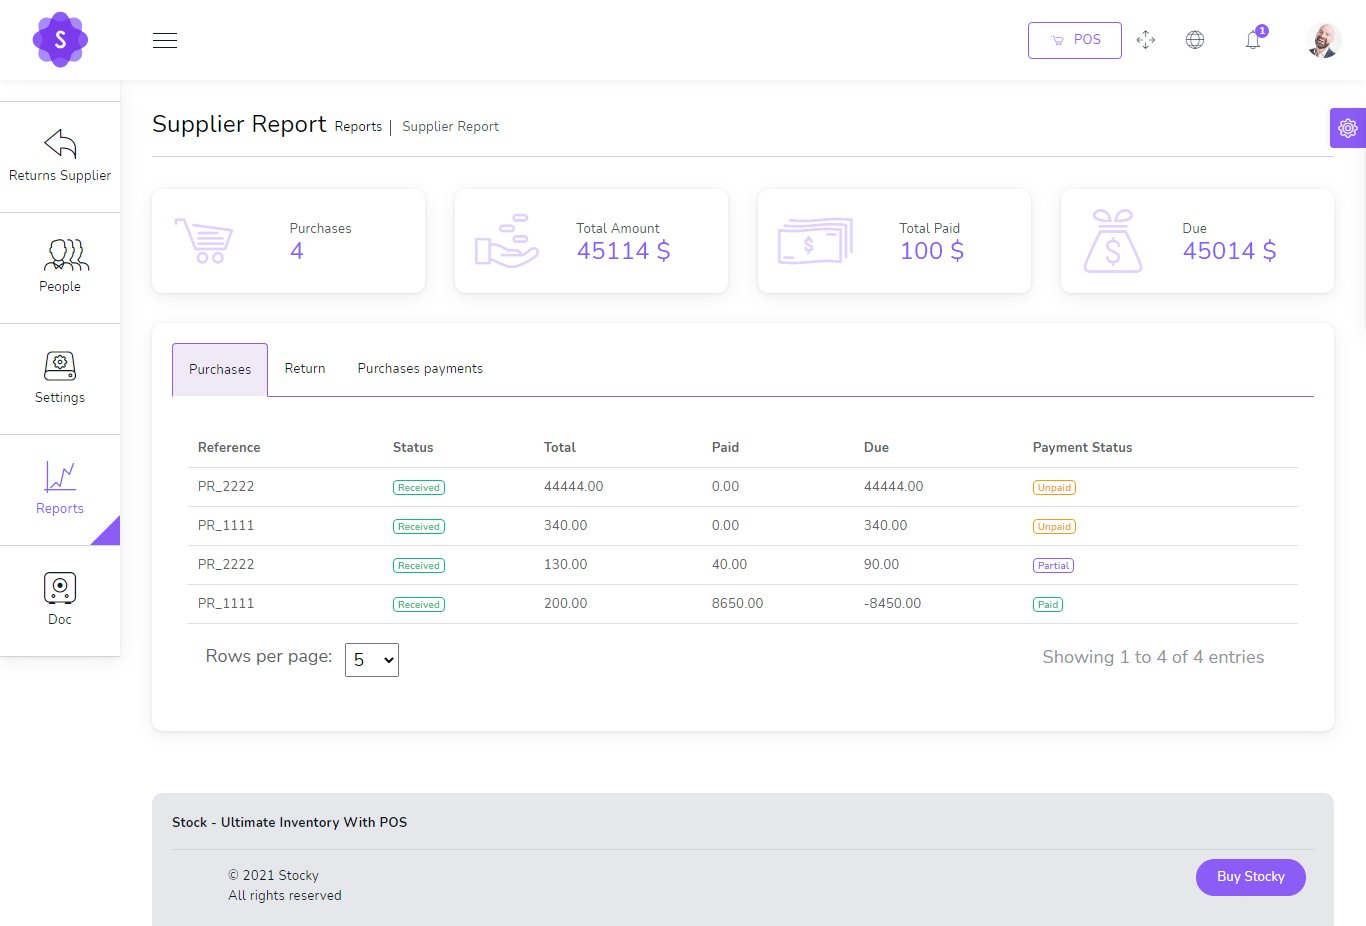
Suppliers report
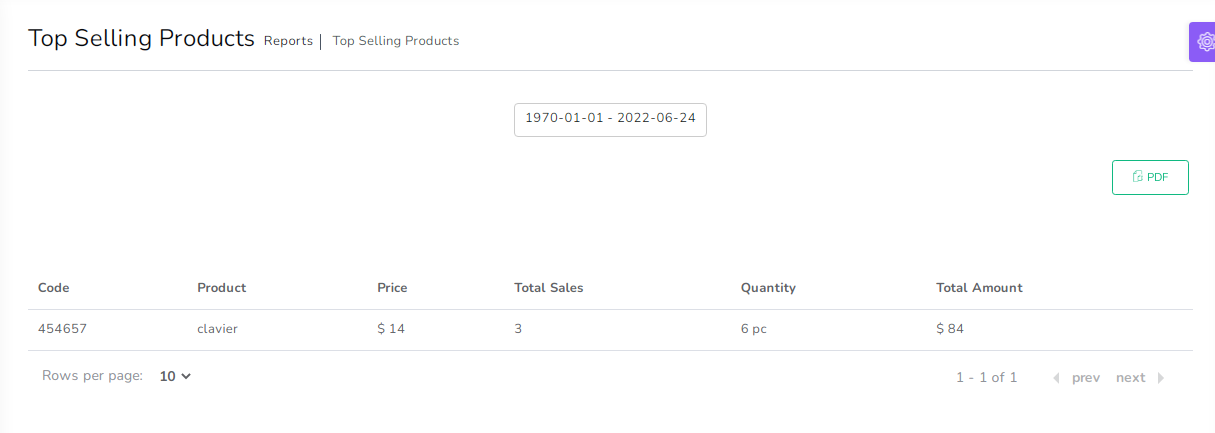
Top selling products report
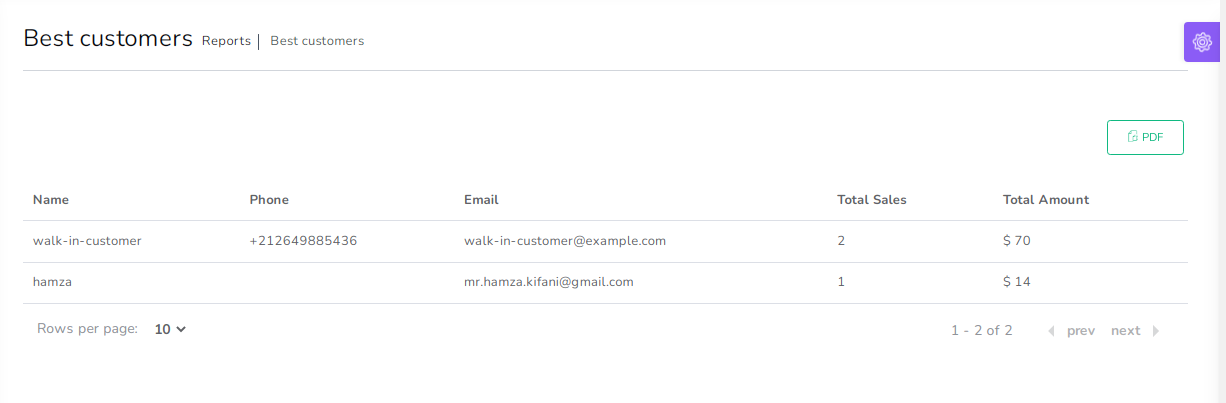
Best Customers report
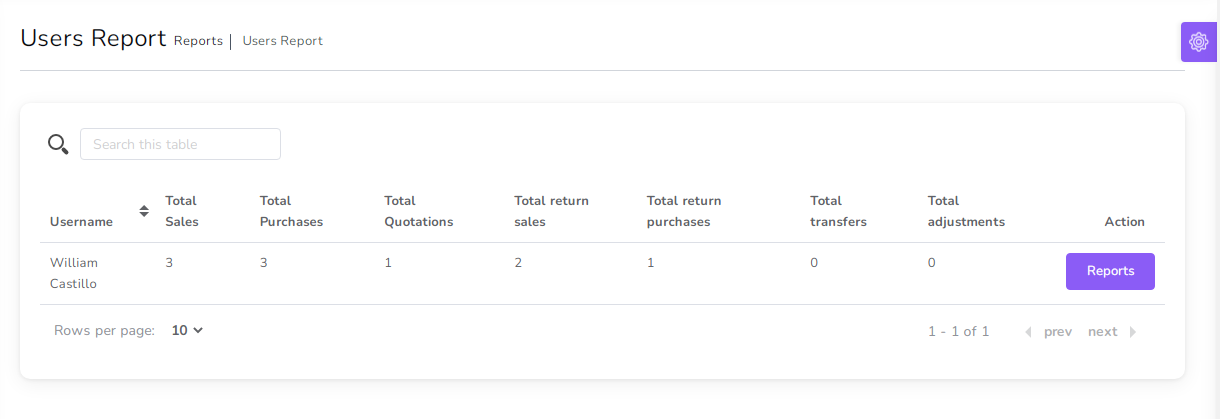
Users report
Ratings & review